

When you’re navigating a hectic morning routine or reaching for a quick snack between meetings, these Nutritious No-Bake Energy Balls step in like little bites of sunshine. I stumbled upon this recipe on a particularly chaotic Tuesday when my usual breakfast bar was nowhere to be found. One taste of the oat and peanut butter mixture, sweetened just right with honey and dotted with dark chocolate chips, and I was hooked. Each ball combines the hearty chew of rolled oats, the nutty smoothness of natural peanut butter, and a gentle kiss of vanilla. With every bite, chia seeds and flaxseed meal add a subtle crunch and nutritional boost, while a pinch of salt enhances all the flavors, elevating them from everyday to extraordinary. In under ten minutes of prep time, you have a batch of snack-sized morale boosters that can be tossed into a lunchbox or enjoyed at your desk, giving you the quick energy you need without sacrificing taste. Trust me, you’ll find yourself reaching for these little orbs long before your next coffee break. What I love most is how customizable they are–swap the peanut butter for sunflower seed butter to make them nut-free, or drizzle a touch of maple syrup for a vegan spin. No complicated baking techniques, no oven to preheat, just pure, wholesome goodness in every bite.
Beyond their effortless assembly, these energy balls embody my philosophy that healthy eating doesn’t have to be complicated. I often roll up my sleeves on Sunday evenings to prepare a batch, and the sight of two dozen perfect spheres chilling in the fridge feels like a small victory. When Monday morning arrives, I simply grab a couple, slide them into my tote, and I’m armed against any mid-morning hunger pangs. Friends who’ve tasted them always ask for the recipe, marveling at how a handful of ingredients can yield such flavor depth and nutrition. The balance of sweetness and heartiness makes them just as suitable for a post-workout recharge as they are for a quick breakfast bite. Plus, the combination of oats and seeds staves off that mid-afternoon sugar crash, keeping energy levels steady until dinner. Even my kids get involved, lining up to roll doughy balls in their palms and crowning each one with a triumphant grin. These energy balls aren’t just food; they’re a small ritual that fits seamlessly into busy lives while nurturing our bodies and souls.
KEY INGREDIENTS IN NUTRITIOUS NO-BAKE ENERGY BALLS
Before we roll up our sleeves and mix everything, let’s break down the simple yet powerful ingredients that make these energy balls both nutritious and delicious. Each item brings a unique flavor and texture, ensuring that every bite offers a perfect harmony of sweet, nutty, and wholesome undertones.
- Rolled oats
These serve as the hearty backbone, providing a satisfying chew and slow-release carbohydrates for sustained energy. Their fibrous nature also helps bind the mixture together and adds a comforting, rustic texture.
- Natural peanut butter
Offering creamy richness and plant-based protein, peanut butter smooths the dough and helps the balls stick. It also contributes healthy fats that support satiety and keep these bites irresistibly moist.
- Honey or maple syrup
Acting as the natural sweetener, these syrups bring a touch of golden sweetness that balances the nutty and earthy elements. They also moisten the dry ingredients, helping the dough cohere without refined sugar.
- Chocolate chips (dark or semi-sweet)
These mini bursts of decadence add a hint of indulgence. Dark chocolate chips bring antioxidants, while semi-sweet options add nostalgic sweetness, making every bite delightfully satisfying.
- Flaxseed meal
Rich in omega-3 fatty acids and fiber, flaxseed meal boosts the nutritional profile and lends a subtle, nutty flavor. It helps thicken the mixture, ensuring each ball holds its shape.
- Chia seeds
Tiny but mighty, chia seeds introduce extra crunch and plant-based protein, as well as fiber that swells with moisture, giving the balls a slightly gelled interior that’s a pleasure to bite into.
- Vanilla extract
Just a hint of vanilla rounds out the flavors, enhancing sweetness and adding a warm, aromatic note that ties all the ingredients together.
- Salt
A small pinch of salt is crucial for amplifying flavor contrasts. It sharpens the sweetness and deepens the overall taste experience, preventing the mixture from tasting flat.
HOW TO MAKE NUTRITIOUS NO-BAKE ENERGY BALLS
Creating these no-bake energy balls is as straightforward as it gets. In this section, we’ll walk you through each step so you can mix, chill, and roll your way to a nourishing snack that delivers a quick boost whenever you need it. The process requires no baking skills, just a bowl, a spatula, and a bit of patience during the resting time. Let’s dive into the step-by-step instructions to bring these little powerhouses to life.
1. In a large mixing bowl, combine the rolled oats, flaxseed meal, and a pinch of salt. Stir them together until the mixture looks uniform and each oat flake is coated by the fine meal, ensuring a consistent base texture.
2. Add the peanut butter, honey (or maple syrup), and vanilla extract to the dry ingredients. Mix thoroughly using a spatula or your hands to ensure there are no pockets of dry oats and that the dough reaches a cohesive, slightly sticky consistency.
3. Fold in the chocolate chips and chia seeds until they are evenly distributed throughout the mixture. Incorporating these mix-ins at this stage ensures every bite has a delightful crunch and sweet surprise.
4. Chill the mixture in the refrigerator for about 20–30 minutes. This helps the fats in the nut butter solidify, making the dough firmer and easier to shape into balls.
5. Once chilled, use a spoon or cookie scoop to portion out the mixture. Roll each portion into a small ball, about the size of a walnut, pressing gently to achieve a smooth surface and compact shape.
6. Place the finished energy balls on a baking sheet lined with parchment paper. If the dough sticks to your hands, coat them with a little water or oil to maintain a clean rolling process.
7. Store the energy balls in an airtight container in the refrigerator for up to a week, or freeze them for longer storage. Proper storage helps them maintain their freshness and chewy texture.
SERVING SUGGESTIONS FOR NUTRITIOUS NO-BAKE ENERGY BALLS
Once you have a batch of these energy balls ready, the fun really begins. Serving them is all about presentation and personalization, turning a quick snack into an eye-catching treat that captures attention and appetite. Whether you’re hosting a casual gathering, packing a lunchbox, or simply want a stylish way to elevate your kitchen counter, these little orbs adapt beautifully. I love lining them up on a patterned ceramic platter, scattering fresh berries around for a pop of color, or sprinkling extra chia seeds on top for a photogenic finishing touch. On lazy Sunday mornings, I pair two balls with a frothy smoothie bowl, letting the chewiness contrast with silky yogurt or coconut cream. For an afternoon pick-me-up, nestle them in mini cupcake liners and serve alongside herbal tea for a cozy vibe. If you’re in a rush, toss a handful into a Mason jar for grab-and-go convenience. These serving ideas not only make the snack visually inviting but also encourage portion control so you can enjoy just the right amount of energy without overindulging. By mixing and matching serving styles—like drizzling a light chocolate sauce over the top or rolling the balls in shredded coconut—you can customize each batch for different taste preferences and occasions. Ready to impress your family, friends, or even just yourself? Let’s dive into these simple yet impactful serving suggestions that will take your energy ball game up a notch.
- Rustic Platter Display: Arrange the balls on a wooden or slate serving board, garnished with a sprinkle of flaxseed meal and fresh mint leaves. The rustic backdrop highlights the natural textures and adds a cozy, artisanal feel.
- Breakfast Bowl Boost: Place two or three balls alongside a colorful smoothie bowl or parfait layered with yogurt, granola, and berries. This combination creates a contrast of textures and flavors that feels indulgent yet balanced.
- Party Cupcake Liners: Line mini paper liners in a muffin tin, set one energy ball in each, and dust with cocoa powder or cinnamon. This bite-sized presentation is perfect for gatherings and adds a playful touch.
- On-the-Go Jar Packs: Layer energy balls in small Mason jars with fresh fruit or carrot sticks. Seal tightly for a convenient, portable snack that’s as practical as it is appealing.
HOW TO STORE NUTRITIOUS NO-BAKE ENERGY BALLS
Proper storage is key to keeping your Nutritious No-Bake Energy Balls tasting their best, whether you plan to enjoy them over the next few days or preserve them for weeks ahead. Since these snacks rely on the moisture from peanut butter and honey (or maple syrup), storing them correctly ensures they maintain their chewy texture without drying out or becoming overly firm. In this section, I’ll share my top tips for refrigeration, freezing, and even clever packing strategies, so you can always have a stash of these nutrient-packed treats at your fingertips. With the right containers, temperature, and little organizational touches, you’ll never have to worry about stale bites again—just fresh, delicious energy balls every time you reach in for a snack.
- Refrigerate in Airtight Container: Place the balls in a sealed container with as little air space as possible. Layer parchment or wax paper between rows to prevent sticking. Store in the fridge for up to one week, checking moisture levels before each serving.
- Freeze for Long-Term: Arrange the balls on a baking sheet and freeze until firm, then transfer to a freezer-safe bag or container. They’ll keep for up to three months. Simply thaw a few at room temperature or in the fridge before enjoying.
- Use Dividers or Paper Liners: For individual portions, nestle each energy ball in a paper liner or silicone cup. This prevents them from clumping together and makes it easy to grab single servings without disturbing the rest.
- Label and Date: Always write the preparation date on your container or bag with a permanent marker. This simple step helps you track freshness and rotate your stash, ensuring you enjoy each ball at peak flavor.
CONCLUSION
From the very first mix in your bowl to the moment you sink your teeth into a chewy, chocolate-studded bite, you’ve discovered why these Nutritious No-Bake Energy Balls have become a staple in so many kitchens. This recipe marries pantry-friendly ingredients—like rolled oats, natural peanut butter, honey or maple syrup, and a hint of vanilla—for a snack that’s as easy to assemble as it is satisfying. With only ten minutes of active prep time, zero baking required, and a brief thirty-minute chill, you’ll have a batch of approximately 12–14 balls, each delivering around 200 calories per two-ball serving. Whether you’re a beginner in the kitchen or a seasoned home cook, you’ll love the flexibility to add mix-ins like dried fruit or nuts, or use sunflower seed butter and agave syrup to cater to nut-free or vegan diets. Feel free to print this article and save it for later use. You can also find a FAQ below to answer any lingering questions as you master these quick and easy no-bake snacks.
I hope you’ve enjoyed diving into this recipe as much as I enjoy preparing it for my family and friends. If you decide to give these energy balls a try, I’d love to hear how they turned out! Leave a comment with your favorite mix-in or serving style, or let me know if you have any questions about the process. Your feedback and stories help make this community of home cooks even more vibrant and inspiring. Whether you need tips on customizing flavors or just want to share a success story, feel free to drop a note below. Happy rolling!
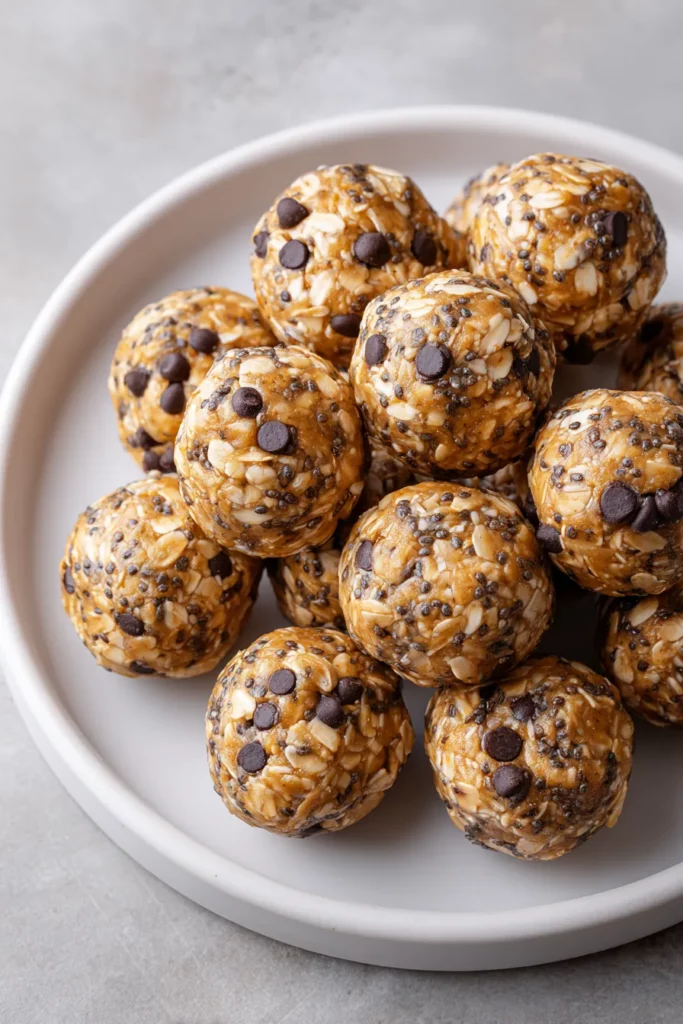

Nutritious No-Bake Energy Balls
Description
Packed with wholesome ingredients, these no-bake energy balls offer a delightful balance of sweetness and nutrition. Perfect for snacking or breakfast on the go!
Ingredients
Instructions
-
In a large mixing bowl, combine the rolled oats, flaxseed meal, and a pinch of salt. Stir well until evenly mixed.
-
Add the peanut butter, honey (or maple syrup), and vanilla extract to the dry ingredients. Mix thoroughly using a spatula or your hands to ensure all components are well blended.
-
Fold in the chocolate chips and chia seeds until they are evenly distributed throughout the mixture.
-
Chill the mixture in the refrigerator for about 20-30 minutes. This helps the mixture firm up, making it easier to mold into balls.
-
Once chilled, use a spoon or cookie scoop to portion out the mixture. Roll each portion into a small ball, about the size of a walnut.
-
Place the finished energy balls on a baking sheet lined with parchment paper. You may coat your hands with a little water or oil if the mixture is sticky.
-
Store the energy balls in an airtight container in the refrigerator for up to a week, or freeze them for longer storage.
Note
- These energy balls can be customized with your favorite add-ins like dried fruit, nuts, or seeds.
- Use sunflower seed butter to make this recipe nut-free.
- Agave syrup can be used as an alternative sweetener for a vegan option.
- These make a perfect on-the-go snack or a quick breakfast bite.
- Allow kids to help roll the balls for a fun family cooking activity.

