

Get ready to treat yourself to Sweet Coconut Banana Sushi Rolls, where tropical flavors meet playful presentation. Creamy coconut-infused rice hugs a sweet, ripe banana, all wrapped in crisp nori and finished with toasted coconut flakes and a honey drizzle. It’s a cheerful no-bake dessert that feels fancy but is beginner-friendly, making it perfect for impressing friends or spoiling yourself. Whether you’re craving something fruity for snack time or a light, chewy dessert, this recipe has you covered—no sushi skills required!
Key Ingredients
Before you roll up your sleeves, here’s what you’ll need to bring these Sweet Coconut Banana Sushi Rolls to life. Each ingredient plays a key role in delivering that perfect balance of creamy, sweet, and tropical fun.
- 1 cup sushi rice: sticky foundation that soaks up sweet coconut milk and holds everything together.
- 1 cup coconut milk: gives the rice a rich, creamy coconut flavor and helps bind the grains.
- 1/2 cup water: thins the coconut milk just enough for tender rice without diluting the taste.
- 2 tablespoons sugar: adds just the right touch of sweetness to enhance the tropical flavors.
- 1/4 teaspoon salt: balances sweetness and brings out the coconut richness.
- 1/2 teaspoon vanilla extract: adds a warm, aromatic depth to the coconut-infused rice.
- 2 nori sheets: crisp seaweed wraps that provide structure and a savory contrast.
- 2 medium bananas: sweet, firm fruit fills each roll with tropical deliciousness.
- 2 tablespoons shredded coconut: toasted topping that adds crunch and visual appeal.
- 1 tablespoon honey: sweet drizzle that ties all the flavors together in a glossy finish.
How To Make Sweet Coconut Banana Sushi Rolls
Rolling these Sweet Coconut Banana Sushi Rolls is easier than you might think, and you’ll love watching basic ingredients transform into a stunning dessert. First, we’ll prepare perfectly fluffy coconut rice, then master the art of spreading it onto nori sheets. Next comes the fun part—wrapping the rice around bananas and slicing into neat bite-sized pieces. Each step is designed to build confidence, so even beginners can create picture-perfect rolls in no time.
1. Rinse the sushi rice under cold water until the water runs clear, swirling the grains gently in a fine-mesh strainer to remove excess starch for a fluffier texture.
2. In a medium saucepan combine rice, coconut milk, water, sugar, salt, and vanilla extract; bring to a gentle boil over medium heat, stirring occasionally to dissolve the sugar.
3. Reduce heat to low, cover, and simmer for 15 minutes or until liquid is absorbed and rice is tender, avoiding the temptation to lift the lid too often.
4. Remove from heat and let rice rest covered for 10 minutes, then fluff with a fork and allow to cool slightly so it’s easier to handle without sticking.
5. Place a nori sheet on a bamboo sushi mat or clean work surface and evenly spread half the rice in a thin layer, leaving a 1-inch border at the top to seal the roll.
6. Lay one banana horizontally across the center of the rice, ensuring it’s centered for even slices later.
7. Using the mat, carefully roll the nori over the banana, pressing gently to shape a tight log; seal the edge with a little water to keep it from unrolling.
8. Repeat steps 5–7 with the second nori sheet and remaining ingredients, so you end up with two neatly rolled logs.
9. Using a sharp knife, slice each roll into 6 pieces; wipe the knife clean between cuts for neat slices and to prevent rice build-up.
10. Arrange sushi rolls on a plate, sprinkle with shredded coconut, and drizzle with honey for a sweet, glossy finish.
Serving Suggestions
These Sweet Coconut Banana Sushi Rolls shine on their own, but you can elevate the experience with some fun serving ideas. Whether you’re hosting a brunch, snacking poolside, or craving a light dessert, these playful bites adapt to any occasion. Here are a few ways to present them with style and boost those tropical vibes.
- Mango Salsa Side: pair with a bright mango and lime salsa for a fruity contrast that complements the sweet banana and coconut.
- Coconut Whipped Cream: serve a dollop of lightly sweetened coconut whipped cream alongside each roll for extra creaminess.
- Fresh Fruit Platter: arrange rolls on a platter of fresh pineapple, kiwi, and berries to create a colorful tropical spread.
- Chocolate Drizzle Twist: swap or add a thin drizzle of dark or white chocolate for a decadent finish that pairs beautifully with the coconut rice.
Tips For Perfect Sweet Coconut Banana Sushi Rolls
To make these rolls turn out spectacular every time, a few insider tips can make all the difference. From selecting the right bananas to handling the rice and achieving clean cuts, these little hints will help you serve up flawless bites that look as good as they taste. Embrace these suggestions, have fun experimenting with variations, and you’ll be rolling like a pro in no time.
- Use firm but ripe bananas to prevent mushy rolls.
- Chill the rolls briefly before slicing to maintain shape.
- Substitute sliced strawberries or mango for banana variation.
- Store any leftovers covered in the refrigerator and enjoy within one day.
How To Store It
When you have any leftover sushi rolls, it’s important to store them properly to keep that coconut-infused rice tender and the nori from turning soggy. Follow these simple storage methods to maintain freshness and enjoy them later without compromising flavor or texture.
- Airtight Container: place the sliced rolls in a single layer inside an airtight container, separating layers with parchment paper to prevent sticking, and refrigerate for up to one day.
- Plastic Wrap: wrap whole rolls tightly in plastic wrap before slicing; this seals in moisture and keeps the rice soft while preventing nori from becoming tough.
- Refrigerator: always store the wrapped or containered rolls in the refrigerator’s coolest section; avoid the door to maintain consistent temperature.
- Avoid Freezing: freezing can make the rice hard and the nori rubbery, so it’s best to enjoy these rolls fresh within 24 hours.
Frequently Asked Questions
Here are answers to common questions so you can roll, slice, and serve with confidence!
- Q: What type of rice and coconut milk should I use for these sushi rolls?
A: Use short-grain sushi rice for its stickiness and ability to hold shape. Full-fat canned coconut milk will give the rice a rich, creamy texture and a pronounced coconut flavor. Avoid low-fat or watered-down coconut milk, as it can make the rice less cohesive and less flavorful.
- Q: How do I prevent the rice from sticking to the nori sheet and my hands?
A: Keep your hands damp by dipping them in a small bowl of water before handling the rice. Spread the rice in a thin, even layer on the nori without pressing too hard. A gentle touch ensures the rice adheres to the seaweed without becoming too compacted or sticking to your fingers.
- Q: What’s the best way to get clean slices when cutting the rolls?
A: Chill the assembled rolls in the refrigerator for at least 10 minutes to firm up the rice. Use a very sharp, slightly wet knife and wipe the blade clean between each cut. This prevents rice from building up on the blade and helps you achieve neat, uniform pieces.
- Q: Can I make variations or substitutions in this recipe?
A: Absolutely. You can substitute the banana with thinly sliced strawberries or mango for a different flavor profile. If you prefer less sweetness, reduce the sugar in the rice or omit the honey drizzle. You may also experiment with adding a thin layer of cream cheese or a sprinkle of chopped nuts inside the roll for added texture.
- Q: How far in advance can I prepare these sushi rolls and how should I store leftovers?
A: You can cook the rice and assemble the rolls up to two hours before serving, then cover them tightly with plastic wrap and refrigerate. Once sliced, store any leftover pieces in an airtight container in the refrigerator and enjoy within one day. Beyond that, the rice can become too firm and the nori soggy.
- Q: Do I need a bamboo mat to roll the sushi, or is there an alternative method?
A: A bamboo sushi mat helps you apply even pressure but isn’t strictly necessary. You can use a clean kitchen towel wrapped in plastic wrap to mimic the mat’s flexibility. Alternatively, gently use your fingers to shape and roll the nori around the banana, then press the seam with a little water to seal.
- Q: Why is resting the rice after cooking important, and can I skip that step?
A: Resting the rice for 10 minutes off the heat allows the grains to absorb any remaining moisture and become tender. Skipping this step may result in rice that is too wet or unevenly cooked, which makes rolling more difficult and can lead to a soggy texture.
What Makes This Special
This recipe works like a tropical party in your mouth: the creamy coconut rice, sweet banana, crisp nori, and crunchy shredded coconut all dance together in perfect harmony. Its playful twist on traditional sushi means you get all the fun without any raw fish or complicated prep. Feel free to print this article and tuck it into your recipe binder—you’ll want to make these rolls again and again. If you give them a try or have any burning questions, drop a comment below; I’d love to hear how your sweet sushi adventure turns out!
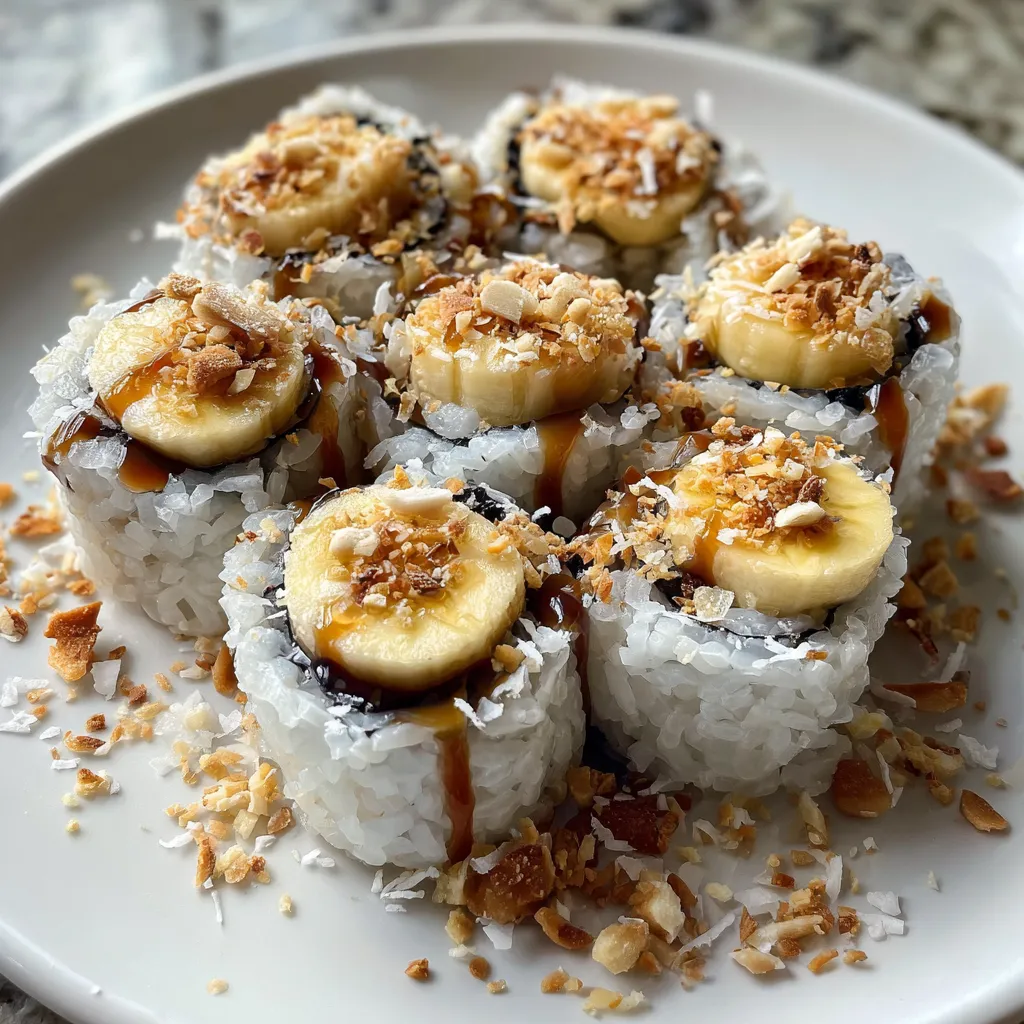

Sweet Coconut Banana Sushi Rolls
Description
Creamy coconut-infused rice wraps around sweet banana and crisp nori, finished with a shower of toasted coconut and honey for a bright, chewy bite that melts on your tongue.
Ingredients
Instructions
-
Rinse the sushi rice under cold water until the water runs clear.
-
In a medium saucepan combine rice, coconut milk, water, sugar, salt, and vanilla extract; bring to a gentle boil.
-
Reduce heat to low, cover, and simmer for 15 minutes or until liquid is absorbed and rice is tender.
-
Remove from heat and let rice rest covered for 10 minutes, then fluff with a fork and allow to cool slightly.
-
Place a nori sheet on a bamboo sushi mat or clean work surface and evenly spread half the rice in a thin layer, leaving a 1-inch border at the top.
-
Lay one banana horizontally across the center of the rice.
-
Using the mat, carefully roll the nori over the banana, pressing gently to shape a tight log; seal the edge with a little water.
-
Repeat steps 5–7 with the second nori sheet and remaining ingredients.
-
Using a sharp knife, slice each roll into 6 pieces; wipe the knife clean between cuts for neat slices.
-
Arrange sushi rolls on a plate, sprinkle with shredded coconut, and drizzle with honey.
Note
- Use firm but ripe bananas to prevent mushy rolls.
- Chill the rolls briefly before slicing to maintain shape.
- Substitute sliced strawberries or mango for banana variation.
- Store any leftovers covered in the refrigerator and enjoy within one day.

