

If you love sushi but crave something shareable and fuss-free, Salmon Sushi Bake delivers exactly that. Layers of seasoned sushi rice topped with spicy salmon are baked to golden perfection, creating bubbling, tender rice that makes a tangy base for a creamy, sriracha-kissed salmon layer. Each square offers a satisfying edge crunch and a hint of seaweed, perfect for casual gatherings or weeknight feasts. Let’s dive in and turn your kitchen into a sushi haven!
Key Ingredients
Before you roll up your sleeves, gather these essentials for a flawless Salmon Sushi Bake:
- 2 cups sushi rice: Sticky base that soaks up all the tangy-sweet vinegar seasoning.
- 2 1/2 cups water: Hydrates the rice evenly for fluffy, perfectly cooked grains.
- 3 tablespoons rice vinegar: Brings that classic sushi tang and helps the rice stick.
- 2 tablespoons sugar: Sweetens and balances the vinegar’s sharpness for authentic flavor.
- 1 teaspoon salt: Enhances all the rice seasonings and binds flavors together.
- 12 ounces salmon fillet: Rich protein that flakes beautifully and melds with creamy mayo.
- 1/2 cup Japanese mayonnaise: Lends silkiness to the salmon topping and browns nicely.
- 2 tablespoons sriracha: Adds a bold, zesty kick that cuts through the richness.
- 1 tablespoon soy sauce: Infuses umami depth into the spicy salmon mixture.
- 1 teaspoon sesame oil: Delivers a toasty aroma and subtle nuttiness.
- 2 tablespoons furikake seasoning: Sprinkles crunchy bits of seaweed and sesame for extra umami.
- 4 sheets nori: Crispy wraps for enjoying each golden-baked square.
- 2 stalks green onions, sliced: Bright, fresh garnish that adds color and mild bite.
How To Make Salmon Sushi Bake
Baking this sushi twist is easier than you think! First, you’ll steam and season the rice, pressing it firmly into a baking dish for a cohesive layer. Next, whip up a creamy, spicy salmon topping before smoothing it over the rice bed. A sprinkle of furikake adds crunch, and a quick bake transforms everything into a bubbling, golden casserole. Follow these steps for restaurant-worthy results:
1. Preheat the oven to 375°F (190°C) and line a 9×9-inch baking dish with parchment paper for hassle-free removal.
2. Rinse the sushi rice under cold water until it runs clear to remove excess starch, then drain.
3. Combine the rice and water in a pot, bring to a boil, then reduce heat, cover, and simmer for 15 minutes.
4. Remove the pot from heat and let the rice steam, covered, for another 10 minutes to finish cooking evenly.
5. In a small bowl, mix rice vinegar, sugar, and salt until dissolved, then fold this seasoning into the hot rice.
6. Spread the seasoned rice evenly in the prepared dish and press down gently to form a compact, flat layer.
7. In a separate bowl, flake the salmon, then stir in mayonnaise, sriracha, soy sauce, and sesame oil until well combined.
8. Spread the salmon mixture over the rice layer, smoothing the top with a spatula for even coverage.
9. Sprinkle furikake seasoning evenly over the salmon layer to add that signature crunch and flavor.
10. Bake for 10 to 12 minutes until the edges are bubbly and lightly golden.
11. Remove from the oven and let cool for 5 minutes before slicing into neat squares.
12. Serve each square on a piece of nori and garnish with sliced green onions for the perfect bite.
Serving Suggestions
This Salmon Sushi Bake is incredibly versatile—serve it however you like! Whether you’re hosting a casual get-together or enjoying a cozy weeknight dinner, these ideas will level up your presentation and taste:
- Offer extra nori sheets so guests can assemble mini hand rolls on the spot for a fun, interactive experience.
- Drizzle a little extra sriracha mayo or soy sauce on top of each square for added zest and creaminess.
- Plate with a side of pickled ginger and wasabi to channel classic sushi accompaniments and brighten the flavors.
- Pair with a light cucumber salad or miso soup to balance the rich salmon and tangy rice layers.
Tips For Perfect Salmon Sushi Bake
Mastering this bake is all about balance—creaminess, spice, and that tangy rice base. A few small tweaks can take your dish from great to unforgettable:
- Adjust the sriracha amount to make the bake milder or spicier.
- Use canned salmon in a pinch, but fresh yields better flavor.
- For extra crunch, broil for 1–2 minutes before removing from the oven.
- Store leftovers in an airtight container in the fridge for up to two days.
How To Store It
Keeping your Salmon Sushi Bake fresh is simple—focus on airtight conditions and quick chilling to preserve texture and flavor:
- Store baked squares in an airtight container in the refrigerator for up to two days to maintain moisture and taste.
Frequently Asked Questions
Here are answers to the most common questions about making this tasty Salmon Sushi Bake:
- Q: How long does it take to prepare this recipe?
From start to finish you’re looking at about one hour. Rinsing and cooking the rice takes about 25 minutes, seasoning and pressing it another 5 minutes, mixing and spreading the salmon topping 5 minutes, baking for 10–12 minutes, and allowing a brief 5-minute rest before serving.
- Q: Can I use canned salmon instead of fresh salmon fillet?
Yes. Drain and flake the canned salmon, then stir in an extra teaspoon of Japanese mayonnaise or a small drizzle of sesame oil to make up for the moisture lost during canning. Proceed with the remaining ingredients and baking time as directed.
- Q: How can I adjust the spiciness of the salmon layer?
Tweak the sriracha to taste by starting with one tablespoon for a mild kick and increasing up to three tablespoons for maximum heat. You can also serve extra sriracha on the side for diners to add as they like.
- Q: What is furikake seasoning and can I substitute it?
Furikake is a Japanese blend of dried seaweed, sesame seeds, and seasonings that adds umami and crunch. If you don’t have it, you can sprinkle crushed nori sheets mixed with toasted sesame seeds and a pinch of salt over the salmon layer before baking.
- Q: How should I store and reheat leftovers without soggy rice?
Store baked squares in an airtight container in the refrigerator for up to two days. To reheat, place them on a baking sheet and warm in a 350°F oven for 5–7 minutes. This method helps maintain the rice texture. Rewarm nori sheets separately or serve cold to prevent sogginess.
- Q: Is it necessary to season the rice with vinegar, sugar, and salt?
Yes. That seasoning mimics sushi rice’s signature tangy-sweet flavor and helps the rice grains stick together. Fold the mixture into the hot rice immediately after steaming so it absorbs evenly.
- Q: How can I achieve an extra-crispy top on the bake?
After the regular bake, switch your oven to broil and broil on high for one to two minutes, watching closely. The high heat will caramelize the mayonnaise mixture and furikake for a delightful crunch.
What Makes This Special
What really sets Salmon Sushi Bake apart is its perfect balance of tangy rice, creamy spicy salmon, and that golden-baked edge crunch—minus the complicated rolling. It’s an easy, shareable twist on sushi night that impresses every time. Feel free to print this guide and tuck it into your recipe binder for lazy evenings or festive gatherings. Tried it already? Drop your questions, substitutions, or brag-worthy photos in the comments—I can’t wait to hear how yours turned out!
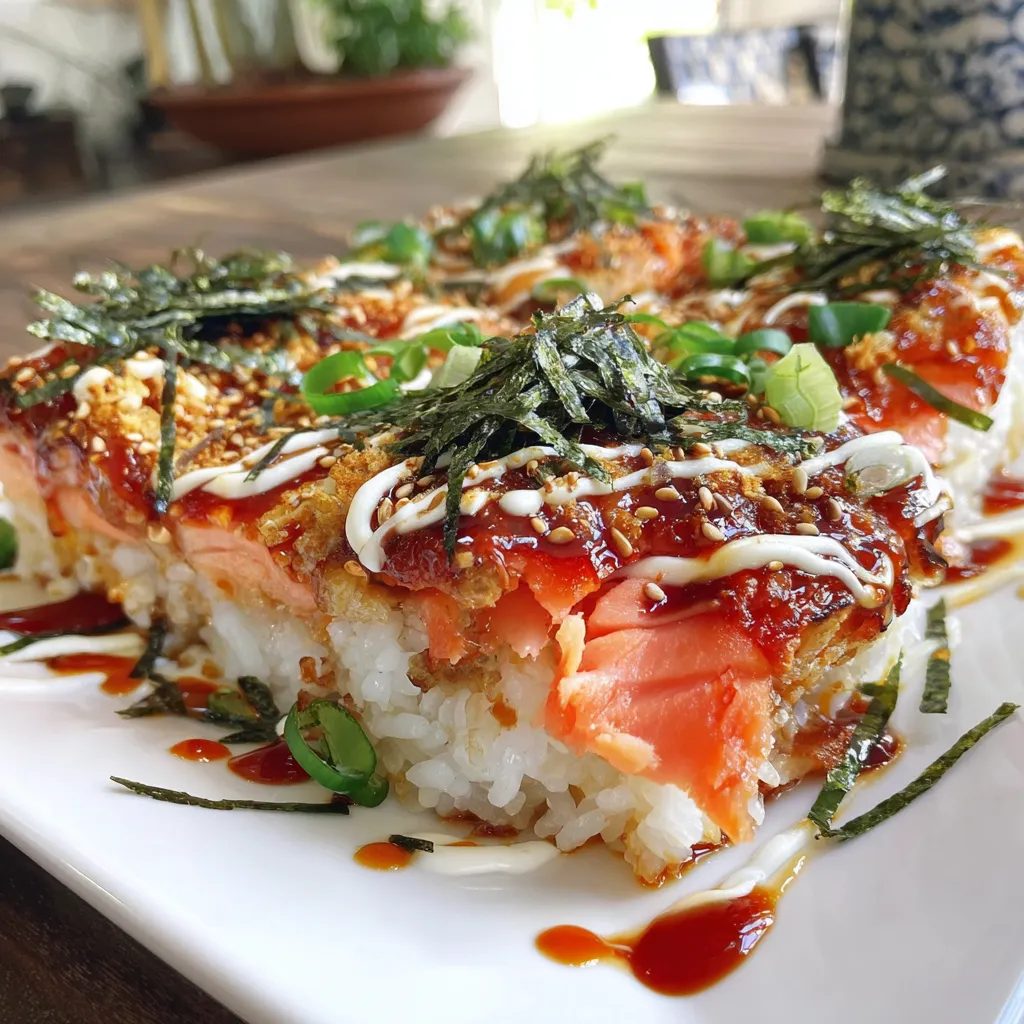

Salmon Sushi Bake
Description
Bubbling sushi rice forms a tender, tangy base for a creamy, sriracha-kissed salmon layer. Each golden-baked square offers a satisfying crunch at the edges and a hint of seaweed, perfect for casual gatherings or weeknight feasts.
Ingredients
Instructions
-
Preheat the oven to 375°F (190°C) and line a 9x9-inch baking dish with parchment paper.
-
Rinse the sushi rice under cold water until the water runs clear, then drain.
-
Combine the rice and water in a pot, bring to a boil, reduce heat, cover, and simmer for 15 minutes.
-
Remove the pot from heat and let the rice steam, covered, for another 10 minutes.
-
In a small bowl, mix rice vinegar, sugar, and salt until dissolved, then fold into the cooked rice.
-
Spread the seasoned rice evenly in the prepared baking dish and press down gently to form a flat layer.
-
In a separate bowl, flake the salmon, then stir in mayonnaise, sriracha, soy sauce, and sesame oil until well combined.
-
Spread the salmon mixture over the rice layer, smoothing the top with a spatula.
-
Sprinkle furikake seasoning evenly over the salmon layer.
-
Bake for 10 to 12 minutes until the edges are bubbly and lightly golden.
-
Remove from the oven and let cool for 5 minutes before slicing into squares.
-
Serve each square on a piece of nori and garnish with sliced green onions.
Note
- Adjust the sriracha amount to make the bake milder or spicier.
- Use canned salmon in a pinch, but fresh yields better flavor.
- For extra crunch, broil for 1–2 minutes before removing from the oven.
- Store leftovers in an airtight container in the fridge for up to two days.

