

Fall brings with it a cascade of warm shades and cozy gatherings, and what better way to celebrate than with adorable, bite-sized treats that capture all the flavors of autumn? Pumpkin Spice Cake Pops are exactly that—a playful twist on the classic spice cake you know and love, turned into hand-held delights that are perfect for fall parties, casual get-togethers, or a little midweek pick-me-up. Each pop delivers a moist, tender crumb infused with nutmeg, cinnamon, ginger, and cloves, beautifully balanced by the rich, creamy tang of a light cream cheese filling. Biting into one feels like wrapping yourself in a cozy blanket, sipping a spiced latte, and curling up with your favorite book, all at once. These little spheres of joy make every moment feel festive, whether you’re serving them up at a Halloween bash or simply indulging in a sweet treat after dinner.
If you’ve never made cake pops before, don’t worry—this recipe is truly beginner-friendly. You’ll find yourself whisking, baking, crumbling, and shaping the mixture into perfectly round bites in no time. I love how hands-on the process is: it feels almost therapeutic to roll each ball between my palms and watch my countertop slowly get covered in little orange orbs. Then comes the fun part—dipping each one into molten white chocolate and decorating with colorful sprinkles or drizzles. Before you know it, you’ll have a whimsical display that looks like it came straight from a bakery window. And the best part? Every pop is brimming with that signature pumpkin spice flavor, so you can savor the season in every bite.
KEY INGREDIENTS IN PUMPKIN SPICE CAKE POPS
To whip up these festive cake pops, you only need a handful of pantry staples and a few extra touches to bring out that warm, spiced character. Let’s break down the magic behind each ingredient and how it contributes to the final taste and texture of these playful treats.
- Pumpkin puree
Provides natural moisture and a subtle earthy sweetness, plus that lovely orange hue that screams fall.
- Vegetable oil
Keeps the cake crumb tender and moist, making it easy to blend into a dough for rolling.
- Granulated sugar
Sweetens the batter and helps achieve a soft, light crumb.
- Eggs
Bind ingredients together, add structure, and create a dreamy, rich crumb.
- Vanilla extract
Enhances all of the other flavors with its warm, aromatic notes.
- All-purpose flour
Forms the base of the cake, giving it the body and structure to hold its shape.
- Baking powder
Leavening agent that helps the cake rise and stay light.
- Baking soda
Works with the acidic pumpkin and spice blend to add lift and moisture.
- Salt
Balances sweetness and intensifies the complex spice flavors.
- Ground cinnamon
Brings a comforting warmth and classic pumpkin-spice profile.
- Ground nutmeg
Adds a rich, nutty depth that rounds out the spice blend.
- Ground cloves
Contributes a pungent, floral intensity for depth.
- Ground ginger
Offers a tangy kick and brightens the overall spice mix.
- Cream cheese
When softened and whipped, creates a luscious filling that binds the crumbs.
- Powdered sugar
Sweetens and thickens the cream cheese for the perfect dough consistency.
- Milk
Lightens and smooths out the cream cheese mixture.
- White chocolate chips (or candy melts)
Provides a silky coating that hardens into a flawless finish.
- Lollipop sticks
Transform your cake balls into charming, dip-and-share treats.
- Sprinkles
Optional pop of color and texture that makes each cake pop uniquely festive.
HOW TO MAKE PUMPKIN SPICE CAKE POPS
Ready to create these cinnamon-kissed spheres of joy? Follow these step-by-step instructions, and you’ll be on your way to perfectly spiced, irresistibly creamy cake pops that everyone will adore.
1. Preheat your oven to 350°F (175°C). Grease and flour a 9×13 inch baking dish to ensure your cake releases easily once baked.
2. In a large mixing bowl, combine the pumpkin puree, vegetable oil, granulated sugar, eggs, and vanilla extract. Whisk vigorously until the mixture is smooth and uniform.
3. In a separate bowl, whisk together the all-purpose flour, baking powder, baking soda, salt, ground cinnamon, ground nutmeg, ground cloves, and ground ginger. This ensures your spice blend is evenly distributed.
4. Gradually add the dry ingredients to the wet ingredients, stirring gently until just combined. Be careful not to over-mix, or the cake may turn dense.
5. Pour the batter into your prepared baking dish and use a spatula to spread it into an even layer.
6. Bake for 25–30 minutes, or until a toothpick inserted into the center comes out clean, signaling that the cake is perfectly cooked.
7. Allow the cake to cool completely in the pan on a wire rack to prevent condensation from making it soggy.
8. Once fully cooled, crumble the cake into fine crumbs using your hands or a fork. You’re aiming for a sand-like texture.
9. In a medium bowl, beat the softened cream cheese until smooth. Gradually add the powdered sugar and milk, mixing until a silky, well-combined filling forms.
10. Add the cream cheese mixture to the cake crumbs and mix until a moist, moldable dough forms.
11. Roll the dough into 1-inch balls and place them on a baking sheet lined with parchment paper. Insert a lollipop stick into each ball until it feels secure.
12. Refrigerate the cake pops for at least 1 hour to ensure they firm up and are ready for dipping.
13. In a microwave-safe bowl, melt the white chocolate chips or candy melts according to package instructions, stirring frequently until perfectly smooth.
14. Dip each chilled cake pop into the melted chocolate, allowing any excess to drip back into the bowl. If you like, decorate immediately with sprinkles for a festive finish.
15. Place the dipped cake pops upright into a styrofoam block or inverted colander with holes so they can set completely without sticking.
SERVING SUGGESTIONS FOR PUMPKIN SPICE CAKE POPS
Once these cake pops are set and gleaming, it’s time to plan the perfect presentation. Whether you’re hosting a seasonal brunch, a Halloween soirée, or simply treating yourself after a busy day, these serving ideas will help showcase your autumn-inspired creations and make them the highlight of any spread.
- Decorate a festive platter with mini pumpkins, acorns, and fall leaves alongside your cake pops. Place each pop in a mini cupcake liner so guests can grab them easily without smudging the chocolate coating.
- Create a Halloween treat station by placing cake pops upright in clear glass jars. Add a few themed signs—like “Boo Bites” or “Spooky Sweets”—and scatter some faux cobwebs around the base for a playful vibe.
- Serve alongside warm spiced beverages, such as pumpkin spice lattes or mulled cider. The contrast between the cold, creamy cake pop and a hot drink is pure magic in every bite and sip.
- Use as an edible centerpiece for your autumn table. Arrange pops in a decorative bucket filled with dried corn kernels or cranberries so they stand tall, making a stunning seasonal focal point.
HOW TO STORE PUMPKIN SPICE CAKE POPS
Keeping these cake pops fresh and flavorful is all about proper storage. Whether you’re prepping in advance or saving leftovers for tomorrow’s snack, these methods will help maintain their texture, taste, and delightful appearance.
- Refrigeration: Place cake pops upright in an airtight container, separated by parchment paper layers if stacking. Store in the fridge for up to 4 days; let them come to room temperature for 10–15 minutes before serving to restore that perfect melt-in-your-mouth feel.
- Freezing: For longer storage, wrap each pop individually in plastic wrap, then place them in a freezer-safe bag or container. They’ll keep for up to 1 month. To enjoy, thaw in the refrigerator overnight, then bring to room temperature.
- Room temperature: If you plan to eat them within 24 hours, store the pops in a cool, dry spot, covered loosely with plastic wrap. Avoid direct sunlight or heat sources to prevent the chocolate shell from melting.
- Transport: For parties or potlucks, stand the cooled cake pops in a shallow box lined with bubble wrap or foam to keep sticks stable. Cover lightly with plastic to protect the coating during travel.
CONCLUSION
Baking and decorating Pumpkin Spice Cake Pops is a delightful way to embrace the flavors of autumn in a fun, handheld form. From whisking the batter to rolling each ball of cake-and-cream-cheese mixture, every step invites you to slow down, get creative, and savor the spirit of fall. The blend of warming spices with that soft cream cheese center, all wrapped in a crisp white chocolate shell, makes these pops a crowd-pleaser at any gathering—whether you’re hosting a spooky Halloween party, a cozy family brunch, or simply looking for a sweet treat that feels both nostalgic and new.
Feel free to print this article or save it for future baking adventures—your kitchen will thank you when pumpkin season rolls around again. Below, you’ll find a handy FAQ section to answer any lingering questions, but in the meantime, I’d love to hear from you. Did you try these cake pops at home? How did your family or friends react to that first delicious bite? Drop a comment, share your photos, or ask any questions you might have. Happy baking, and here’s to many more seasonally spiced creations!
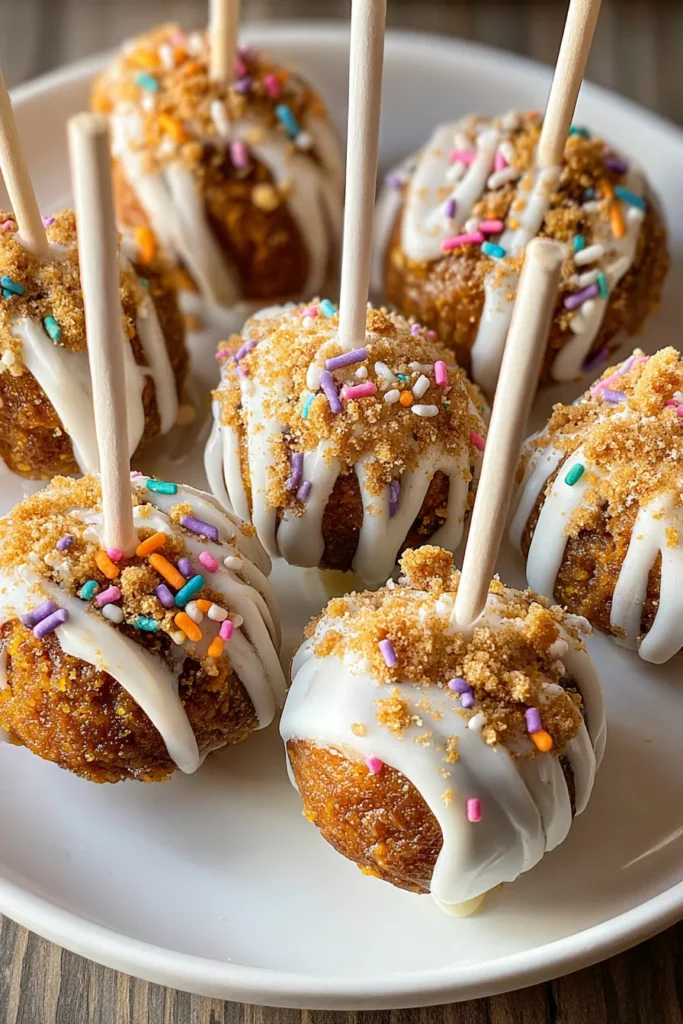

Pumpkin Spice Cake Pops
Description
These adorable Pumpkin Spice Cake Pops are a fun twist on a classic dessert, melding the rich flavors of pumpkin and warm spices into each bite-sized treat. Perfect for festive gatherings!
Ingredients
Instructions
-
Preheat your oven to 350°F (175°C). Grease and flour a 9x13 inch baking dish.
-
In a large mixing bowl, combine pumpkin puree, vegetable oil, granulated sugar, eggs, and vanilla extract. Mix until well combined.
-
In another bowl, whisk together the flour, baking powder, baking soda, salt, cinnamon, nutmeg, cloves, and ginger.
-
Gradually add the dry ingredients to the wet ingredients, mixing until just combined. Do not over-mix.
-
Pour the batter into the prepared baking dish and spread evenly.
-
Bake for 25-30 minutes or until a toothpick inserted into the center comes out clean.
-
Allow the cake to cool completely in the pan on a wire rack.
-
Once cooled, crumble the cake into fine crumbs using your hands or a fork.
-
In a medium bowl, beat the softened cream cheese until smooth. Gradually add powdered sugar and milk, mixing until creamy and well combined.
-
Add the cream cheese mixture to the cake crumbs and mix until a moist dough forms.
-
Roll the mixture into 1-inch balls and place them on a baking sheet lined with parchment paper. Insert a lollipop stick into each ball.
-
Refrigerate the cake pops for at least 1 hour to firm up.
-
In a microwave-safe bowl, melt the white chocolate chips or candy melts according to package instructions, stirring until smooth.
-
Dip each cake pop into the melted chocolate, allowing excess to drip off. Decorate with sprinkles if desired.
-
Place the cake pops upright into a styrofoam block or an inverted colander with holes to set completely.
Note
- For enhanced flavor, consider adding a teaspoon of pumpkin spice to the crumb mixture.
- You can substitute dark chocolate chips for a richer taste.
- Ensure your cake pops are fully chilled before dipping to prevent crumbling.
- These cake pops are perfect for autumn themed events or Halloween parties.

