

There’s something wonderfully nostalgic about diving into a slice of Peanut Butter Pie with Oreo Crust & Creamy Filling. This dessert wraps up all the best parts of indulgence—sweet, salty, crunchy, and silky—in a single, stunning presentation. With a beginner-friendly difficulty level, it’s one of those easy recipes that feels fancy but requires just a handful of pantry staples and a little bit of patience. In just about 20 minutes of active preparation time and a quick 10 minutes of baking the crust, you’ll be well on your way to a show-stopping dessert that needs 3–4 hours of chilling to reach its full glory. Each slice carries roughly 400 calories, making it rich enough to satisfy every peanut butter lover’s craving without being overly complicated.
The real magic happens when you shimmy that crunchy Oreo crust out of the oven and pour in the dreamy, no-bake dessert filling. A luscious blend of creamy peanut butter, soft cream cheese, and fluffy whipped topping comes together with a hint of vanilla and powdered sugar, resulting in a texture so airy yet decadent you’ll find yourself reaching for just one more forkful. Whether you’re whipping this up for a casual family gathering or an elegant dinner party, the vibrant contrast between dark chocolate cookie crumbs and pale peanut butter filling will have everyone asking, “How did you make this?” Trust me, it’s easier than it looks, and every bite is a mini celebration of flavors dancing on your taste buds.
KEY INGREDIENTS IN PEANUT BUTTER PIE WITH OREO CRUST & CREAMY FILLING
Before you start layering and chilling, let’s get to know the stars of this dessert. Each ingredient plays a special role in balancing texture, flavor, and ease—so grab your mixing bowls and let’s chat about what makes this pie shine.
- Oreo cookies
These chocolate sandwich cookies, crushed into fine crumbs, form the sturdy base of our crust. Their sweetness and cocoa flavor create the perfect contrast to the rich peanut butter filling.
- Unsalted butter
Melted and mixed with the Oreo crumbs, this butter acts as the glue that holds the crust together. It ensures a firm bake that still breaks apart easily for that satisfying bite.
- Creamy peanut butter
The heart of the filling, a smooth peanut butter adds that signature nutty flavor and silky mouthfeel we all adore. It pairs beautifully with the tang of cream cheese.
- Cream cheese
Softened to perfection, this ingredient lends a tangy richness and helps the filling maintain its shape without being overly dense.
- Powdered sugar
This ultra-fine sugar sweetens the filling without graininess, helping to lift and lighten the mixture as you whip.
- Vanilla extract
A splash of vanilla rounds out the flavors, adding warm aromatic notes that tie peanut butter and chocolate together in perfect harmony.
- Cool whip or whipped topping
Thawed and gently folded in, this airy component transforms the filling into a light, dreamy mousse-like texture. Freshly whipped cream works too for an extra-rich finish.
- Chocolate shavings or peanut butter cups (optional)
These make for a playful chocolate garnish, adding an eye-catching flourish and a bonus crunch just before serving.
HOW TO MAKE PEANUT BUTTER PIE WITH OREO CRUST & CREAMY FILLING
Creating this pie is a straightforward process that combines simple mixing, a quick bake for the crust, and a chill session to set the filling perfectly. Whether you’re familiar with making pie crusts or brand new to pie-making, each step will guide you toward a flawless result.
1. Preheat your oven to 350°F (175°C), ensuring it reaches the right temperature before you slide in the crust so it bakes evenly and forms that beautiful, dark-chocolate edge.
2. In a medium bowl, combine the crushed Oreo cookies and melted butter. Mix well until every crumb is coated in butter, giving you a uniform, damp sand-like texture that will hold together when pressed.
3. Press the Oreo mixture into the bottom and up the sides of a 9-inch pie dish to form a crust. Use the back of a spoon or the bottom of a measuring cup to pack it firmly, creating an even, compact layer.
4. Bake the crust in the preheated oven for about 8–10 minutes, then remove and allow it to cool completely on a wire rack. This quick bake sets the crust so it won’t crumble when you cut into the pie.
5. In a large mixing bowl, beat together the peanut butter, cream cheese, and powdered sugar until smooth and creamy, scraping down the sides as needed to blend everything into a lump-free filling.
6. Add in the vanilla extract and mix until well combined, distributing that warm flavor throughout the filling.
7. Fold in the cool whip or whipped topping gently, using a spatula to preserve as much air as possible. This ensures your filling stays light and fluffy.
8. Pour the creamy peanut butter filling into the cooled Oreo crust, smoothing the top with a spatula to create an even surface.
9. Refrigerate the pie for at least 3–4 hours or until fully set. The chilling time allows the flavors to meld and the filling to firm up nicely.
10. Before serving, garnish with chocolate shavings or cut peanut butter cups if desired. These final touches add both visual appeal and a little extra texture.
SERVING SUGGESTIONS FOR PEANUT BUTTER PIE WITH OREO CRUST & CREAMY FILLING
When it’s time to slice into this dreamy pie, you’ll want to present it in a way that highlights its stunning layers and rich flavors. From pairing ideas to plate styling, these serving suggestions will make every bite feel like a special occasion. Remember to slice with a sharp, warm knife for perfect wedges that show off the contrast between dark crust and pale filling.
- Serve each slice with a dollop of fresh whipped cream on top and a light dusting of cocoa powder for a café-style treat that’s both elegant and cozy.
- Accompany the pie with a side of ripe berries—strawberries, raspberries, or blueberries—to cut through the richness with bright, fruity notes.
- Drizzle a ribbon of melted chocolate across each plate and sprinkle with crushed peanut butter cups for a festive presentation that screams indulgence.
- Pair individual slices with iced coffee or a rich cold brew for a delightful afternoon pick-me-up, balancing sweet and bitter flavors in every bite.
HOW TO STORE PEANUT BUTTER PIE WITH OREO CRUST & CREAMY FILLING
Proper storage ensures that every slice of this pie maintains its flavor, texture, and visual appeal. Since the filling is creamy and the crust is delicate, it’s best to keep it chilled and well-protected from strong odors in the fridge. If you plan to make the pie ahead of time, follow these guidelines to keep it fresh and ready to serve.
- Wrap the chilled pie tightly with plastic wrap, pressing it gently against the surface of the filling to prevent a skin from forming. Store on the middle shelf of the refrigerator for up to 4 days.
- For individual leftovers, place single slices in airtight containers or cover small plates with plastic wrap, which protects the flavors and avoids odor absorption.
- To freeze for longer-term storage, freeze whole or cut the pie into slices first. Place parchment paper between layers to prevent sticking, then secure in a freezer-safe airtight container. Freeze for up to 1 month.
- Thaw frozen slices overnight in the refrigerator before serving. This gradual thawing helps the creamy filling rehydrate evenly and maintains the crunch of the crust.
CONCLUSION
Every time I revisit this Peanut Butter Pie with Oreo Crust & Creamy Filling, I’m reminded of how a handful of simple ingredients can come together to create something truly spectacular. From the crunchy, chocolatey Oreo crust to the velvety peanut butter filling, this dessert strikes the perfect balance between nostalgia and sophistication. With a total of 20 minutes of hands-on prep, a short 10-minute bake, and a restful 3–4 hours of chilling, you end up with a dessert that looks like it belongs in a bakery display case but comes together effortlessly in your own kitchen. Whether you’re a beginner exploring no-bake desserts for the first time or a seasoned home cook looking for a quick crowd-pleaser, this recipe is your ticket to dessert stardom. Feel free to print and save this article for later reference, and remember that you can scroll down to find a handy FAQ section to answer any lingering questions.
I hope you give this pie a whirl and experience firsthand how a luscious creamy filling and crunchy Oreo crust can transform simple pantry staples into a memorable treat. If you try out the recipe, tweak a garnish, or have any questions—whether it’s about substituting the whipped topping for fresh cream or the best way to pack the crust—please leave your comments, stories, or feedback below. I love hearing from fellow home cooks and peanut butter enthusiasts, and I’m here to help you master this dessert in your own kitchen. Happy baking (and chilling)!
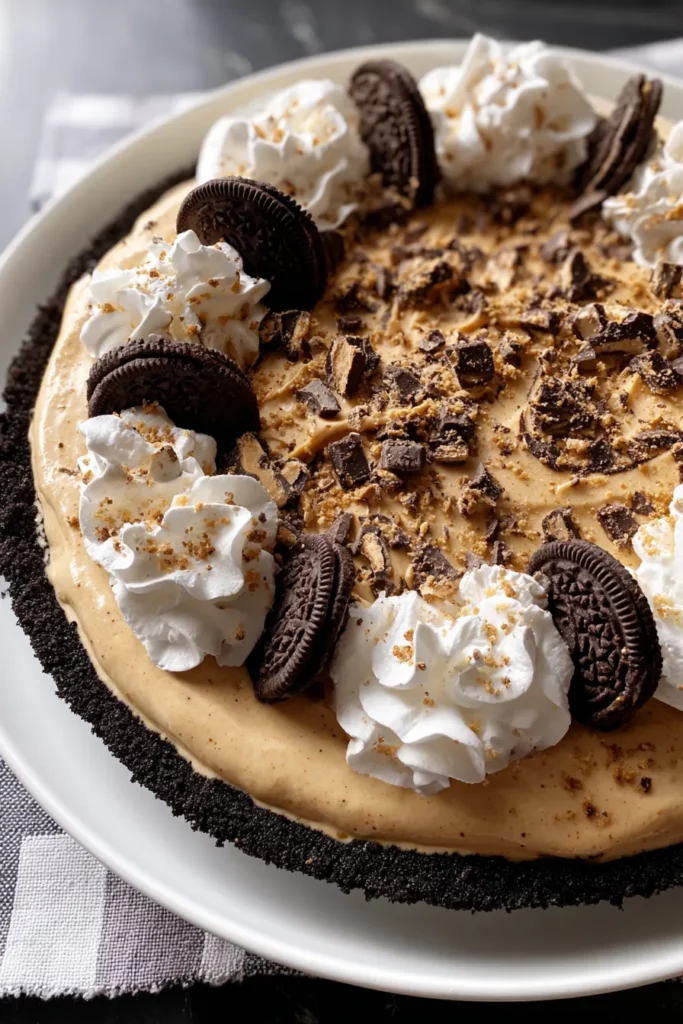

Peanut Butter Pie with Oreo Crust & Creamy Filling
Description
Experience the perfect blend of creamy peanut butter and smooth whipped topping, all nestled in a crunchy Oreo crust. This pie is a delightful treat for any occasion.
Ingredients
Instructions
-
Preheat your oven to 350°F (175°C).
-
In a medium bowl, combine the crushed Oreo cookies and melted butter. Mix until the crumbs are evenly coated.
-
Press the Oreo mixture into the bottom and up the sides of a 9-inch pie dish to form a crust. Use the back of a spoon to pack it firmly.
-
Bake the crust in the preheated oven for about 8-10 minutes, then remove and allow it to cool completely on a wire rack.
-
In a large mixing bowl, beat together the peanut butter, cream cheese, and powdered sugar until smooth and creamy.
-
Add in the vanilla extract and mix until well combined.
-
Fold in the cool whip or whipped topping gently, ensuring everything is well combined but not deflated.
-
Pour the creamy peanut butter filling into the cooled Oreo crust, smoothing the top with a spatula.
-
Refrigerate the pie for at least 3-4 hours or until set.
-
Before serving, garnish with chocolate shavings or cut peanut butter cups if desired.
Note
- You can substitute the cool whip with freshly whipped cream for a richer texture.
- For a fun twist, consider layering with a chocolate ganache.
- This pie can be made a day in advance, making it ideal for parties.
- Serve chilled for the best set and flavor.

