

If you have a sweet tooth and crave nostalgia in every bite, these Melt-In-Your-Mouth S’mores Roll-Ups are a game-changer. Soft flour tortillas envelop bubbling marshmallows, creamy milk chocolate, and crunchy graham cracker crumbs—then they’re baked until crisp and golden. They’re perfectly portioned for snack time, easy enough for beginners, and fun enough to share around the table. Ready to bring that campfire magic indoors? Let’s dive into this playful, gooey dessert that everyone will love.
Key Ingredients
Before we get rolling, let’s gather the essentials for these gooey treat-wrapped tortillas:
- 4 large flour tortillas: Soft, pliable wraps that cradle the gooey marshmallow and chocolate filling.
- 2 tablespoons unsalted butter, melted: Adds richness and helps create a golden, crispy exterior when brushed on the tortillas.
- 1 cup mini marshmallows: Provides that classic gooey, chewy s’mores texture.
- 1 cup milk chocolate chips: Melts into creamy pockets of chocolate bliss inside each roll-up.
- 1/2 cup graham cracker crumbs: Adds a delightful crunch and authentic s’mores flavor.
- 1 teaspoon vanilla extract: Infuses the crumb mixture with warm, aromatic sweetness.
- Powdered sugar for dusting (optional): A light dusting gives a pretty finish and extra touch of sweetness.
How To Make Melt-In-Your-Mouth S’mores Roll-Ups
Rolling up these s’mores is half the fun. In under 15 minutes, you’ll assemble soft tortillas layered with irresistible fillings—mini marshmallows, milk chocolate chips, and spiced-up graham crumbs—before baking them to golden perfection. Follow these easy steps and you’ll have a dessert that oozes warmth and crunch in every bite.
1. Preheat your oven to 350°F (175°C) and line a baking sheet with parchment paper to prevent sticking.
2. In a small bowl, combine the graham cracker crumbs and powdered sugar (if using), mixing thoroughly so the sweet spice is evenly distributed. Set this mixture aside.
3. Lay one flour tortilla flat on a clean surface. Brush one side lightly with the melted butter, ensuring even coverage without soaking.
4. Sprinkle a generous amount of the graham cracker mixture evenly across the buttered side of the tortilla, leaving a small border to help seal the roll.
5. Add a layer of mini marshmallows followed by a layer of milk chocolate chips on top of the graham cracker crumbs for that classic s’mores combo.
6. Roll the tortilla tightly from one end to the other, tucking in the edges to keep the filling enclosed and prevent leaks.
7. Place the rolled tortilla seam-side down onto the prepared baking sheet to secure its shape while baking.
8. Repeat the process with the remaining tortillas and filling ingredients, working in batches if needed.
9. Brush the tops of the rolled tortillas with the remaining melted butter to help them achieve a golden brown color in the oven.
10. Bake in the preheated oven for about 12–15 minutes or until each roll-up is crispy, puffed, and lightly golden.
11. Once done baking, remove them from the oven and allow them to rest for a few minutes before slicing to avoid losing all that gooey filling.
12. Dust with additional powdered sugar, if desired, and serve warm for the ultimate melt-in-your-mouth experience.
Serving Suggestions
When your s’mores roll-ups emerge golden and fragrant, it’s time to think about the perfect way to serve them. Whether you’re impressing friends at brunch, whipping up an after-school treat, or simply indulging on a cozy evening in, these bite-sized delights shine on their own. That said, a few thoughtful finishing touches can elevate the experience even more. Here are a handful of serving ideas to make every bite as memorable as a night under the stars.
- Dipped in Chocolate: Offer a small bowl of melted chocolate—dark, milk, or white—for guests to dip each roll-up, creating double the chocolate fun.
- With Fresh Berries: Plate alongside a handful of fresh strawberries or raspberries for a pop of color and tangy contrast.
- Drizzled with Caramel: Warm caramel sauce makes a rich drizzle that adds gooey sweetness and a professional-looking finish.
- Sprinkled with Sea Salt: A pinch of flaky sea salt lightly dusted over the top balances the dessert’s sweetness with a hint of savory.
Tips For Perfect Melt-In-Your-Mouth S’mores Roll-Ups
Want to take these roll-ups from great to truly unforgettable? A few clever tweaks and flavor swaps can jazz up your s’mores game and keep everyone asking for seconds. Whether you’re in the mood for nuttier notes, fruity bursts, or a dip that steals the show, these ideas will help you customize each bite just the way you like it. Plus, they’re all super-simple—just grab a few extra ingredients and get creative. Let’s make sure every roll-up you serve is delicious, crowd-pleasing perfection!
- These roll-ups can be customized with various fillings like peanut butter or Nutella for a delightful twist.
- You can also add nuts or fruit like bananas for extra flavor and texture.
- For a fun presentation, serve with a side of melted chocolate for dipping.
- Experiment with different types of chocolate such as dark or white chocolate for unique flavor profiles.
How To Store It
If you end up with more roll-ups than you can devour in one sitting (no judgment—these are irresistible), keeping them fresh is key. Whether you want to save leftovers for tomorrow’s snack or prep a batch in advance, proper storage helps maintain that crispy shell and gooey interior. Here are a few easy methods to stash your s’mores roll-ups so they stay just as magical as when they first came out of the oven.
- Room Temperature: Store cooled roll-ups in an airtight container at room temperature for up to 2 days; this keeps the shell crisp and the filling soft.
- Refrigeration: For longer storage, place cooled rolls in an airtight container in the fridge for up to 3 days; allow them to come to room temperature before serving.
- Freezing Preassembled: Assemble and wrap each roll-up individually in plastic wrap, freeze on a baking sheet until firm, then transfer to a freezer bag for up to 1 month.
- Reheat Properly: To refresh crispiness, bake stored roll-ups in a 350°F oven for 5–7 minutes (or microwave briefly for a softer texture) before serving.
Frequently Asked Questions
Got questions? Here are some quick answers to help you master these s’mores roll-ups.
- Q: How long does it take to prepare and bake Melt-In-Your-Mouth S’mores Roll-Ups?
A: From start to finish, plan on about 30–35 minutes. It takes roughly 5–10 minutes to gather and measure ingredients, 10–12 minutes to assemble the tortillas, 12–15 minutes to bake until golden and crispy, plus a few minutes of cooling before slicing.
- Q: Can I customize the fillings, and what are some popular variations?
A: Absolutely. In addition to mini marshmallows and milk chocolate chips, you can spread peanut butter or Nutella on the tortilla before adding crumbs, swap in dark or white chocolate chips, include sliced bananas or strawberries for fruitiness, or sprinkle chopped nuts like almonds or pecans for extra crunch and flavor.
- Q: What’s the best way to prevent the tortillas from becoming soggy?
A: Brushing the tortillas with melted butter creates a moisture barrier and helps them crisp up. Make sure to roll each tortilla tightly, seal the seam-side down on the baking sheet, and bake until they achieve a golden-brown color—this ensures a crisp outer shell that stays crunchy rather than soggy.
- Q: How should I store any leftover roll-ups, and can I reheat them?
A: Store cooled roll-ups in an airtight container at room temperature for up to 2 days or in the refrigerator for up to 3 days. To reheat, place them on a baking sheet and warm in a 350°F (175°C) oven for 5–7 minutes, or microwave briefly (10–15 seconds) if you prefer a softer texture.
- Q: Can I prepare these roll-ups ahead of time or freeze them?
A: Yes. Assemble and wrap the filled tortillas individually, then freeze on a baking sheet until firm. Transfer to a freezer bag for up to 1 month. Bake directly from frozen, adding a few extra minutes to the baking time, or thaw in the refrigerator overnight before baking.
- Q: Why is vanilla extract included, and can I omit it?
A: The teaspoon of vanilla extract lightly infuses the graham cracker crumb mixture with warm, aromatic flavor, rounding out the sweetness of marshmallows and chocolate. You can omit it if unavailable, but the extra layer of flavor will be missed by s’mores enthusiasts.
- Q: Are there gluten-free or vegan adaptations for this recipe?
A: For a gluten-free version, use certified gluten-free tortillas and graham cracker crumbs. To make it vegan, choose dairy-free margarine or coconut oil in place of butter, vegan marshmallows, and dairy-free chocolate chips. The rest of the assembly and baking process remains the same.
What Makes This Special
This dessert works on every level: it’s quick, simple, and taps into everyone’s nostalgic love for campfire s’mores—without the need for matches or a chilly night sky. Soft tortillas transform into golden, crispy tubes that burst open with warm chocolate and gooey marshmallow, all wrapped around crunchy graham crumbs. The best part? You can print this article, slap it on your fridge, and revisit the magic these roll-ups bring time and again. If you try them, drop a comment below with your favorite twist or any questions you have—your kitchen adventures deserve the spotlight!
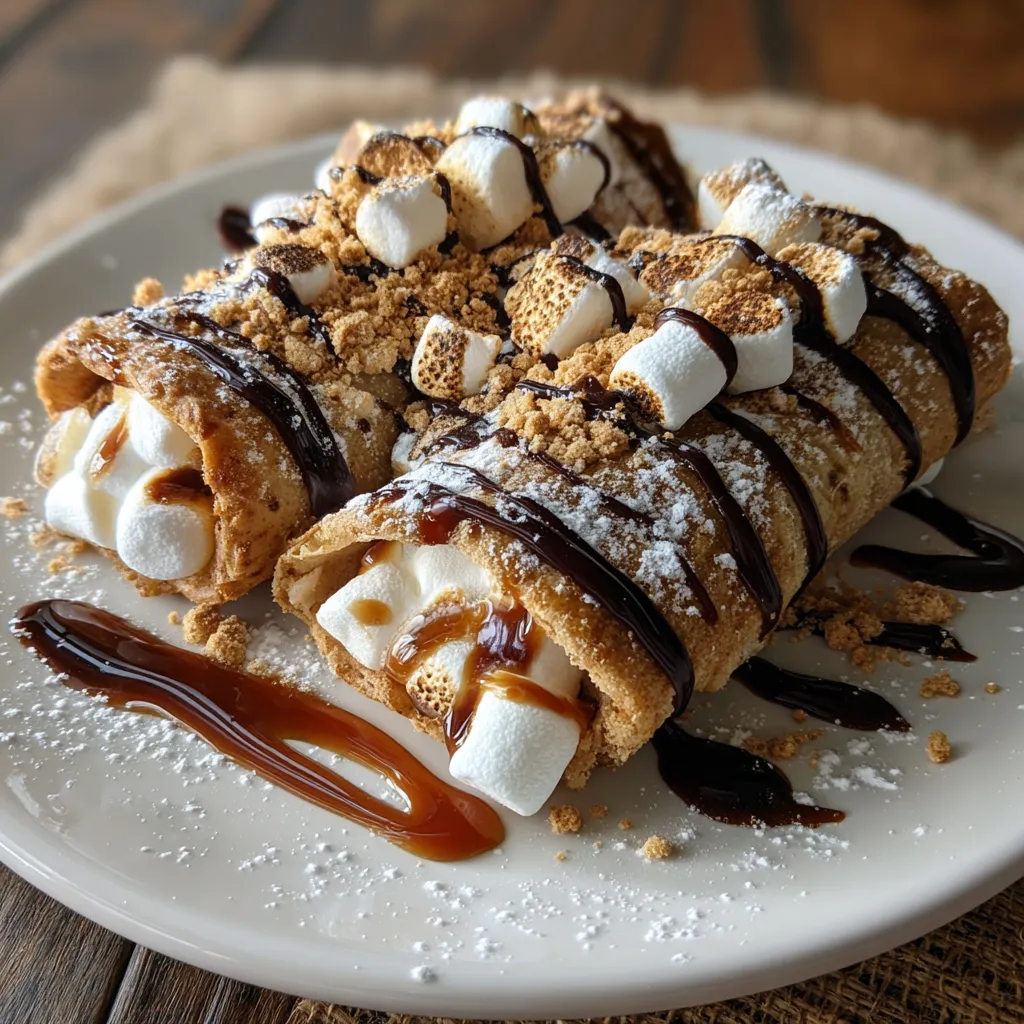

Melt-In-Your-Mouth S’mores Roll-Ups
Description
Each bite reveals warm, bubbling chocolate and marshmallows clasped in a buttery tortilla, accented by crunchy graham crumbs. Golden-baked to crisp perfection, they bring campfire nostalgia straight from your oven.
Ingredients
Instructions
-
Preheat your oven to 350°F (175°C) and line a baking sheet with parchment paper.
-
In a small bowl, combine the graham cracker crumbs and powdered sugar (if using), mixing them well. Set this mixture aside.
-
Lay one flour tortilla flat on a clean surface. Brush one side lightly with the melted butter.
-
Sprinkle a generous amount of the graham cracker mixture evenly across the buttered side of the tortilla.
-
Add a layer of mini marshmallows followed by a layer of milk chocolate chips on top of the graham cracker crumbs.
-
Roll the tortilla tightly from one end to the other, making sure to keep the filling enclosed.
-
Place the rolled tortilla seam-side down onto the prepared baking sheet.
-
Repeat the process with the remaining tortillas and filling ingredients.
-
Brush the tops of the rolled tortillas with the remaining melted butter. This will help them achieve a golden brown color while baking.
-
Bake in the preheated oven for about 12-15 minutes or until golden and crispy.
-
Once they are done baking, remove them from the oven and allow them to cool for a few minutes before slicing them into bite-sized pieces.
-
Dust with additional powdered sugar, if desired, and serve warm.
Note
- These roll-ups can be customized with various fillings like peanut butter or Nutella for a delightful twist.
- You can also add nuts or fruit like bananas for extra flavor and texture.
- For a fun presentation, serve with a side of melted chocolate for dipping.
- Experiment with different types of chocolate such as dark or white chocolate for unique flavor profiles.

