

Frozen Yogurt Granola Cups with Berries are the ultimate make-ahead dessert that balances crunchy, chewy granola with smooth, creamy yogurt and juicy bursts of mixed berries. These frozen treats feel indulgent yet light, making them perfect for a hot afternoon snack or a guilt-free dessert. With crisp granola shells hugging velvety honey-sweetened yogurt and jewel-bright berries, each bite delivers playful texture and refreshing fruitiness that’ll have everyone asking for more.
Key Ingredients
Before diving in, let’s talk about what makes these cups so irresistible—the simple, wholesome ingredients that you probably already have on hand:
- 2 cups rolled oats: The hearty base that toasts up into a crunchy shell.
- 1/4 cup honey: Natural sweetener that helps bind the granola and adds floral notes.
- 1/4 cup melted coconut oil: Provides richness and encourages the granola to crisp up beautifully.
- 2 tablespoons brown sugar: Adds a touch of molasses sweetness and helps caramelize the edges.
- 1/2 teaspoon ground cinnamon: Warm spice that complements the oats and berries.
- Pinch salt: Enhances all the sweet flavors and balances richness.
- 1 cup plain Greek yogurt: Creamy, tangy filling that holds its shape when frozen.
- 1 tablespoon honey: Lightly sweetens the yogurt without overpowering its tang.
- 1 teaspoon vanilla extract: Infuses the yogurt with comforting vanilla fragrance.
- 1 cup mixed berries: Fresh or frozen, they add juicy sweetness and vibrant color.
How To Make Frozen Yogurt Granola Cups with Berries
Creating these frozen yogurt cups is easier than you think—just toast your granola shells, whip up a quick yogurt filling, then freeze until firm. The steps are straightforward, and you’ll love how the flavors and textures come together in each colorful bite.
1. Preheat oven to 350°F (175°C).
2. In a bowl mix rolled oats, honey, melted coconut oil, brown sugar, cinnamon, and salt until well combined and the oats are evenly coated.
3. Press about 2 tablespoons of the granola mixture into the bottom and up the sides of each cavity of a twelve-cup muffin tin, creating a uniform shell.
4. Bake for 12 minutes or until golden brown around the edges, allowing the sugar to caramelize slightly.
5. Let cups cool completely in the tin, then carefully remove them to a wire rack to retain their shape.
6. In a separate bowl stir together Greek yogurt, honey, and vanilla until smooth and silky.
7. Spoon or pipe the yogurt mixture into the cooled granola cups, filling each shell up to the rim.
8. Top each cup with mixed berries, arranging them attractively for a pop of color.
9. Freeze cups for at least 2 hours or until fully set before serving, ensuring a perfect snap when you bite.
Serving Suggestions
These frozen yogurt granola cups are delightful on their own, but you can elevate the presentation and flavor even more. Here are a few fun ideas to make your serving stand out:
- Serve on a chilled platter lined with parchment paper to keep the cups from sticking and to showcase their vibrant colors.
- Drizzle a touch of warm honey or chocolate sauce over the top just before serving for an elegant finish.
- Add a sprig of fresh mint or a light dusting of cinnamon for a fragrant garnish that complements the berries.
- Pair with a side of fruit compote or berry coulis for dipping, giving guests an extra burst of juicy sweetness.
Tips For Perfect Frozen Yogurt Granola Cups with Berries
Getting these cups just right is all about little tricks that make the process smooth and result consistently delicious. Here’s how to nail it every time:
- You can substitute flavored yogurt for a different taste.
- Granola cups can be stored airtight in the freezer for up to two weeks.
- Use silicone muffin liners for easy removal.
- Fresh or frozen berries both work well.
How To Store It
Proper storage ensures your frozen yogurt granola cups stay crisp and flavorful until you’re ready to indulge or share. Below are some methods to keep them in top condition:
- Freezer-safe container: Place cups in a single layer or separate layers with parchment sheets, then seal airtight to prevent freezer burn.
- Freezer bag: Slip cups into a zip-top bag, squeeze out excess air, and seal; this method saves space and keeps them fresh for up to two weeks.
- Label and date: Always mark the storage date so you use older batches first and maintain optimal flavor.
- Thawing tip: When ready to eat, move cups to the refrigerator or let sit at room temperature for 10–15 minutes so they soften just enough for easy biting.
Frequently Asked Questions
Here are answers to the most common questions about making and enjoying these frozen treats:
- How long does it take to prepare and freeze these cups?
It takes about 30 minutes of active prep and baking—mixing the granola, pressing into cups, baking for 12 minutes, and cooling—then at least 2 hours of freezing time before they’re fully set, so plan on about 2½ hours total.
- Can I substitute different types of yogurt or make them non-dairy?
Yes. You can use flavored yogurt for added sweetness—just reduce the extra honey if it’s already sweetened. For a non-dairy version, swap in coconut, almond, or soy yogurt and adjust the honey to taste; note that non-dairy yogurts can be slightly softer once frozen.
- What’s the best way to remove the cups from the muffin tin without breaking them?
Let the cups cool completely in the tin, then freeze briefly until firm. If you’ve used silicone liners removal is easy; otherwise gently press on the bottom of each cup to pop it out. If they’re too solid, let them sit at room temperature for a minute before popping.
- How should I store the granola cups, and how long will they stay fresh?
Store the assembled cups in an airtight container or freezer-safe bag in the freezer for up to two weeks. When you’re ready to serve, transfer them to the refrigerator or leave at room temperature for 10–15 minutes to soften slightly.
- Will using frozen berries affect the texture, and should I thaw them first?
Frozen berries work fine—just pat them dry to remove excess ice crystals before topping. Fresh berries will be firmer, while frozen may release a little juice as they thaw, which can add flavor but may soften the yogurt layer faster.
- Can I add other mix-ins or adjust the flavor of the granola?
Absolutely. Stir chopped nuts, seeds, or dried fruit into the oat mixture before pressing and baking. You can also swap brown sugar for maple syrup or add a pinch of nutmeg or cardamom with the cinnamon to customize the flavor—just keep the wet-to-dry ratio balanced so the cups hold together.
What Makes This Special
These Frozen Yogurt Granola Cups with Berries shine because they combine crisp, toasted oats with a creamy Greek yogurt center and vibrant mixed berries, all held together in a perfectly portable, make-ahead snack. The contrast between crunchy shells and smooth filling is playful, while the natural sweetness keeps things fresh and light. This is a dessert that’s as fun to eat as it is to serve—feel free to print and save these tips for later. Let me know how yours turn out or ask any questions below!
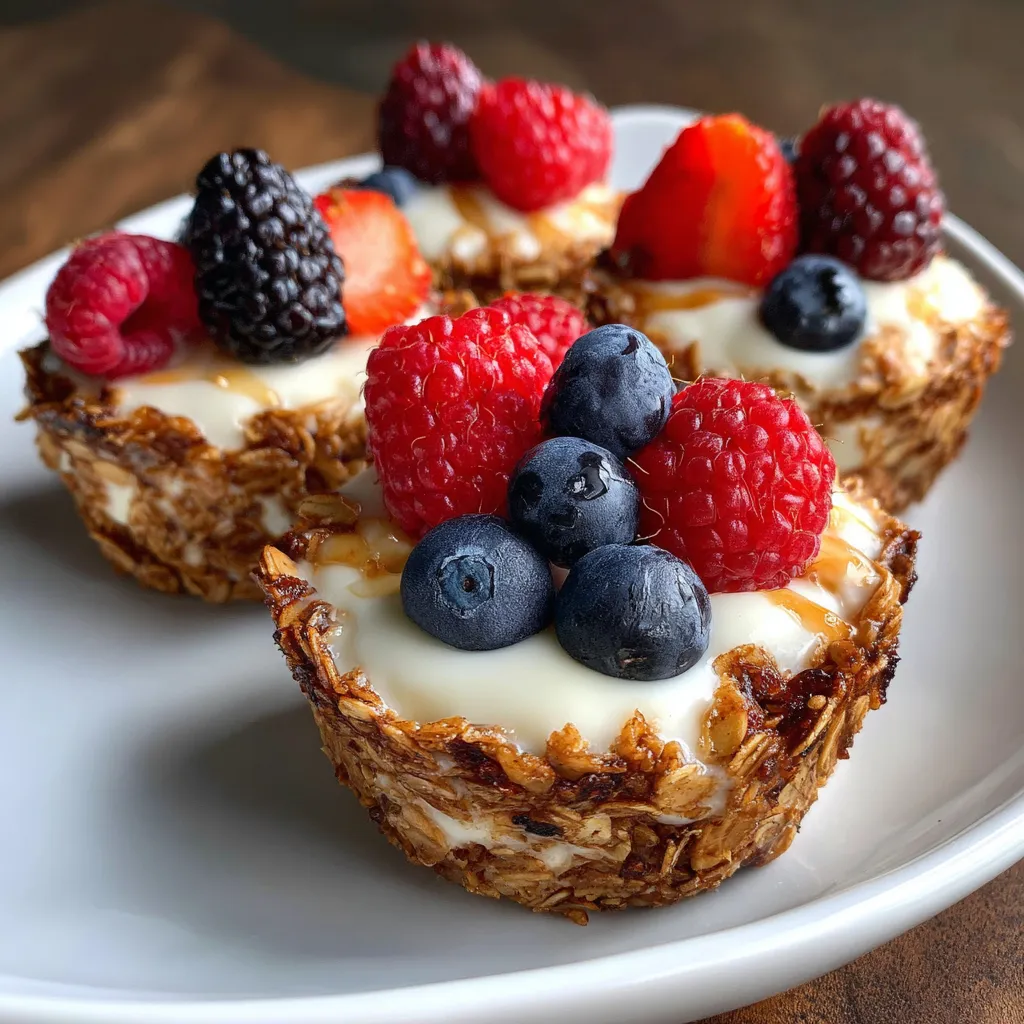

Frozen Yogurt Granola Cups with Berries
Description
Crunchy granola cups cradle velvety yogurt and plump berries, then chill into a refreshing frozen treat. Each bite bursts with contrasting textures and fruity sweetness.
Ingredients
Instructions
-
Preheat oven to 350°F (175°C).
-
In a bowl mix rolled oats, honey, melted coconut oil, brown sugar, cinnamon, and salt until well combined.
-
Press about 2 tablespoons of the granola mixture into the bottom and up the sides of each cavity of a twelve-cup muffin tin.
-
Bake for 12 minutes or until golden brown around the edges.
-
Let cups cool completely in the tin, then carefully remove them to a wire rack.
-
In a separate bowl stir together Greek yogurt, honey, and vanilla until smooth.
-
Spoon or pipe the yogurt mixture into the cooled granola cups.
-
Top each cup with mixed berries.
-
Freeze cups for at least 2 hours or until set before serving.
Note
- You can substitute flavored yogurt for a different taste.
- Granola cups can be stored airtight in the freezer for up to two weeks.
- Use silicone muffin liners for easy removal.
- Fresh or frozen berries both work well.

