

Spring is practically knocking on the door, and what better way to welcome its sweet warmth than by baking a batch of adorable Easter Bunny Buns? These fluffy, golden treats go beyond your everyday rolls—they’re a celebration of soft, tender crumb scented with vanilla, kissed by a gentle hint of sweetness, and playfully decorated to hop right into the heart of your spring brunch. As you roll, knead, and shape each little bunny, you’ll find yourself losing track of the hours, entranced by the delicate sweetness of the dough and the joyful anticipation of seeing those chocolate chip eyes and fruit noses pop to life. Whether you’re baking alongside kids who giggle at creating floppy ears or enjoying a quiet morning with a hot cup of coffee, these buns bring a whimsical delight that feels like a warm hug on a plate.
In my own kitchen, the moment I slip that tray into the oven, all other tasks fade into the background—the gentle bloom of vanilla, the promise of golden brown tops glowing in the oven light, and the memory of childhood Easter gatherings swirl together in a heady mix of nostalgia and pure joy. With just a handful of pantry staples—milk, flour, sugar, and a bit of yeast—you can craft a dozen of these playful buns that practically dance their way onto the table. From their soft, slightly sweet bite to the playful sprinkles on their fluffy backs, every element is designed to spark smiles. Let’s dive right in and hop along the path to creating these festive, beginner-friendly Easter Bunny Buns, perfect for brightening up any spring celebration or simply adding a dash of fun to your weekend baking.
KEY INGREDIENTS IN EASTER BUNNY BUNS
Before we dive into shaping and baking, let’s talk about the stars of our recipe. Each ingredient works together to give these buns their signature fluff, gentle sweetness, and festive charm:
- Warm milk
Acts as the liquid base to activate the yeast, creating that light, airy texture in the dough. Keeping it around 110°F ensures the yeast blooms perfectly without killing it.
- Sugar
Provides sweetness and also helps feed the yeast during the initial proof, encouraging a good rise and a tender crumb.
- Active dry yeast
The leavening powerhouse that makes the dough expand and become irresistibly soft. A little patience during proofing leads to big, fluffy bunnies.
- Unsalted butter
Adds a rich, creamy flavor and tender moisture. Melted into the dough, it helps achieve that melt-in-your-mouth softness.
- Salt
Balances sweetness and strengthens the gluten structure for a more elastic dough that’s easy to shape.
- Eggs
Enrich the dough, contributing to its golden color and supple texture, while adding a subtle richness.
- All-purpose flour
The backbone of our bunnies, it provides structure and the right protein content to yield soft yet sturdy buns.
- Vanilla extract
Infuses a gentle floral sweetness that elevates the overall flavor profile and adds a delightful aroma.
- Mini chocolate chips
Used for the bunny eyes, they offer a pop of sweet, creamy contrast against the tender bread.
- Raisins or dried cranberries
Serve as tiny noses, adding a chewy, fruity touch that complements the sugar-scented dough.
- Egg (for egg wash)
Brushed on top to create a shiny, golden-brown finish that makes each bunny glow.
- Sprinkles or colored sugar (optional)
The final festive flourish, giving each bun a playful sparkle perfect for spring celebrations.
HOW TO MAKE EASTER BUNNY BUNS
Ready to turn those ingredients into the cutest buns you’ve ever seen? Here’s an overview of how our process will unfold—from proofing yeast to the final golden bake—so you know exactly what delicious fun awaits.
1. In a small bowl, combine the warm milk, sugar, and yeast, stirring gently until everything is incorporated. Let it sit for 5–10 minutes until it becomes foamy and fragrant, signaling that your yeast is happily alive and ready to work its magic.
2. In a large mixing bowl, whisk together the flour and salt to evenly distribute the seasoning. Add the melted butter, beaten eggs, and vanilla extract, and whisk briefly to blend these rich, flavor-building ingredients.
3. Pour the yeast mixture into the flour mixture. Stir with a sturdy spoon or dough hook until a rough dough forms, making sure no dry patches remain stuck to the bottom of the bowl.
4. Turn the dough out onto a lightly floured surface and knead for 8–10 minutes, pressing and folding until it’s smooth, elastic, and just a bit springy to the touch. If the dough sticks, sprinkle on a tablespoon of flour at a time—too much flour can make the buns tough, so add carefully.
5. Place the kneaded dough into a lightly greased bowl. Cover with a damp cloth and let it rise for 1–1.5 hours in a warm spot until it’s doubled in size, airy and soft.
6. While the dough is rising, preheat your oven to 350°F (175°C) and line a baking sheet with parchment paper to prevent any sticking.
7. Once risen, punch down the dough to release excess air. Divide it into 12 equal portions so each bunny is the same size and bakes evenly.
8. Roll each portion into a smooth ball, then gently shape into a bunny: flatten the body slightly and pinch two long, pointy ears at the top. For the face, pinch out a small snout or indent lightly where the nose will sit.
9. Arrange the bunny shapes on the prepared baking sheet, spacing them evenly. Gently press mini chocolate chips into place for eyes and tuck raisins or dried cranberries in for noses.
10. Beat the remaining egg and brush it over the tops of each bunny to give them a golden, shiny finish when baked.
11. If you’re feeling extra festive, sprinkle colored sugar or sprinkles on top now, letting them stick to the tacky egg wash.
12. Bake for 15–20 minutes, watching as the buns swell and turn a beautiful, warm golden-brown. They should look plump and feel springy when lightly tapped.
13. Remove from the oven and let cool slightly on a wire rack before serving, so you don’t burn little fingers when it’s time to enjoy.
SERVING SUGGESTIONS FOR EASTER BUNNY BUNS
With your oven-fresh bunnies ready to charm, it’s time to think about how to present them for an unforgettable spring spread. These serving ideas will help you showcase their playful shapes and delicious flavor to maximum effect!
- Warm and Buttered
Serve the bunnies straight from the oven, still slightly warm, with a pat of soft butter melting into every crease. The contrast of warm, tender bread and creamy butter is pure comfort.
- Chocolate Drizzle Plate
Arrange the buns on a decorative platter and drizzle with melted milk or dark chocolate, adding a sprinkling of pastel-colored sugar for a professional-looking finish that guests will adore.
- Fruit and Cream Spread
Accompany each bunny with a small dollop of fresh whipped cream and a side of sliced strawberries or raspberries. The tangy brightness of berries cuts through the sweet dough and makes each bite feel extra special.
- Tea Party Display
Pair your Easter Bunny Buns with a selection of flavored teas—like chamomile, lemon-ginger, or Earl Grey—and stack them on tiered cake stands alongside pastel macarons and petit fours for a whimsical brunch vibe.
HOW TO STORE EASTER BUNNY BUNS
Keeping these sweet, soft bunnies fresh is easy when you follow a few simple storage tricks. Whether you’re saving extras for later in the day or making them ahead for a gathering, these methods will help maintain that just-baked charm.
Storing these buns properly ensures they retain their tender crumb and subtle sweetness without drying out. Always allow them to cool completely to room temperature before sealing away, or condensation can make them soggy.
- Airtight Container at Room Temperature
Place cooled buns in an airtight container or resealable bag. Store at room temperature for up to two days. This method locks in moisture and keeps the crust soft without refrigeration.
- Refrigeration for Longer Freshness
If you need to keep them beyond two days, pop them in the fridge inside a tightly sealed bag. They’ll stay fresh for up to five days, though the texture may firm up slightly—just warm in a low oven to revive their softness.
- Freezing Individual Buns
Wrap each cooled bunny in plastic wrap, then place in a freezer-safe bag. Store in the freezer for up to one month. Thaw at room temperature or gently warm in the oven straight from frozen for a delightful treat any time.
- Reviving Stale Buns
If buns do begin to go stale, sprinkle them lightly with water, then wrap in foil and warm in a 300°F oven for 5–7 minutes. The steam regenerates moisture, bringing them back to near-fresh perfection.
CONCLUSION
What a joyful journey we’ve taken together, from proofing that bubbly yeast mixture to arranging those chocolatey eyes and rosy fruit noses on each bunny. These Easter Bunny Buns aren’t just bread; they’re a celebration of spring’s playful spirit, a nod to cherished traditions, and a chance to gather loved ones around a table filled with warmth, sweetness, and creative fun. Whether you’re an eager beginner or a seasoned home baker, shaping these whimsical buns delivers a sense of accomplishment that will light up your holiday meal or weekend brunch like confetti.
Feel free to print this article and keep it in your recipe binder for easy reference—those charming bunnies deserve a spot in your springtime lineup year after year. And if you scroll down, you’ll find an FAQ section that answers common questions about timing, substitutions, and troubleshooting your dough. As always, I’d love to hear how your baking adventure turned out: leave a comment, share your favorite decorating twist, or ask any questions if you hit a snag. Happy baking, and here’s to many delightful Easter mornings with the fluffiest, friendliest buns you’ve ever made!
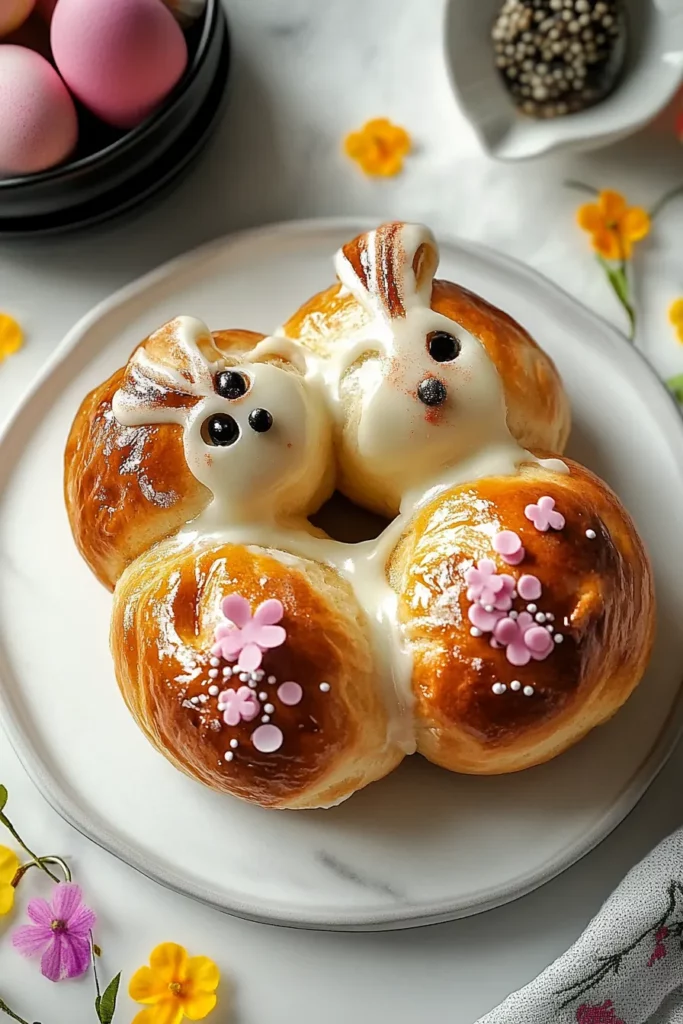

Easter Bunny Buns
Description
These soft, golden-baked buns shaped like playful bunnies offer a tender crumb scented with vanilla and a hint of sweetness. Decorated with chocolate chip eyes and fruit noses, they make every Easter table extra festive.
Ingredients
Instructions
-
In a small bowl, combine the warm milk, sugar, and yeast. Stir and let sit for 5-10 minutes until it becomes foamy.
-
In a large mixing bowl, whisk together the flour and salt. Add the melted butter, eggs, and vanilla extract.
-
Pour the yeast mixture into the flour mixture and stir until a dough starts to form.
-
Knead the dough for about 8-10 minutes, until smooth and elastic. If the dough is too sticky, add a little more flour, a tablespoon at a time.
-
Place the dough in a lightly greased bowl, cover it with a damp cloth, and let it rise for 1-1.5 hours, or until doubled in size.
-
Preheat the oven to 350°F (175°C). Line a baking sheet with parchment paper.
-
Punch down the risen dough and divide it into 12 equal portions.
-
Roll each portion into a ball and then shape each into a bunny by flattening the body and forming two long, pointy ears with the dough. Create the bunny faces by pinching small bits of dough and shaping them into faces.
-
Place the bunny shapes onto the prepared baking sheet, leaving space between them. Use the chocolate chips to make eyes and raisins or dried cranberries for noses.
-
Beat the remaining egg and brush it over the tops of the bunnies for a golden, shiny finish.
-
If desired, sprinkle with colored sugar or sprinkles for a festive touch.
-
Bake the buns in the preheated oven for 15-20 minutes or until golden brown.
-
Remove from the oven and let cool slightly before serving.
Note
- These buns are best served warm.
- The dough can be made the day before; just let it rise in the refrigerator overnight.
- You can swap the chocolate chips and raisins with other small candy pieces or dried fruits for variety.
- These buns can be shaped into other festive shapes for different holidays.

