

Get ready to crunch into fiery, flavor-packed Crispy Chilli Chicken that’ll tantalize your taste buds! This dish is a celebration of textures: succulent chicken pieces coated in a delicate, golden-brown crust, then tossed in a tangy-spicy sauce loaded with garlic, ginger, vibrant peppers, and slit green chilies for that extra kick. As someone who adores experimenting in the kitchen, I can’t help but get excited every time I hear that signature sizzle as the chicken hits the hot oil. There’s something almost therapeutic about watching the tiny bubbles dance around each piece, promising that perfect crunch with every bite. And once you toss these crispy nuggets through the glossy sauce, you’ll be hooked by the complex interplay of heat, sweetness, and umami.
Whether you’re hosting a weeknight get-together or simply craving a cozy, flavor-filled dinner at home, this Crispy Chilli Chicken is your go-to. It’s the ideal appetizer, lunch, or dinner option when you want something that feels special but doesn’t require hours in the kitchen. The preparation time is just 20 minutes, cooking time around 25 minutes, and a rest time of 20 minutes for marinading. With a difficulty level of intermediate and about 550 calories per serving, it strikes a perfect balance between fun cooking and rewarding flavor. This recipe will have you ladling up spoonfuls of that irresistible sauce and greedily wiping your plate clean. Trust me, once you experience that first mouthwatering crunch followed by the warmth of chilli and garlic, you’ll be dreaming of making it again tomorrow.
KEY INGREDIENTS IN CRISPY CHILLI CHICKEN
Before you start chopping and frying, let’s talk about the building blocks of this mouthwatering dish. Each ingredient plays a crucial role, whether it’s creating a crispy coating, layering in spice, or bringing that glossy finish that makes you want to dive in right away.
- Boneless chicken
Provides juicy, tender bites that absorb flavors beautifully. Cutting into bite-sized pieces ensures an even fry and satisfies that craving for perfectly crispy chicken in every mouthful.
- Cornflour
Delivers that extra-crunch magic. Cornflour helps form a light, crisp exterior that stays crunchy even after being coated in sauce.
- All-purpose flour
Works in tandem with cornflour to create a sturdy batter. It gives structure to the coating and helps achieve a golden-brown finish.
- Egg
Acts as a binding agent for the flours and seasonings. The egg helps the dry ingredients cling to the chicken, ensuring an even, crisp envelope.
- Ginger-garlic paste
Infuses the marinade with aromatic warmth. It’s the backbone of Indo-Chinese cooking, lending deep, savory notes to each piece.
- Black pepper powder
Adds a subtle heat that complements the green chilies. Its sharp, earthy flavor balances the sweetness of ketchup and sugar later on.
- Salt
Enhances every flavor in the dish. Proper seasoning in the marinade is essential for juicy, well-flavored chicken.
- Soy sauce
Brings umami richness and a hint of saltiness. Used both in the marinade and sauce, it ties all the savory elements together.
- White vinegar
Provides bright acidity that cuts through the richness. It’s used sparingly to give a tangy lift without overpowering the sauce.
- Baking powder
Helps the coating puff up slightly during frying, creating a light, airy crust around each chicken piece.
- Oil
The medium for deep-frying. Make sure it’s hot enough to crisp the coating without becoming greasy.
- Onion
Thinly sliced for sweetness and crunch. Onion adds texture contrast and soaks up the flavors of the sauce.
- Green bell pepper
Brings a mild, fresh crunch. Its vibrant color and vegetal taste balance the heat.
- Green chilies
Slit lengthwise for bursts of fiery heat. Adjust the number to suit your spice tolerance.
- Garlic cloves
Finely chopped to release sharp, pungent flavor. Garlic sautéed briefly lends aromatic depth to the sauce.
- Ginger
Finely chopped for zesty warmth. It pairs with garlic to create the characteristic Indo-Chinese flavor profile.
- Red chili sauce
Infuses the sauce with tangy spice and vivid red color. It’s a quick way to boost heat and sweetness.
- Tomato ketchup
Offers a familiar sweetness and tang. Ketchup helps thicken the sauce and mellow out the sharpness of other sauces.
- Sugar
Balances the heat and acidity. A small amount ensures the sauce is complex without being overwhelmingly spicy.
- Vinegar
Adds a second touch of acidity for brightness. It helps cut through the richness and keeps the flavors lively.
- Sesame oil (optional)
Provides a nutty finish when drizzled on at the end. A little goes a long way in boosting aroma.
- Fresh coriander leaves
Adds a fresh, herbal garnish. Coriander brightens each bite and makes the dish look extra inviting.
HOW TO MAKE CRISPY CHILLI CHICKEN
Let’s dive into the step-by-step magic that transforms simple ingredients into your next favorite Indo-Chinese snack. Follow these detailed instructions to ensure every piece of chicken is perfectly seasoned, crispy, and coated in a glossy, flavorful sauce.
1. In a bowl, combine the boneless chicken pieces with soy sauce, white vinegar, black pepper powder, ginger-garlic paste, salt, and egg. Use a gentle fold to mix everything until the chicken is evenly coated. Cover and let it marinate for 15-20 minutes to allow those flavors to penetrate the meat.
2. After marinating, sprinkle cornflour, all-purpose flour, and baking powder over the chicken. Use your hands or a spatula to toss the pieces until each one is thoroughly coated in a light, powdery layer that will crisp up beautifully when fried.
3. Heat enough oil for deep-frying in a wok or deep frying pan over medium heat. Test the temperature by dropping a small pinch of flour—if it sizzles and rises immediately, the oil is ready. Carefully drop the coated chicken pieces in batches, ensuring not to overcrowd the pan. Fry until they turn a gorgeous golden brown and feel crispy to the touch, about 5-6 minutes per batch. Remove with a slotted spoon and drain on paper towels.
4. In a separate pan, heat a tablespoon of oil over medium heat. Add the chopped garlic, ginger, and slit green chilies. Sauté for about a minute, stirring constantly until they release their fragrant aromas without burning.
5. Add the thinly sliced onions and bell peppers to the pan. Toss them for 2-3 minutes, stirring frequently until they begin to soften but still hold a pleasant crunch.
6. Pour in soy sauce, red chili sauce, tomato ketchup, sugar, and vinegar. Stir to combine and let the sauce simmer for 2-3 minutes, allowing the flavors to meld and thicken slightly.
7. Add the crispy fried chicken pieces to the pan. Toss gently to coat each piece in the sauce. Then pour in the cornflour slurry. Stir continuously until the sauce thickens further and forms a glossy coating around every chicken bite.
8. If you like a hint of nuttiness, drizzle sesame oil over the chicken and toss once more. Finally, garnish with fresh coriander leaves for that bright, herbal finish.
SERVING SUGGESTIONS FOR CRISPY CHILLI CHICKEN
Now that your Crispy Chilli Chicken is dressed to impress, it’s time to think about presentation and pairings that will elevate your meal. Whether you’re serving this at a casual family dinner or a festive gathering, these suggestions will help you create a spread that’s as appetizing to the eye as it is to the taste buds.
- Serve with steamed jasmine rice or fragrant garlic fried rice for a balanced plate. The mild rice soaks up the spicy sauce, making every bite a harmonious blend of textures.
- Pair with vegetable noodles or chow mein. Slide the saucy chicken over a nest of springy noodles and garnish with spring onions for a one-bowl miracle meal.
- Offer as a crunchy party appetizer on a platter lined with cabbage leaf “boats.” Add small ramekins of extra chili sauce and soy dip for guests to customize their spice level.
- Create a fusion taco bar by placing the chicken in soft corn tortillas, topping with pickled onions, shredded cabbage, fresh cilantro, and a squeeze of lime for a playful East-meets-West twist.
HOW TO STORE CRISPY CHILLI CHICKEN
Leftovers of this addictive dish can be a real treat—but only if stored correctly. Keeping the chicken crispy and the sauce full of flavor requires just a few smart steps so you can enjoy it again tomorrow or even later in the week.
- Refrigerator storage: Place cooled chicken and sauce in an airtight container. Store in the fridge for up to 3 days. When ready to enjoy, reheat in a preheated oven at 180°C for 5-7 minutes to refresh the crispiness.
- Freezer storage: Freeze the chicken pieces (without sauce) on a baking sheet until solid, then transfer to a freezer-safe bag. They’ll keep well for up to one month. Defrost overnight in the fridge before reheating and tossing in freshly made sauce.
- Separate sauce storage: If you want maximum crunch, store the sauce separately in a mason jar or airtight container. Combine and reheat gently in a pan just before serving.
- Reheating tips: Avoid the microwave if you can. Instead, use an oven or a lightly oiled skillet on medium heat to crisp every piece back to life. Add a splash of water to the sauce if it thickened too much.
CONCLUSION
Congratulations! You’ve just mastered a show-stopping Crispy Chilli Chicken that balances fiery heat, tangy sweetness, and crave-worthy crunch. From marinating the tender chicken and crafting the perfect batter to frying each piece to a golden crisp and coating it in that glossy Indo-Chinese sauce, you’ve covered every step with care and flair. This recipe is more than just a meal—it’s an experience that brings together the best of textures and bold flavors in a dish that’s bound to impress friends, family, and anyone lucky enough to share your table.
Feel free to print this article and save it for later so you can recreate these succulent, spicy bites whenever the craving strikes. Don’t forget—you can also find a FAQ below to troubleshoot any questions or to get extra tips on perfecting your Crispy Chilli Chicken. If you give this recipe a try, I’d love to hear how it turns out! Share your comments, questions, or feedback about what worked for you, any customizations you made, or if you need help with any part of the process. Happy cooking, and here’s to many more crunchy, saucy adventures in your kitchen!
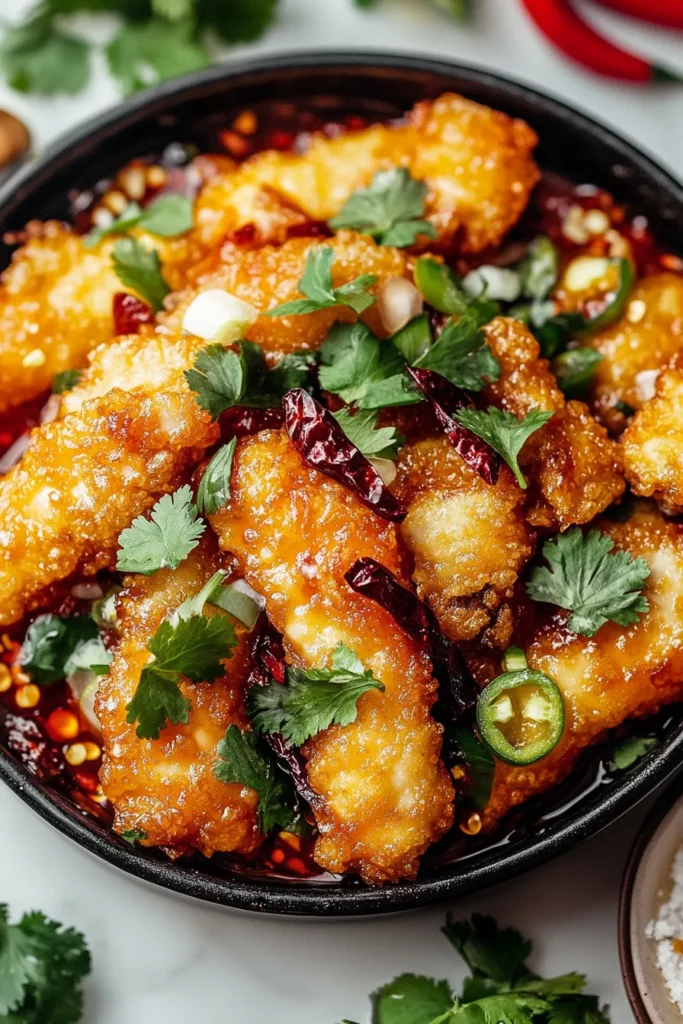

Crispy Chilli Chicken
Description
Experience succulent chicken bites coated in a spicy, tangy sauce, loaded with garlic, ginger and vibrant peppers for a mouthwatering crunch in every bite.
Ingredients
Instructions
-
In a bowl, combine the boneless chicken pieces with 1 tablespoon soy sauce, 1/4 teaspoon white vinegar, 1/2 teaspoon black pepper powder, ginger-garlic paste, salt, and egg. Mix well and let it marinate for 15-20 minutes.
-
Add the cornflour, all-purpose flour, and baking powder to the marinated chicken mixture. Coat the chicken pieces evenly.
-
Heat oil in a deep frying pan or wok over medium heat. Once the oil is hot, carefully drop the coated chicken pieces into the oil. Fry the chicken in batches until golden brown and crispy, about 5-6 minutes. Remove and drain on paper towels.
-
In a separate pan, heat a tablespoon of oil over medium heat. Add the chopped garlic, ginger, and slit green chilies. Sauté for a minute or until aromatic.
-
Add the sliced onions and bell peppers to the pan, sautéing them for 2-3 minutes until they start to soften but still retain some crunch.
-
Stir in the soy sauce, red chili sauce, tomato ketchup, sugar, and vinegar. Let the sauce simmer for 2-3 minutes to combine the flavors.
-
Add the crispy fried chicken pieces to the pan, tossing them well in the sauce. Pour in the cornflour slurry and stir continuously until the sauce thickens and coats the chicken evenly.
-
Drizzle with sesame oil if using and toss again for a glossy finish. Garnish with fresh coriander leaves.
Note
- For an extra crispy texture, double coat the chicken pieces with cornflour and flour.
- Adjust the heat level by adding more or fewer green chilies.
- This dish pairs wonderfully with fried rice or noodles.
- You can use boneless chicken thighs for a juicier texture.
- If you prefer less oil, you can bake the chicken pieces at 180°C for 15-20 minutes instead of frying.

