

Life on the dinner table just got a serious upgrade with the Crispy Bacon Ranch Chicken Melt, and I can’t wait to share every juicy detail with you. This ultimate sandwich brings together the crunch of a Panko crusted chicken breast, smoky ribbons of crispy bacon, creamy ranch dressing, and a blanket of melty cheddar cheese that’s pure comfort food magic. Every bite is like a crunchy, savory hug that satisfies all your comfort food cravings in one glorious package. Whether you’re looking to impress friends at a casual get-together or simply treat yourself to a next-level lunch, this melt has you covered. I’ve tested this recipe on my family (and let’s be real, on myself late at night), and it’s never lasted more than minutes before someone asking for seconds.
What makes this Crispy Bacon Ranch Chicken Melt truly special is how all the flavors and textures play off each other. You get the golden-brown crunch on the outside, the tender chicken inside, the rich smokiness of bacon, the tang of ranch, and the gooey pull of cheddar cheese all in one bite. It’s an intermediate-level recipe with a little hands-on work—seasoning, pan-searing, dredging in breadcrumbs, baking, and assembling—but trust me, the effort is 100% worth the end result. With 20 minutes of prep, 50 minutes of cooking, and a 10-minute rest, you’re looking at roughly 80 minutes from start to finish. Perfect for lunch, dinner, or any time you need a flavor explosion that clocks in at about 1100 calories of sheer deliciousness. Ready to dig in? Let’s roll!
KEY INGREDIENTS IN CRISPY BACON RANCH CHICKEN MELT
Before we dive into the step-by-step, let’s talk about the stars of the show. Each ingredient in this sandwich plays a specific role to bring out those unforgettable flavors and textures. From the juicy chicken breast that forms the base to the fresh parsley that adds a pop of color, here’s why every item on your shopping list matters.
- Boneless, skinless chicken breasts
These provide a lean, juicy protein foundation. When seasoned and seared properly, they stay tender inside while giving you that satisfying outer crunch once coated and baked.
- Bacon
Adds smokiness and crisp texture. Once cooked to perfection, it delivers that irresistible salty bite that pairs beautifully with ranch dressing and cheese.
- Ranch dressing
A creamy, tangy layer that acts as both a flavor booster and an adhesive for the Panko coating. It ensures every crumb sticks and every bite bursts with that classic ranch zip.
- Shredded cheddar cheese
Melts into ooey-gooey goodness, enveloping the chicken and bacon in a blanket of savory, rich flavor. Sharp or mild cheddar both work, so pick according to your taste preference.
- Panko breadcrumbs
Create the ultra-crisp crust that sets this melt apart from your average sandwich. Their light, airy texture gives each bite a satisfying crunch.
- Olive oil
Used for searing the chicken—helps to lock in moisture, prevents sticking, and contributes subtle fruity notes.
- Garlic powder
Delivers savory depth and aromatic warmth. It’s a quick way to layer flavor without mincing fresh garlic.
- Onion powder
Offers sweet, pungent undertones that complement the garlic and ranch, rounding out the seasoning profile.
- Smoked paprika
Infuses a gentle smokiness and vibrant color for extra visual appeal and flavor dimension.
- Salt and pepper
Essential for enhancing all the other flavors. A balanced seasoning ensures nothing tastes flat.
- Sandwich buns or rolls
Provide the vessel for your melt. Choose soft rolls that can handle the weight of the chicken and toppings without falling apart.
- Lettuce leaves
Add freshness and a cool, crisp contrast to the warm, cheesy chicken.
- Tomato slices
Bring juicy brightness and acidity, cutting through the richness of the melt.
- Fresh chopped parsley
An optional garnish that offers a fresh, herbaceous note and a splash of color.
HOW TO MAKE CRISPY BACON RANCH CHICKEN MELT
Let’s roll up our sleeves and walk through how to turn these ingredients into the most epic melt you’ve ever had. Follow each step carefully—this process involves searing, baking, layering, and ultimate assembly to guarantee that perfect contrast of textures and flavors.
1. Preheat your oven to 400°F (200°C) so it’s ready to crisp up the chicken and melt that cheese to golden perfection.
2. Season each chicken breast generously with garlic powder, onion powder, smoked paprika, salt, and pepper, ensuring an even coating for maximum flavor.
3. Heat olive oil in a skillet over medium heat. When the oil shimmers, sear the chicken breasts for about 5–6 minutes per side until they form a golden-brown crust. They’ll finish cooking in the oven, so don’t worry if they aren’t cooked through completely. Transfer them to a plate and set aside.
4. In the same skillet, cook bacon until it’s crispy, turning occasionally. Once done, transfer the bacon to paper towels to drain excess fat.
5. Allow the chicken to cool just enough to handle, then spread a generous layer of ranch dressing over the top side of each breast, creating the perfect glue for the breadcrumbs.
6. In a shallow dish, mix Panko breadcrumbs with a pinch of salt and pepper to season. This ensures every breadcrumb contributes to flavor, not just crunch.
7. Press the ranch-covered side of each chicken breast into the Panko mixture, firmly coating the surface.
8. Place the coated chicken breasts on a baking sheet lined with parchment or a light coating of oil. Bake in the preheated oven for 15 minutes to cook through and set the crust.
9. After 15 minutes, top each chicken breast with two slices of crispy bacon and a generous handful of shredded cheddar cheese, ensuring every corner is covered.
10. Return the baking sheet to the oven and bake for an additional 5–7 minutes, until the cheese is melted and slightly golden at the edges.
11. While the chicken melts, lightly toast your sandwich buns or rolls either in a toaster or briefly in the oven on a separate rack.
12. On the bottom half of each bun, layer a lettuce leaf and a slice of tomato to add freshness and a juicy counterpoint.
13. Once the chicken is done, carefully place each piece on top of the prepared buns.
14. If you’re craving more creaminess, drizzle on extra ranch dressing at this stage.
15. Finish with a sprinkle of fresh chopped parsley before topping with the bun lid. Serve immediately, savoring the crispy, cheesy goodness!
SERVING SUGGESTIONS FOR CRISPY BACON RANCH CHICKEN MELT
When you’re ready to elevate your Crispy Bacon Ranch Chicken Melt experience, presentation and side pairings can truly make it shine. Whether you’re serving it for a family meal, casual lunch, or backyard gathering, these suggestions will make your sandwich the star attraction. From complementary textures to flavor enhancers, each idea is designed to highlight the melt’s crunchy, savory profile and ensure every plate looks as irresistible as it tastes.
- Create a picnic platter
Arrange the melts on a wooden board with small bowls of extra ranch, sliced pickles, and colorful vegetable sticks. The communal feel makes it perfect for sharing and lets guests customize each bite.
- Serve with crispy kettle chips
The light saltiness and extra crunch of good-quality kettle chips echo the chicken’s coating. Place them in a paper-lined basket alongside your melt for a casual, diner-style vibe.
- Plate with a fresh garden salad
A simple mix of arugula, cherry tomatoes, cucumber ribbons, and a light vinaigrette provides a peppery, tangy counterpoint to rich cheese and bacon. It balances the heaviness while adding vibrant greens.
- Offer a DIY nacho bar
Break the chicken in chunks, let everyone top tortilla chips with melted cheese, chicken bits, bacon pieces, ranch, and jalapeños. It transforms the melt into a fun, interactive snack perfect for game day or movie night.
HOW TO STORE CRISPY BACON RANCH CHICKEN MELT
Life happens, and sometimes you have leftovers of this glorious melt. Storing it properly ensures that crunchy coating, tender chicken, and melty cheese maintain their textures and flavors for later enjoyment. Whether you’re meal-prepping for the week or just want to savor every last bit, follow these guidelines to keep your sandwich at its best.
- Refrigerate in airtight containers
Separate the chicken breasts, buns, and any cold toppings (lettuce, tomato) into different containers. This prevents sogginess. Store the bread at room temperature if you plan to eat the next day.
- Use parchment paper layering
If stacking multiple pieces of leftover chicken, place a sheet of parchment paper between each. This keeps the Panko crust from sticking and maintains crispness.
- Reheat with care
Preheat your oven or toaster oven to 350°F (175°C). Warm the chicken and buns separately on a baking sheet for about 10 minutes until the crust is re-crisped and the cheese is bubbly again. Avoid the microwave—it’ll make the crust lose its crunch.
- Freeze for longer storage
Wrap individual chicken breasts tightly in plastic wrap and then foil. Freeze for up to one month. Thaw overnight in the fridge before reheating using the oven method above. Add fresh toppings after reheating for best results.
CONCLUSION
Wow, what a flavorful journey we’ve taken with the Crispy Bacon Ranch Chicken Melt! We’ve explored how juicy chicken breasts are seasoned and pan-seared to a golden brown, then dressed up with tangy ranch, crunchy Panko, smoky bacon, and a mountain of melting cheddar. We covered every ingredient’s role and broke down each step from preheating the oven to that final sprinkle of fresh parsley. Whether you’re hosting friends or simply indulging in a weekend kitchen adventure, this recipe brings together texture, flavor, and visual appeal in one unforgettable sandwich. Don’t forget that this intermediate-level recipe takes about 20 minutes to prep, 50 minutes to cook, plus a quick 10-minute rest, making it a satisfying project without keeping you away from the table all day.
Feel free to print this article and save it for later use, or bookmark it if you prefer digital. I promise you’ll come back to it whenever you need a comforting, crowd-pleasing meal with maximum crunch and cheese pull. Below you’ll also find a handy FAQ section to address any questions or troubleshooting tips. If you give this Crispy Bacon Ranch Chicken Melt a try—or even if you tweak it with jalapeños, turkey bacon, or whole wheat buns—drop a comment and let me know how it went! Your feedback, questions, or cooking stories are always welcome. Happy cooking!
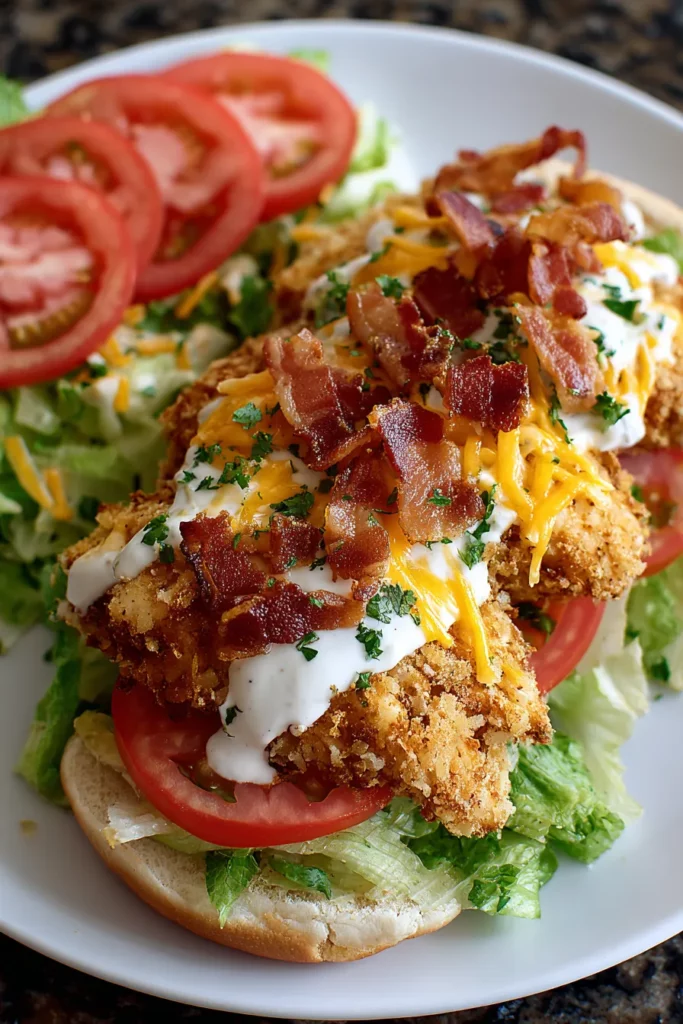

Crispy Bacon Ranch Chicken Melt
Description
Experience a flavor explosion! Golden, Panko-crusted chicken meets crispy bacon, zesty ranch, and a blanket of melted cheddar. This melt is pure comfort food magic.
Ingredients
Instructions
-
Preheat your oven to 400°F (200°C).
-
Season the chicken breasts with garlic powder, onion powder, smoked paprika, salt, and pepper.
-
Heat olive oil in a skillet over medium heat. Cook the chicken breasts until golden brown on both sides, about 5-6 minutes per side. They do not need to be fully cooked as they will finish baking in the oven. Set aside.
-
In the same skillet, cook bacon until crispy. Remove and drain on paper towels.
-
Once the chicken has cooled slightly, spread a generous layer of ranch dressing over each breast.
-
In a shallow dish, combine Panko breadcrumbs with a pinch of salt and pepper.
-
Press the ranch-covered side of each chicken breast into the Panko mixture to coat.
-
Place chicken breasts on a baking sheet. Bake in the preheated oven for 15 minutes.
-
After 15 minutes, top each chicken breast with two slices of crispy bacon and a generous amount of shredded cheese.
-
Return to the oven and bake for an additional 5-7 minutes until the cheese is melted and slightly golden.
-
While the chicken is baking, lightly toast the sandwich buns or rolls.
-
Assemble each sandwich by layering a lettuce leaf and a slice of tomato on the bottom half of each bun.
-
Once the chicken is done, place each piece on top of the prepared buns. Add additional ranch dressing if desired.
-
Sprinkle with fresh chopped parsley before placing the top bun on.
-
Serve immediately, enjoying the crispy, cheesy goodness.
Note
- For an extra kick, add sliced jalapenos or a dash of hot sauce to your sandwich.
- You can use turkey bacon for a lighter version of this dish.
- Substitute whole wheat buns for a healthier option.

