

There's something poetic about slipping on an apron on a crisp morning and filling your kitchen with the promise of something warm, fluffy, and utterly sweet. These Classic Baked Vanilla Donuts deliver exactly that: irresistibly fluffy and sweet little rings that make every moment feel like a cozy celebration. Each morsel boasts a tender crumb kissed by pure vanilla extract, gently puffed by a duo of leavening agents to create that perfect rise. A light golden exterior gives just the right crispness before melting into a soft, delicate chew, and when you dip those tops into a glossy vanilla glaze, watch them transform into edible jewels. Sprinkles are optional, but let’s be real—those vibrant flecks of color add a playful note to every afternoon snack or celebratory brunch spread. Baking instead of frying makes these donuts surprisingly lighter, so you can indulge more without feeling weighed down, letting the vanilla notes dance on your taste buds in the most delightful way. Mornings seem brighter, and casual get-togethers turn into memory-making occasions when you offer a box of these homemade rings. Even a simple cup of coffee becomes an event when paired with one of these delightful donuts—kids will rush to the table, and neighbors will start RSVP-ing before you know it! And here’s the best part: this isn’t an advanced pastry trick. If you can mix a few bowls and bake in a standard oven, you’re in. Ready to fill your home with the sweet comfort of baked vanilla donuts?
As a self-proclaimed breakfast lover and occasional weekend baker, I’ve discovered that nothing beats the thrill of creating homemade treats from scratch—especially when they come together in under half an hour. These donuts are a shining example of a beginner-friendly project: just 15 minutes of prep, 12 minutes in the oven, and a quick five-minute rest, and you’re ready to dive in. No deep-frying or advanced skills required—just simple pantry staples like all-purpose flour, sugar, sour cream, and vanilla extract. The result? A dessert-worthy course that feels indulgent without the fuss: perfect for lazy Sundays, midday pick-me-ups, and casual brunches when you want guests to feel right at home. At around 150 calories per donut, they’re also a sweet compromise when you’re craving something special without going overboard. Whether you enjoy them fresh from the oven or savor one as part of your afternoon coffee break, these Classic Baked Vanilla Donuts prove that homemade can be effortless, delicious, and delightfully shareable. So let’s gather our ingredients and start a new chapter in your easy recipes arsenal—one that promises comfort, sweetness, and a whole lot of smiles.
KEY INGREDIENTS IN CLASSIC BAKED VANILLA DONUTS
Before we dive into this delightful donut-making process, let’s highlight the essential building blocks of flavor and texture in our Classic Baked Vanilla Donuts. Each ingredient plays a specific role, from providing structure to adding just the right amount of sweetness and moisture.
- All-purpose flour: The foundation that provides structure and creates a tender crumb in each donut.
- Granulated sugar: Sweetens the batter and encourages a light browning for a delicate crust.
- Baking powder: A primary leavening agent that helps the donuts rise and become fluffy.
- Baking soda: Works in tandem with baking powder to give a gentle lift and tender texture.
- Salt: Balances sweetness and enhances the flavors, ensuring every bite is well-rounded.
- Milk: Adds moisture, helps bind ingredients together, and contributes to a soft, tender crumb.
- Sour cream: Introduces a subtle tang and extra richness, keeping the donuts moist and flavorful.
- Egg: Binds the batter, adds structure, and contributes to that classic cakey texture.
- Unsalted butter: Melted and folded in for butterfat richness, adding flavor and tender mouthfeel.
- Vanilla extract: The star flavor, infusing a warm, aromatic sweetness into every bite.
- Powdered sugar: The base of the glaze, creating a smooth, sweet coating that clings to the donuts.
- Milk (for glaze): Thins the powdered sugar into a spreadable glaze, allowing for the perfect drizzle.
- Vanilla extract (for glaze): Infuses the glaze with the same rich vanilla notes that shine in the donut itself.
- Sprinkles: An optional finishing touch for color, crunch, and a playful pop.
HOW TO MAKE CLASSIC BAKED VANILLA DONUTS
Now that we’ve assembled our lineup of pantry staples, let’s walk through the step-by-step process of turning these ingredients into tender, golden rings of vanilla goodness. Each stage is simple and designed to keep things beginner-friendly, so you can focus on enjoying the magic of homemade donuts.
1. Preheat your oven to 350°F (175°C) and lightly grease a donut pan. This ensures the donuts release cleanly and develop a delicate golden edge.
2. In a medium bowl, whisk together the flour, sugar, baking powder, baking soda, and salt until the mixture is uniform and free of lumps.
3. In a separate bowl, combine the milk, sour cream, egg, melted butter, and vanilla extract. Stir with a whisk or spatula until smooth and well blended.
4. Gradually pour the wet mixture into the dry ingredients, stirring until just combined. Avoid overmixing—a few small lumps help keep the donuts tender.
5. Transfer the batter to a piping bag or a large zip-top bag with a corner snipped off. Pipe the batter into the donut cavities, filling each about 2/3 full.
6. Bake on the center rack for 10–12 minutes, or until the donuts are lightly golden and a toothpick inserted into the center comes out clean.
7. Remove the pan from the oven and allow the donuts to cool in the pan for about 5 minutes. Then use a butter knife to gently loosen them before transferring to a wire rack to cool completely.
8. For the glaze, whisk the powdered sugar, milk, and vanilla extract in a small bowl until a smooth, pourable consistency forms. Adjust by adding more milk to thin or extra sugar to thicken.
9. Dip the tops of the cooled donuts into the glaze, allowing any excess to drip back into the bowl. Place glazed donuts on the wire rack.
10. Optional: Decorate with sprinkles while the glaze is still wet. Let the glaze set for a few minutes before serving to ensure it adheres perfectly.
SERVING SUGGESTIONS FOR CLASSIC BAKED VANILLA DONUTS
Bringing a batch of these Classic Baked Vanilla Donuts to the table transforms an ordinary gathering into something memorable. The glossy glaze shines under bright morning light, inviting everyone to reach for a golden ring that melts between their fingers. These donuts are versatile enough to star at a brunch buffet, enrich a dessert spread, or brighten an afternoon coffee break at the office. The sweet vanilla flavor pairs beautifully with rich espresso or a frothy latte, while the soft cake-like interior harmonizes with fresh berries, yogurt, or a dollop of whipped cream. Whether you’re serving up a dozen for family breakfast or surprising friends for an impromptu tea party, the elegant simplicity of a homemade donut showcases your baking chops without hours of work. You can customize garnishes—think chopped nuts, citrus zest, or a sprinkle of cinnamon sugar—to fit any theme, mood, or season. Let’s explore a few fun and delicious ways to present your fresh-baked vanilla donuts so each bite feels like a mini celebration.
- Brunch Centerpiece: Arrange donuts on a tiered cake stand alongside fresh fruit, scrambled eggs, and a pitcher of mimosas to create an inviting brunch display that guests can’t resist.
- Coffee Pairing: Serve warm donuts with a bold espresso shot or creamy latte, allowing the deep coffee notes to complement the sweet vanilla and cut through the richness of the glaze.
- Dessert Board: Include these donuts on a dessert charcuterie board with chocolate truffles, berries, and small jars of flavored sauces (caramel, chocolate) for a playful, shareable treat.
- Themed Celebration: Decorate with colored sprinkles or edible glitter to match holidays, birthday parties, or showers, and present them in cute boxes as party favors or table décor.
HOW TO STORE CLASSIC BAKED VANILLA DONUTS
After the excitement of pulling these golden rings from the oven and drizzling them with glaze, you’ll want to preserve that freshly baked goodness for as long as possible. While donuts are at their peak right off the wire rack—warm, tender, and slightly sticky—there are simple steps to maintain their ideal texture and flavor over time. A quick strategy is to let them cool completely before storing, which prevents any residual steam from making the glaze soggy. Choosing the right container and environment can keep these homemade vanilla donuts soft and irresistible, whether you’re enjoying them over the next couple of days or planning to freeze them for future snacking sessions. Let’s walk through four storage methods that will help you extend that delightful bake-shop experience right in your own home.
- Airtight Container at Room Temperature: Place the completely cooled, glazed donuts in a single layer inside a sealed container. Store at room temperature for up to 2 days, keeping them soft and moist. Avoid stacking heavier items to prevent crushing.
- Refrigeration for Longer Freshness: If you prefer your glaze to set firm and want to extend shelf life to 4–5 days, transfer the donuts to the refrigerator. Seal them in an airtight container or zip-top bag to minimize exposure to moisture.
- Freezing for Up to Two Months: To enjoy these treats later, flash-freeze cooled donuts on a baking sheet until firm, then wrap each in plastic wrap and place in a freezer-safe bag. When you’re ready, thaw at room temperature or microwave for a few seconds.
- Reviving Stale Donuts: For donuts that have lost a bit of their freshly baked softness, warm them at 300°F (150°C) for 3–5 minutes in the oven or microwave individually for 10–15 seconds. This refreshes texture and brings back that delightful tender crumb.
CONCLUSION
From mixing pantry staples to piping batter rings into a donut pan, this guide has walked you through every step of creating Classic Baked Vanilla Donuts that are fluffy, sweet, and utterly charming. You’ve learned how to harness simple ingredients—like all-purpose flour, granulated sugar, and vanilla extract—to build a tender dough, and how a quick dip in a glossy powdered sugar glaze can turn each bite into a moment of pure delight. With just 15 minutes of preparation, 12 minutes of bake time, and a 5-minute cooldown, these beginner-friendly homemade donuts deliver bakery-worthy results without deep frying or complicated techniques. Whether you’re treating yourself at breakfast, curating a brunch spread, or packing a picnic basket, you’ll appreciate how these donuts combine ease, flavor, and that irresistible homemade donut charm. Feel free to print this article and save it for future reference, and don’t forget that you can find a FAQ below for extra tips and troubleshooting.
I hope these insights have inspired confidence to tackle your next sweet creation. If you experiment with different glaze flavors—like chocolate or lemon—or swap sour cream for Greek yogurt for a tangier profile, I’d love to hear about your results. Did you try adding a pinch of cinnamon or nutmeg, or surprise neighbors with a dozen fresh donuts? Please share your experiences, questions, or feedback in the comments below. Your stories and tips are what make a recipe truly come to life in kitchens around the world. Happy baking, and here’s to many more batches of warm, tender, and oh-so-sweet vanilla donuts!
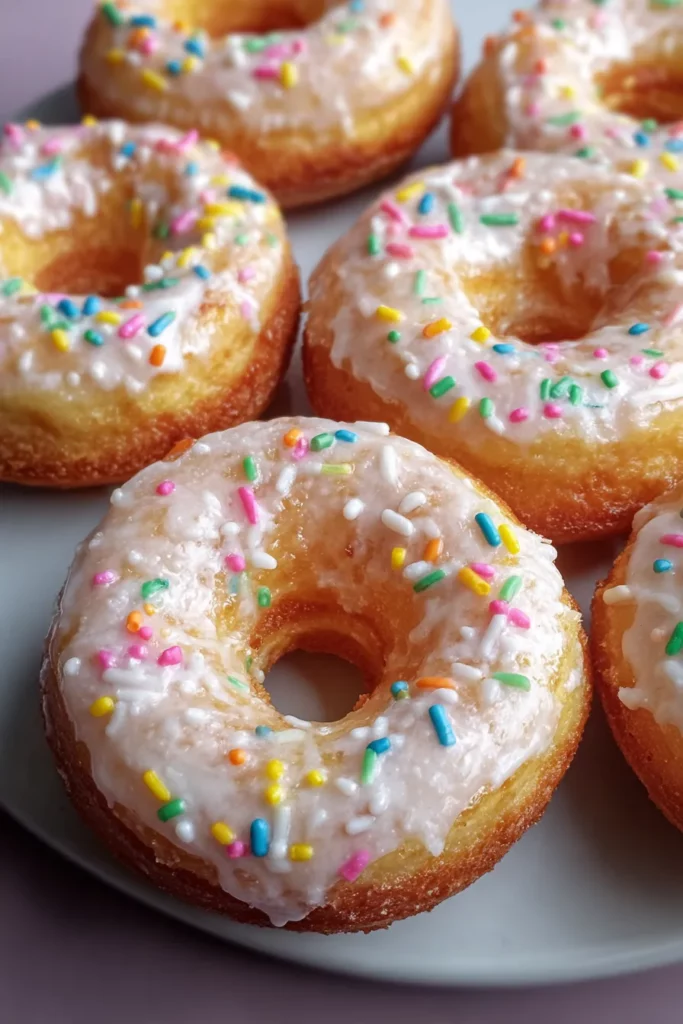

Classic Baked Vanilla Donuts
Description
With a tender crumb and rich vanilla flavor, these baked donuts are easy to make and topped with a glossy glaze. Perfect for brunch or a snack!
Ingredients
Instructions
-
Preheat your oven to 350°F (175°C) and lightly grease a donut pan.
-
In a medium bowl, whisk together the flour, sugar, baking powder, baking soda, and salt.
-
In a separate bowl, combine the milk, sour cream, egg, melted butter, and vanilla extract. Mix until well blended.
-
Gradually add the wet ingredients to the dry ingredients, stirring until just combined. Do not overmix the batter.
-
Spoon the batter into a piping bag (or a large zip-top bag with the corner snipped) and fill the donut pan cavities about 2/3 full.
-
Bake for 10-12 minutes, or until the donuts are lightly golden and a toothpick inserted into the center comes out clean.
-
Allow the donuts to cool in the pan for about 5 minutes before transferring them to a wire rack to cool completely.
-
For the glaze, mix the powdered sugar, milk, and vanilla extract in a bowl until smooth. Adjust the consistency if necessary by adding more milk (thin) or sugar (thicken).
-
Dip the tops of the cooled donuts into the glaze, allowing any excess to drip off. Add sprinkles if desired.
-
Let the glaze set on the donuts for a few minutes before serving.
Note
- For extra flavor, try adding a pinch of cinnamon or nutmeg to the batter.
- These donuts freeze well; store them in an airtight container and freeze for up to 2 months.
- For a twist, experiment with different glaze flavors like chocolate or lemon.
- Substitute the sour cream with Greek yogurt for a slightly tangier taste.
- Ensure not to overbake the donuts to keep them soft and moist.

