

Experience the crackling crust and billowy interior of Ciabatta Bread Airy Crusty Bakery-Style, perfect for toasting or stacking into a hearty sandwich. A gauzy dough transforms into a bronzed, crackling shell with pillowy pockets of tender crumb, all thanks to gentle stretch-and-folds and a searing hot stone bake. Whether you’re a seasoned baker or trying artisan bread for the first time, this approachable recipe brings bakery quality right into your kitchen—let’s get baking!
Key Ingredients
Before you dive into crafting this rustic loaf, let’s review the handful of ingredients that create its airy crumb and crisp crust.
- 500 grams bread flour: High-protein base that develops a sturdy gluten network for chewy, open texture.
- 400 milliliters water, room temperature: Hydration magic that yields those signature bubbles and soft crumb.
- 10 grams fine sea salt: Balances flavor and controls yeast activity for an even rise.
- 5 grams instant dry yeast: Reliable leavening agent that gives your dough lift without fuss.
- 15 milliliters extra virgin olive oil: Adds subtle richness and helps tenderize the crumb.
How To Make Ciabatta Bread Airy Crusty Bakery-Style
Baking Ciabatta Bread Airy Crusty Bakery-Style is all about patience and gentle technique. From mixing to bulk fermentation, you’ll let the dough relax and build strength through periodic stretch-and-folds, then shape and bake on a fiery-hot stone for that sought-after oven spring and crackly crust. Follow these steps for a plush, open crumb that rivals any artisanal bakery.
1. In a large bowl combine flour and water and mix until no dry spots remain. Use your hands or a sturdy spatula to stir in a circular motion, scraping the sides of the bowl and ensuring every bit of flour is hydrated.
2. Cover the dough and let it rest for 30 minutes for autolyse. This pause allows the flour to absorb moisture fully and encourages initial gluten development.
3. Sprinkle the yeast over the dough, add salt and olive oil, and fold until fully integrated. Work gently to incorporate ingredients without deflating the dough’s air pockets.
4. Perform four sets of stretch and folds every 20 minutes during a two hour bulk fermentation. Lift one side of the dough, stretch it upward, then fold back down, rotating the bowl between sets for even strength.
5. Preheat the oven to 230C with a baking stone or steel on the middle rack. Allow at least 30 minutes for the stone to reach full heat for optimal oven spring.
6. Gently transfer the dough onto a well floured surface and divide into two pieces. Use a bench scraper to handle the sticky dough and preserve its airy structure.
7. Perform a light shaping into rectangles, transfer onto parchment on a baking peel. Keep the movements soft to maintain those precious gas bubbles.
8. Proof the loaves for 45 minutes until slightly puffy, then slide onto the stone. Look for a gentle spring-back when poked, indicating the right proof.
9. Bake for 25 to 30 minutes until crust is golden and hollow sounding. Rotate halfway if needed for an even browning.
10. Cool completely on a wire rack before slicing. Patience here sets the crumb and keeps that crust delightfully crisp.
Serving Suggestions
This airy, crusty ciabatta shines when paired with complementary flavors and textures. Its open crumb soaks up spreads, while its crackling shell provides a satisfying contrast. Whether you’re hosting a gathering, packing lunch, or simply craving a warm slice, these serving tips will elevate your loaf into mouthwatering bites that highlight both the tender interior and golden crust.
- Spread with garlic herb butter and broil briefly for a quick, flavorful toast that crisps every nook and cranny.
- Layer fresh mozzarella, tomatoes, and basil for a vibrant Caprese sandwich that celebrates summer produce.
- Serve alongside a steaming bowl of minestrone or tomato soup, letting the bread soak up the rich, savory broth.
- Cut into sticks for dipping in high-quality olive oil and aged balsamic, turning simple flavors into a satisfying appetizer.
Tips For Perfect Ciabatta Bread Airy Crusty Bakery-Style
Mastering artisan ciabatta can feel like a performance, but a few friendly reminders ensure every loaf rises to the occasion. From embracing the high hydration to treating the dough gently, these pointers help you coax out those signature air pockets and achieve a crust that crackles with every bite. With the right tools and a dash of patience, you’ll be slicing through an irresistible loaf that’s as beautiful as it is delicious. Ready for some pro-level tweaks? Let’s dive into the must-know tips!
- Use high hydration for airy crumb. Aim for around 80% hydration so the dough stays loose and full of bubbles.
- Maintain gentle handling to preserve gas pockets. Avoid aggressive kneading or rough shaping to keep the interior light.
- A baking stone helps achieve a crisp crust. Preheat the stone well so the bottom of the loaf sears instantly.
- Allow the bread to cool fully to set the crumb. Resist slicing until it’s completely cool to prevent gummy texture.
How To Store It
When it comes to keeping your ciabatta fresh, gentle storage methods go a long way in preserving both its airy crumb and crisp crust. Proper cooling is key before stashing any slices away, and choosing the right wrap ensures you don’t accidentally steam out that hard-earned crunch. Whether you plan to enjoy it the next day or freeze for future meals, these methods will maintain maximum flavor and texture.
- Room temperature in paper or tea towel: once cool, slide the loaf into a paper bag or wrap loosely in a tea towel for up to two days of crispy crust.
- Avoid airtight plastic: plastic bags trap moisture, softening the crust and dulling the crunch.
- Slice and freeze: cut the cooled loaf into slices, freeze in labeled freezer bags, and toast directly from the freezer when needed.
- Use a wire rack: always cool on a rack to let steam escape before storing, preventing soggy bottoms.
Frequently Asked Questions
Got questions about nailing this ciabatta? You’re not alone—here are answers to the most common queries, straight from the oven and our experience.
- Q: Why is the autolyse step important and how do I know when it’s complete?
The 30-minute autolyse allows the flour to fully hydrate and gluten strands to begin forming, which improves dough extensibility and final crumb structure. You’ll know it’s complete when the dough surface looks smoother, holds together in a cohesive mass, and no dry flour patches remain.
- Q: What is the purpose of the stretch and folds and how do I perform them correctly?
Stretch and folds strengthen the dough’s gluten network without intensive kneading, preserving gas pockets. Every 20 minutes over the two-hour bulk fermentation, reach under one side of the dough, gently pull it up until it stretches, then fold it back over the top. Rotate the bowl and repeat three more times, ensuring even tension.
- Q: How do I handle the high-hydration dough so it isn’t too sticky and I don’t degas it?
Keep your hands and work surface lightly floured or wet. Use a gentle touch: scoop under the dough and lift rather than pressing down. When transferring or dividing, use a bench scraper to support the dough, minimizing direct handling to preserve the airy structure.
- Q: How should I shape the loaves into rectangles without deflating them?
Lightly flour your bench and gently turn the dough out. Fold one long edge toward the center, then the opposite edge over it, creating a seam. Rotate 90° and repeat if needed for rectangle definition. Handle by sliding a floured peel or parchment underneath rather than picking up the dough.
- Q: How do I know when the loaves are properly proofed before baking?
After shaping, proof for 45 minutes. The loaves should appear slightly puffy but still hold a bit of tension. A gentle poke should leave a slow spring-back indentation. If it springs back quickly, it needs more time; if it collapses, it’s overproofed.
- Q: What’s the best way to achieve a crisp, golden crust?
Preheat your oven to 230 °C with a baking stone or steel on the middle rack to ensure a hot surface. Bake on parchment for 25–30 minutes until the crust turns deep golden and sounds hollow when tapped. The residual heat of the stone and the initial high temperature create rapid oven spring and crust development.
- Q: How should I cool and store the ciabatta to maintain its airy crumb and crust?
Transfer loaves to a wire rack immediately after baking to cool completely; this prevents moisture buildup. Once cool, store in a paper bag or loosely wrapped in a tea towel at room temperature for up to two days. Avoid airtight plastic, which will soften the crust.
What Makes This Special
From its dance of gentle stretch-and-folds to the sizzling stone bake that rewards you with a crackling shell and billowy maze of holes inside, Ciabatta Bread Airy Crusty Bakery-Style is the ultimate ode to artisan simplicity. This recipe works because it embraces the power of high hydration, smart fermentation, and patience, turning basic pantry staples into a loaf you’ll want to show off. Print this guide, stash it in your kitchen library, then come back and let me know how your crusty masterpiece turned out—questions, comments, or curious tweaks are always welcome here!
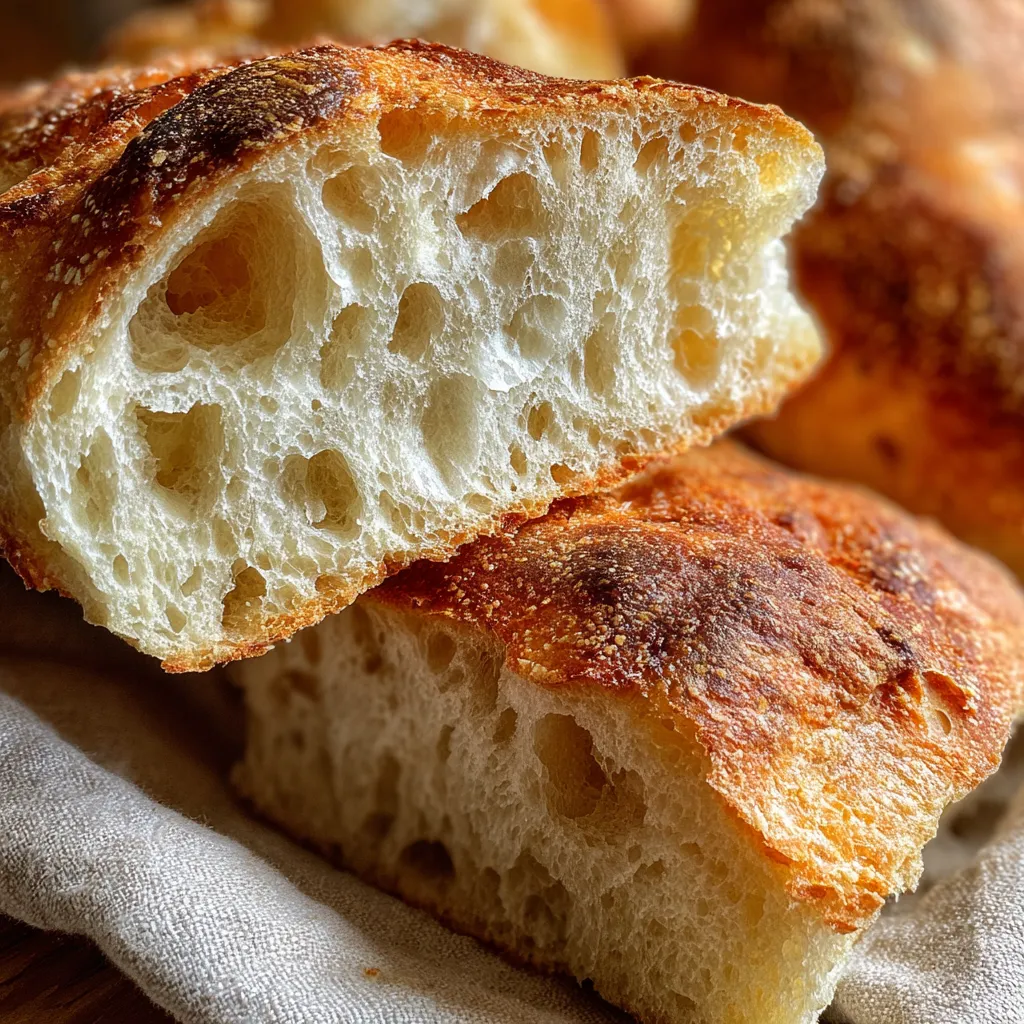

Ciabatta Bread Airy Crusty Bakery-Style
Description
A gauzy dough that transforms into a bronzed, crackling shell with pillowy pockets of tender crumb. Follow gentle stretch-and-folds to coax out lofty air bubbles, then bake on a hot stone for bakery-worthy ciabatta at home.
Ingredients
Instructions
-
In a large bowl combine flour and water and mix until no dry spots remain.
-
Cover the dough and let it rest for 30 minutes for autolyse.
-
Sprinkle the yeast over the dough, add salt and olive oil, and fold until fully integrated.
-
Perform four sets of stretch and folds every 20 minutes during a two hour bulk fermentation.
-
Preheat the oven to 230C with a baking stone or steel on the middle rack.
-
Gently transfer the dough onto a well floured surface and divide into two pieces.
-
Perform a light shaping into rectangles, transfer onto parchment on a baking peel.
-
Proof the loaves for 45 minutes until slightly puffy, then slide onto the stone.
-
Bake for 25 to 30 minutes until crust is golden and hollow sounding.
-
Cool completely on a wire rack before slicing.
Note
- Use high hydration for airy crumb.
- Maintain gentle handling to preserve gas pockets.
- A baking stone helps achieve a crisp crust.
- Allow the bread to cool fully to set the crumb.

