

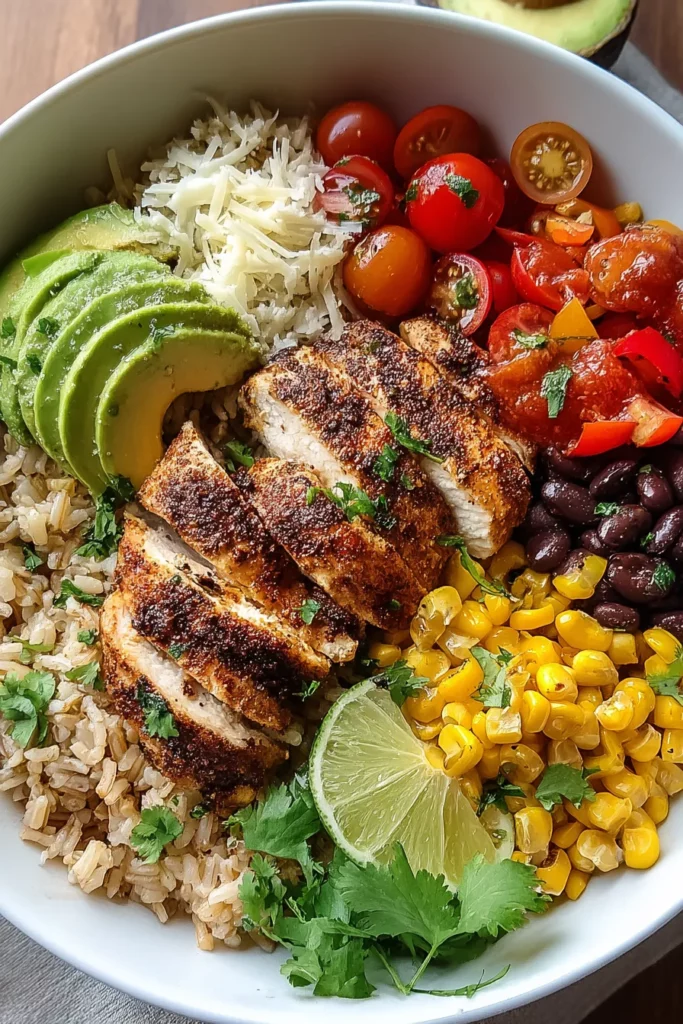
There’s something so satisfying about tucking into a bowl that feels as good as it tastes, and these Chicken Power Bowls are exactly that: a vibrant, protein-packed hug for your taste buds. Tender, seasoned chicken rests on a bed of fluffy brown rice, while juicy black beans and sweet corn kernels add playful pops of texture. Then you’ve got the crunch of fresh red bell pepper, the creaminess of ripe avocado, and the bright burst of cherry tomatoes, all brought together by a squeeze of lime and a sprinkle of cilantro. Whether you’re a seasoned home cook looking to shake up your meal-prep routine or a kitchen newbie craving an easy yet impressive dinner, this dish has got your back. And because it’s labeled “Beginner,” you can feel confident stepping into the kitchen—even if you only know how to boil water.
Beyond the flavor fiesta, these bowls are a nutritional powerhouse. Each serving clocks in around 540 calories of balanced goodness—complex carbs from brown rice, lean protein in the chicken, fiber-packed beans, and healthy fats from avocado and olive oil. Total time on the clock? About 25 minutes of prep, an hour of cooking (mostly hands-off), and a quick 5-minute rest for the chicken. It’s a meal that fits lunch or dinner, shines as a make-ahead option for busy weekdays, and stays fresh in the fridge for up to four days. Plus, customizable swaps—quinoa instead of rice, tofu or shrimp instead of chicken—mean it’ll never get boring. So grab your apron, crank up your favorite playlist, and let’s get into how to build the best Chicken Power Bowls you’ve ever tasted.
KEY INGREDIENTS IN CHICKEN POWER BOWLS
Every element in these power bowls plays a starring role in flavor, texture, and nutrition. From the juicy, seasoned chicken to the zesty lime finish, each ingredient combines to create a balanced meal that’s as colorful as it is delicious.
- Boneless, skinless chicken breasts: The lean protein base that soaks up all the spices and delivers tender, juicy bites.
- Olive oil: A drizzle of heart-healthy fat for searing chicken to a golden-brown perfection.
- Salt: The essential flavor enhancer that brings out the natural taste in every ingredient.
- Black pepper: A touch of heat and depth that complements the mild chicken and rice.
- Garlic powder: Adds a savory, aromatic punch without the fuss of peeling fresh cloves.
- Onion powder: Provides a sweet, savory undertone that dances beautifully with garlic.
- Paprika: Lends a warm, smoky color and subtle flavor pop.
- Brown rice: Whole grain goodness offering nutty flavor, fiber, and a satisfying chew.
- Chicken broth: Infuses the rice with rich, savory notes so every grain is packed with taste.
- Black beans: Creamy, protein-rich legumes that boost fiber and add earthy flavor.
- Corn kernels: Sweet bursts of sunshine that balance the hearty beans and rice.
- Red bell pepper: Crunchy, colorful, and full of vitamin C, it adds freshness and vibrancy.
- Ripe avocado: Silky, buttery slices loaded with healthy fats and a creamy mouthfeel.
- Cherry tomatoes: Juicy, tangy pops that brighten each forkful.
- Fresh cilantro: Herbaceous green flecks that elevate the overall freshness.
- Lime juice: Citrusy zing that ties all the flavors together with a refreshing twist.
- Shredded cheese (optional): Melty richness for an indulgent finish.
- Salsa or hot sauce (optional): Adds a customizable kick of heat and extra flavor layers.
HOW TO MAKE CHICKEN POWER BOWLS
Let’s dive into assembling these bowls step by step. You’ll find that each instruction is straightforward, and pretty soon you'll be plating up a feast that feels like it took way more effort than it actually did.
1. Preheat the oven to 375°F (190°C). This ensures your chicken roasts evenly, sealing in juices for maximum tenderness.
2. Season the chicken breasts by generously rubbing them with salt, black pepper, garlic powder, onion powder, and paprika. This simple spice blend builds the recipe’s foundation of bold flavor.
3. Heat the olive oil in a skillet over medium-high heat until it shimmers. Carefully place your chicken breasts in the hot oil and sear both sides for about 3–4 minutes each, creating a flavorful golden crust. Remove the chicken from heat.
4. Transfer the seared breasts to a baking dish and roast in the preheated oven for 20–25 minutes, or until an instant-read thermometer reads 165°F (74°C). This gentle oven finish cooks the interior without drying it out.
5. Meanwhile, cook the brown rice by bringing the chicken broth to a boil in a medium saucepan. Stir in the rice, reduce heat to low, cover, and simmer for about 40 minutes, or until the liquid is absorbed and the grains are tender.
6. Once the chicken is done, let it rest on a cutting board for at least 5 minutes. Resting locks in juices and makes slicing easier.
7. Prepare the bowls by dividing the cooked rice evenly among four serving bowls. Arrange the sliced chicken on top of the rice.
8. Add the black beans, corn kernels, diced red bell pepper, avocado slices, and halved cherry tomatoes evenly around the chicken for a beautiful rainbow of ingredients.
9. Sprinkle each bowl with chopped cilantro and squeeze fresh lime juice over the top to wake up all the flavors.
10. If you like, top with a little shredded cheese and serve with salsa or hot sauce on the side for those who crave extra heat or tang.
SERVING SUGGESTIONS FOR CHICKEN POWER BOWLS
When it comes to serving, these Chicken Power Bowls practically gift-wrap themselves. Yet, a few thoughtful touches can elevate your meal from tasty to downright memorable. Grab some colorful bowls to showcase all those vibrant ingredients, and consider layering textures—like a crisp green salad on the side or a creamy dollop of your favorite sauce. Whether you’re hosting a casual dinner or packing lunches for the week, these bowls are endlessly adaptable. Mix and match garnishes, switch up the salsas (mango salsa, anyone?), and don’t be afraid to get playful with presentation. After all, we eat with our eyes first! Here are four easy ideas to make your serving game even stronger:
- Serve with a Greek yogurt drizzle: Stir a squeeze of lime and a pinch of cumin into plain Greek yogurt for a tangy, creamy topping that cools the palate.
- Offer alongside a simple green salad: A bed of mixed greens lightly tossed in a lemon vinaigrette adds a refreshing contrast to the hearty bowl.
- Drizzle with homemade lime crema: Blend sour cream, fresh cilantro, garlic powder, and lime juice for a silky sauce that ties all the flavors together.
- Pack into meal-prep containers: Layer rice, chicken, and toppings in airtight containers for quick grab-and-go lunches. Keep avocado slices and dressings separate until ready to eat to preserve freshness.
HOW TO STORE CHICKEN POWER BOWLS
One of the best perks of Chicken Power Bowls is how well they hold up in the fridge and freezer—perfect for meal-prep superheroes or anyone with busy weekdays. Proper storage ensures each component stays fresh, vibrant, and full of flavor when you’re ready to enjoy it later. Sealing ingredients in airtight containers is key to preventing moisture loss and odors from mingling. If you foresee using these bowls throughout the week, consider storing certain elements separately. That way, you can maintain the perfect texture: creamy avocado, crisp bell pepper, and just-right rice. Below are some top tips to keep your power bowls tasting their best:
- Refrigerate in airtight containers: Store fully assembled bowls or individual components in sealed glass or BPA-free plastic containers. Keep them in the coldest part of the fridge and consume within 4 days.
- Prep components separately: Cook rice, roast chicken, and chop veggies, then store each in its own container. This prevents sogginess and lets you mix-and-match throughout the week.
- Freeze portions: Place rice and chicken slices in freezer-safe bags, removing as much air as possible. Freeze for up to 2 months; thaw overnight in the fridge before reheating.
- Revive with a quick reheat: When reheating, add a splash of water or broth to rice and microwave or gently warm on the stovetop. Top with fresh avocado and cilantro after heating for that just-made zest.
CONCLUSION
From the moment you gather your spices and heat the olive oil, these Chicken Power Bowls invite you into a world of bold flavors, bright colors, and simple cooking techniques. They’re proof that “easy dinner” doesn’t have to mean bland or boring. Instead, you get a harmonious blend of savory, smoky, tangy, and fresh—plus the satisfaction of a well-balanced meal that supports your wellness goals. Whether you’re cooking for one, feeding a family, or prepping lunches for the week, this recipe adapts effortlessly. And with a total of about 1 hour and 25 minutes from start to finish (including the chicken’s 5-minute rest), you can plan around your schedule without sacrificing taste.
Feel free to print this article and tuck it into your recipe binder, or save it digitally for quick reference whenever you need a reliable weeknight winner. Below you’ll find a FAQ section to troubleshoot any questions—like how to swap ingredients or adjust cooking times for higher altitudes. And if you try these bowls or have any questions, feedback, or anecdotes to share, please leave a comment! I love hearing about your kitchen triumphs, creative spins, or even the occasional mishap. Cooking is all about learning, experimenting, and enjoying the journey—so let’s keep the conversation going. Your next favorite meal might start with these Chicken Power Bowls, and I can’t wait to hear how they turn out for you!

Chicken Power Bowls
Description
Enjoy tender, seasoned chicken over fluffy brown rice, paired with colorful black beans, corn, bell pepper, and creamy avocado. A zesty lime finish makes every bite pop!
Ingredients
Instructions
-
Preheat the oven to 375°F (190°C).
-
Season the chicken breasts with salt, pepper, garlic powder, onion powder, and paprika.
-
Heat olive oil in a skillet over medium-high heat. Sear the chicken on both sides until golden brown, about 3-4 minutes per side. Remove from heat.
-
Transfer the chicken to a baking dish and roast in the oven for 20-25 minutes, until cooked through.
-
Meanwhile, cook the brown rice by bringing the chicken broth to a boil in a medium saucepan. Add the rice and reduce heat to low. Cover and simmer for about 40 minutes or until rice is tender and liquid is absorbed.
-
Once the chicken is done, let it rest for 5 minutes before slicing it.
-
Prepare the bowls by dividing the cooked rice among four bowls. Top each with slices of the cooked chicken.
-
Add black beans, corn, red bell pepper, avocado slices, and cherry tomatoes evenly to each bowl.
-
Sprinkle with chopped cilantro and squeeze lime juice over the top.
-
If desired, add a sprinkle of shredded cheese and serve with salsa or hot sauce on the side.
Note
- These bowls can be meal-prepped ahead and stored in the fridge for up to 4 days.
- Feel free to customize with your favorite veggies or add quinoa instead of rice.
- Swap out chicken for tofu or shrimp if preferred.
- This dish is high in protein and full of colorful, nutritious ingredients.

