

Golden, buttery spirals of flaky cruffin dough give way to a melt-in-your-mouth center of garlic-spiced mozzarella and parmesan, baked to a perfect golden brown. Topped with a sprinkle of fresh parsley, these savory Cheesy Garlic Cruffins bring a gourmet twist to breakfast or brunch. Whether you’re impressing guests or treating yourself, each bite balances crisp, flaky layers with gooey cheese and subtle garlic notes. Eager to add a show-stopping pastry to your repertoire? Let’s get your apron on and dive into the fun!
Key Ingredients
Before you start rolling and twisting, gather these simple yet flavorful ingredients that make each cruffin irresistible.
- 2 cups all-purpose flour: The sturdy base that creates tender, flaky layers.
- 2 teaspoons instant yeast: The leavening agent that lifts the dough to airy perfection.
- ½ teaspoon salt: Balances sweetness and enhances all the savory flavors.
- ½ cup milk, warmed: Feeds the yeast and adds a rich, creamy texture.
- ¼ cup water, warmed: Helps activate the yeast and bring the dough together.
- ¼ cup unsalted butter, melted: Enriches the dough and contributes to flaky layers.
- 1 tablespoon sugar: Feeds the yeast and adds a hint of sweetness to contrast the garlic.
- 1 large egg: Binds the dough and adds extra richness and color.
- 1 teaspoon garlic powder: Infuses every layer with savory garlic flavor.
- 1 cup grated mozzarella cheese: Provides that melty, stretchy center we all adore.
- ½ cup grated parmesan cheese: Adds salty, nutty depth to the cheese filling.
- 2 tablespoons unsalted butter, softened: Greases the muffin tin for easy release and a buttery finish.
- Fresh parsley, chopped: Brings a bright, herby finish to each golden cruffin.
How To Make Cheesy Garlic Cruffin
These step-by-step instructions will guide you through transforming simple pantry staples into golden, cheese-stuffed spirals. From mixing and kneading the dough to shaping and baking, you’ll learn how to achieve perfect layers, a tender crumb, and a gooey, flavorful center.
1. In a large mixing bowl, combine the all-purpose flour, instant yeast, and salt. Stir thoroughly to ensure the yeast and salt are evenly distributed throughout the flour.
2. In a separate bowl, whisk together the warmed milk, warmed water, melted butter, sugar, and the egg until the mixture is smooth and cohesive.
3. Create a well in the center of the dry ingredients and pour in the wet mixture. Stir until a soft dough begins to form, scraping down the sides as needed.
4. Transfer the dough onto a lightly floured surface and knead for 5–7 minutes, or until it becomes smooth and elastic. Add extra flour sparingly if the dough sticks.
5. Place the kneaded dough in a lightly greased bowl. Cover with a damp cloth or plastic wrap and let it rise in a warm spot for about 1 hour, or until doubled in size.
6. Preheat your oven to 375°F (190°C) and grease a standard muffin tin with the softened butter to ensure easy release.
7. Once the dough has risen, gently punch it down and roll it out on a floured surface into a rectangle about ¼ inch thick.
8. Brush the entire surface with melted butter, then sprinkle garlic powder evenly over the dough for that garlicky kick.
9. Evenly distribute the mozzarella and parmesan cheese over the buttered surface, covering the dough from edge to edge.
10. Starting from one long side, roll the dough tightly into a log. Use a sharp knife to cut the log into 12 equal pieces.
11. Take each piece and gently twist before placing it vertically in the prepared muffin tin, ensuring the layers and cheese are visible on top.
12. Cover the tin with a damp cloth and let the cruffins rise for another 30 minutes, allowing them to puff up.
13. Bake in the preheated oven for 20–25 minutes, or until the cruffins turn a deep golden brown and feel springy to the touch.
14. Remove from the oven and let cool slightly (about 5 minutes) before carefully lifting them out of the muffin tin.
15. Garnish each cruffin with chopped parsley before serving to add a fresh, colorful touch.
Serving Suggestions
These Cheesy Garlic Cruffins shine on their own, but pairing them thoughtfully can elevate your meal. Whether you’re hosting a brunch or grabbing a quick bite, try these ideas to make every serving special.
- Serve warm straight from the oven so the cheese is gooey and the layers are crisp.
- Offer a dipping sauce such as garlic aioli or spicy marinara for added dimension.
- Build a brunch board with fresh fruit, scrambled eggs, and crisp bacon alongside the cruffins.
- Pack for picnics: wrap cooled cruffins in parchment paper and store in a tote for an easy outdoor treat.
Tips For Perfect Cheesy Garlic Cruffin
Getting these cruffins just right comes down to a few simple tweaks and playful variations. Keep an eye on dough temperature, proofing time, and cheese distribution so every twist bakes up beautifully.
- For an extra kick, try adding crushed red pepper flakes to the cheese filling.
- You can use different types of cheese for varied flavors; cheddar or gouda work well too.
- These cruffins are best enjoyed warm, fresh from the oven, but can be stored in an airtight container for a couple of days.
- Experiment by adding cooked bacon or sautéed vegetables to the cheese filling for different flavor profiles.
How To Store It
To keep your Cheesy Garlic Cruffins tasting fresh, follow these simple storage methods. Proper handling ensures they stay moist inside with a slightly crisp exterior.
- Room temperature: Once cooled, place in an airtight container and store on the counter for up to 2 days.
- Refrigeration: Transfer cooled cruffins to a sealed container or zip-top bag and keep in the fridge for up to 4 days. Let come to room temperature or warm briefly before serving.
- Freezing baked cruffins: Cool completely, wrap each cruffin in plastic wrap, then place in a freezer bag for up to 2 weeks. Reheat in a 325°F (160°C) oven for 10–12 minutes.
- Freezing raw cruffins: After shaping, cover the muffin tin tightly with plastic wrap and freeze. Once solid, transfer to a freezer bag for up to 1 month. Thaw in the fridge overnight, let proof at room temperature for 30–45 minutes, then bake as directed.
Frequently Asked Questions
Here are a few quick answers to common questions about making and storing your Cheesy Garlic Cruffins.
- Q: How long does it take to prepare, proof, and bake the Cheesy Garlic Cruffins?
A: The total process takes about 2½ to 3 hours. You’ll need roughly 15–20 minutes to mix and knead the dough, 1 hour for the first rise, 30 minutes for shaping and the second rise, and 20–25 minutes to bake. Allow an additional 5–10 minutes for cooling before serving.
- Q: Can I use fresh yeast instead of instant yeast, and if so, how do I adjust the recipe?
A: Yes, you can substitute fresh yeast for instant yeast at a ratio of roughly 2.5:1 (fresh to instant). Since the recipe calls for 2 teaspoons of instant yeast (about 7g), use 17–18g of fresh yeast. Crumble the fresh yeast into the warmed milk and water mixture with the sugar, letting it dissolve for 5–10 minutes until it becomes foamy before proceeding with the recipe.
- Q: My dough didn’t rise as expected. What factors might be affecting the proofing, and how can I fix it?
A: Dough rising depends on yeast activity, temperature, and humidity. If your kitchen is cooler than 75°F (24°C), proof in a slightly warmed oven (turned off) with a bowl of hot water to create humidity. Make sure your milk and water are no hotter than 110°F (43°C) when mixing—temperatures above that can kill yeast. Also check that your yeast is fresh (check the expiration date) and that the sugar is present to feed it. If needed, extend the rise time by 15–20 minutes until the dough doubles in size.
- Q: How should I store leftover cruffins, and what’s the best way to reheat them?
A: Store cooled cruffins in an airtight container at room temperature for up to 2 days. To reheat, preheat your oven to 325°F (160°C), place the cruffins on a baking sheet, and warm for 5–7 minutes until heated through. For a quicker option, microwave each cruffin on medium power for 20–30 seconds, though this may soften the crust slightly.
- Q: Can I customize the filling with additional ingredients like bacon or vegetables?
A: Absolutely. Cook and drain any bacon bits or sautéed vegetables (onions, bell peppers, spinach) before adding them to the cheese layer. Keep additions to about ¼ cup per cruffin to prevent sogginess and ensure even baking. Layer the extras between the mozzarella and parmesan so they’re evenly distributed inside each twist.
- Q: What cheese substitutions work well if I don’t have mozzarella or parmesan?
A: You can swap in mild cheddar, gouda, Gruyère, or provolone for mozzarella and use Pecorino Romano in place of parmesan for a sharper flavor. Just maintain approximately 1 cup total of a melty cheese and ½ cup of a finely grated hard cheese to preserve the structure and mouthfeel of the filling.
- Q: Is it possible to freeze raw or baked cruffins for later use?
A: Yes. For raw cruffins, shape them, place them in a greased muffin tin, cover tightly with plastic wrap, and freeze. When frozen solid, transfer to a zip-top bag and freeze up to 1 month. Thaw in the fridge overnight, let them proof at room temperature for 30–45 minutes, then bake as directed. For baked cruffins, cool completely, wrap individually in plastic wrap, and freeze up to 2 weeks. Reheat directly from frozen in a 325°F (160°C) oven for 10–12 minutes.
What Makes This Special
This Cheesy Garlic Cruffin recipe hits all the right notes: flaky, buttery spirals that cradle a gooey garlic-spiced cheese center, with bright parsley adding a fresh finish. The combination of mozzarella and parmesan creates a perfect balance of melt and bite, while the simple dough delivers irresistible layers every time. It’s playful, impressive, and surprisingly easy for an intermediate-level bake. Feel free to print this article and save it for your next brunch adventure—and don’t forget to drop a comment if you try it or have questions!
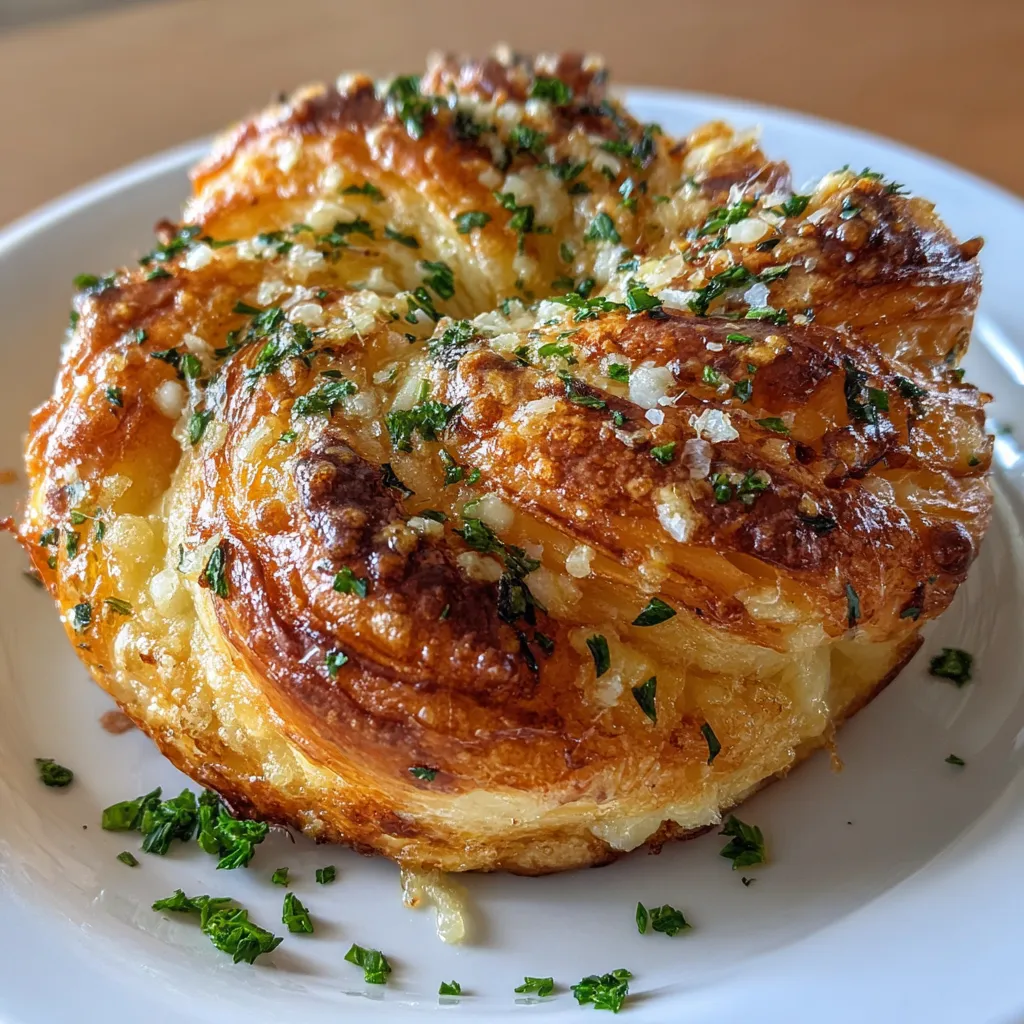

Cheesy Garlic Cruffin
Description
Golden cruffins with crisp, buttery layers give way to a soft, cheesy center, rich with garlic and melted mozzarella Parmesan. Fresh parsley adds a bright finish.
Ingredients
Instructions
-
In a large mixing bowl, combine the all-purpose flour, instant yeast, and salt. Mix well to combine.
-
In a separate bowl, whisk together the warmed milk, warmed water, melted butter, sugar, and the egg until fully combined.
-
Make a well in the center of the dry ingredients and pour the wet mixture into it. Stir until a dough starts to form.
-
Knead the dough on a floured surface for about 5-7 minutes, or until it becomes smooth and elastic. If the dough is sticky, add a little more flour as needed.
-
Place the kneaded dough in a lightly greased bowl. Cover it with a damp cloth or plastic wrap and let it rise in a warm place for about 1 hour, or until it has doubled in size.
-
Preheat your oven to 375°F (190°C) and grease a standard muffin tin with the softened butter.
-
Once the dough has risen, punch it down and roll it out on a floured surface into a rectangle about 1/4 inch thick.
-
Brush the surface of the dough with melted butter and sprinkle the garlic powder evenly over it.
-
Evenly distribute the mozzarella and parmesan cheese on top of the dough.
-
Starting from one long side, roll the dough tightly into a log. Cut the log into 12 equal pieces.
-
Take each piece and twist it gently before placing it vertically in the prepared muffin tin. The cheese should be layered inside with the twisted sides facing up.
-
Cover the muffin tin with a damp cloth and let the cruffins rise for another 30 minutes.
-
Bake in the preheated oven for about 20-25 minutes, or until golden brown and cooked through.
-
Remove from the oven and let cool slightly before removing from the muffin tin.
-
Garnish with chopped parsley before serving.
Note
- For an extra kick, try adding crushed red pepper flakes to the cheese filling.
- You can use different types of cheese for varied flavors; cheddar or gouda work well too.
- These cruffins are best enjoyed warm, fresh from the oven, but can be stored in an airtight container for a couple of days.
- Experiment by adding cooked bacon or sautéed vegetables to the cheese filling for different flavor profiles.

