

Charcuterie Snack Plate is the ultimate crowd-pleaser when you want effortless entertaining without hours in the kitchen. With savory cured meats, creamy brie, sharp cheddar, and mellow gouda, plus briny olives, crunchy nuts and sweet dried fruits, this board comes together in minutes for maximum impact. Drizzle a bit of honey or jam, garnish with fresh rosemary or thyme, and you’ve got a vibrant spread that’ll have friends and family reaching for seconds before you even sit down.
Key Ingredients
To build this colorful snack board, gather high-quality items that balance flavors and textures:
- 1 cup assorted cured meats (salami, prosciutto, chorizo): Provides a savory, salty foundation that pairs beautifully with cheese.
- 1 cup variety of cheeses (brie, cheddar, gouda): Offers a mix of creamy, tangy, and nutty flavors for every palate.
- 1/2 cup mixed olives: Adds briny, tangy bites that cut through rich cheeses and meats.
- 1/4 cup nuts (almonds, walnuts): Contributes crunchy texture and earthy undertones.
- 1/4 cup dried fruits (figs, apricots): Brings sweet chewiness and vibrant color contrasts.
- 1 piece crusty bread or crackers: Serves as a sturdy base for stacking and layering.
- 1 tablespoon honey or jam: Introduces a luscious sweet contrast to savory elements.
- 1/2 teaspoon fresh herbs for garnish (rosemary, thyme): Infuses an aromatic finish and visual pop.
How To Make Charcuterie Snack Plate
Assembling your Charcuterie Snack Plate is a breeze and only takes a few thoughtful steps to showcase each component at its best. By allowing meats and cheeses to warm slightly, arranging items with balance in mind, and using small bowls for loose bites, you’ll create a stunning platter that tastes as good as it looks. Follow these steps to bring everything together:
1. Remove meats and cheeses from the refrigerator and let stand at room temperature for about 15 minutes to enhance flavors and textures.
2. Arrange cured meats in overlapping layers or rosettes on one side of a large platter or board, creating a visually appealing foundation.
3. Place cheeses on the platter, spacing them apart and fanning or slicing semi-soft varieties for easy serving.
4. Fill small bowls or ramekins with olives, nuts, and dried fruits and position them around the meats and cheeses to contain loose items.
5. Add bread slices or crackers in open areas of the platter, stacking them at different angles for height and interest.
6. Drizzle honey or spoon jam over or beside a cheese wedge for a sweet contrast that elevates each bite.
7. Sprinkle fresh herbs over the plate to add color, aroma, and a finishing touch.
8. Serve immediately, replenishing items as needed to keep the plate abundant and inviting.
Serving Suggestions
Once your Charcuterie Snack Plate is assembled, you’ll want to think about how to serve it so every bite feels special. Whether you’re hosting a casual get-together or a more formal affair, these serving ideas will help showcase the flavors and textures of the board. From pairing with refreshing beverages to adding unexpected garnishes, these suggestions ensure your platter stays inviting and visually stunning. Here are four ways to give your charcuterie experience an extra touch of flair and make every guest feel like a VIP.
- Place the board on a wooden or slate serving platter for a rustic charm and sturdy display.
- Offer a selection of mustard, fruit preserves, or tapenades in small bowls to complement the meats and cheeses.
- Include a variety of pickles and cornichons alongside the olives for additional tangy crunch.
- Pair your snack plate with chilled wine, sparkling water, or craft beer to enhance each flavor profile.
Tips For Perfect Charcuterie Snack Plate
Creating a showstopping Charcuterie Snack Plate isn’t just about piling ingredients on a board—it’s about crafting an experience. Start by choosing a mix of colors, flavors, and textures so each mouthful is exciting. Remember that bringing meats and cheeses to room temperature enhances their aromas and textures, so give them about 15 minutes out of the fridge before you begin. By using small bowls for olives, nuts, and dried fruits, you keep loose items contained and add structure to your layout. If you’re feeling adventurous, swap in your favorite wine-friendly cheese or a seasonal fruit. Finally, a simple pairing of a crisp white wine or light red will complement the board and elevate every bite. With these tips, even beginners can put together a professional-looking platter that’s bursting with flavor and fun!
- Choose a mix of flavors, textures, and colors for visual appeal.
- Bringing meats and cheeses to room temperature enhances their flavor.
- Use small bowls to contain loose items like olives and nuts.
- Pair with a crisp white wine or a light red for best enjoyment.
How To Store It
Leftovers from your Charcuterie Snack Plate can stay fresh and delicious for several days when stored properly. Each component—whether cured meats, cheeses, olives, nuts, or dried fruits—has unique needs to preserve taste and texture. By separating items and using airtight containers or wraps, you avoid unwanted moisture and flavor transfer. Store bread or crackers in a cool, dry place to maintain crunch, and keep olives refrigerated in their brine. For cheeses, wrap wedges in parchment paper to let them breathe without drying out. Follow these methods to maintain the best quality and keep your snack plate components ready for quick assembly whenever you want a flavorful bite.
- Keep cured meats tightly wrapped in parchment or stored in an airtight container in the fridge to prevent drying and odor transfer.
- Store cheeses individually in parchment paper or wax paper, then place in a loose container to allow airflow and preserve texture.
- Keep olives in their original brine inside a sealed container in the refrigerator to maintain flavor and moisture.
- Store nuts and dried fruits at room temperature in a sealed jar or zip-top bag to keep them crunchy and fresh.
Frequently Asked Questions
Here are answers to the most common questions about making and enjoying your Charcuterie Snack Plate:
- How long does it take to prepare the Charcuterie Snack Plate?
It takes about 15–20 minutes of active prep time, plus an additional 15 minutes to bring meats and cheeses to room temperature. Most of the time is spent arranging the components aesthetically on a platter and placing small bowls of olives, nuts, and dried fruits. Once set up, you can drizzle honey or jam and garnish with fresh herbs almost instantly.
- Can I make the charcuterie plate in advance?
You can partially prepare the plate up to one hour before serving by slicing the cheeses, arranging the cured meats, and portioning olives, nuts, and dried fruits into bowls. However, wait until 15 minutes before guests arrive to remove items from the fridge so the flavors open up properly. Drizzle honey, add garnishes, and arrange bread or crackers just before serving to maintain freshness and crispness.
- What substitutions can I use if I don’t have all the listed ingredients?
If you’re missing a specific cured meat, replace it with another variety such as soppressata or coppa. Swap any cheese type for your favorites, like swapping gouda for Manchego or cheddar for aged Swiss. Mixed olives can be replaced with cornichons or marinated artichoke hearts, and nuts can include pecans or cashews. Any fruit preserves can stand in for jam, and fresh rosemary can be traded for basil or parsley if needed.
- How should leftovers be stored and for how long will they stay good?
Store leftover components separately in airtight containers. Keep cured meats and cheeses wrapped in parchment or wax paper inside the fridge for up to 3–5 days. Nuts and dried fruits stay fresh at room temperature for several weeks if kept sealed, but olives should remain refrigerated and consumed within 7–10 days. Bread or crackers are best eaten the same day to maintain crunch.
- What are the best wine pairings for this snack plate?
A crisp white wine such as Sauvignon Blanc or a light red like Pinot Noir complements the range of flavors without overpowering them. Sparkling wines like Prosecco or dry Champagne add refreshing acidity that pairs well with brie and prosciutto. For a bolder choice, a medium-bodied Rosé balances fatty meats and creamy cheeses with its bright fruit notes.
- How do I achieve an attractive arrangement on the platter?
Start by arranging meats in overlapping layers or rosette shapes along one side of the platter. Place cheeses at varying intervals, fanning or slicing semi-soft varieties for texture. Position small bowls of olives, nuts, and dried fruits around these anchors to fill gaps, then weave bread slices or crackers throughout. Finish by drizzling honey or jam near a cheese wedge and sprinkling fresh herbs over the entire plate for color and visual balance.
- Can I adapt the charcuterie plate for dietary restrictions?
To make a gluten-free version, substitute gluten-free crackers or bread. For a vegetarian option, replace cured meats with grilled or marinated vegetables, such as roasted peppers and artichoke hearts, and include plant-based cheeses. Those with nut allergies can omit nuts entirely or use roasted chickpeas for crunch. Ensure olives and spreads are free of added allergens by checking labels.
What Makes This Special
From the vibrant mix of flavors and textures to the minimal prep time, this Charcuterie Snack Plate works every time. It’s beginner-friendly, visually stunning, and endlessly customizable—perfect for a relaxed lunch, an impromptu gathering, or a wine-night with friends. Plus, who doesn’t love a little sweet, salty, and crunchy action on one board? Print and save this article for your next event, and let me know what you think! Drop a comment if you try it or have questions—I’m here to help make your snack plate dreams come true.
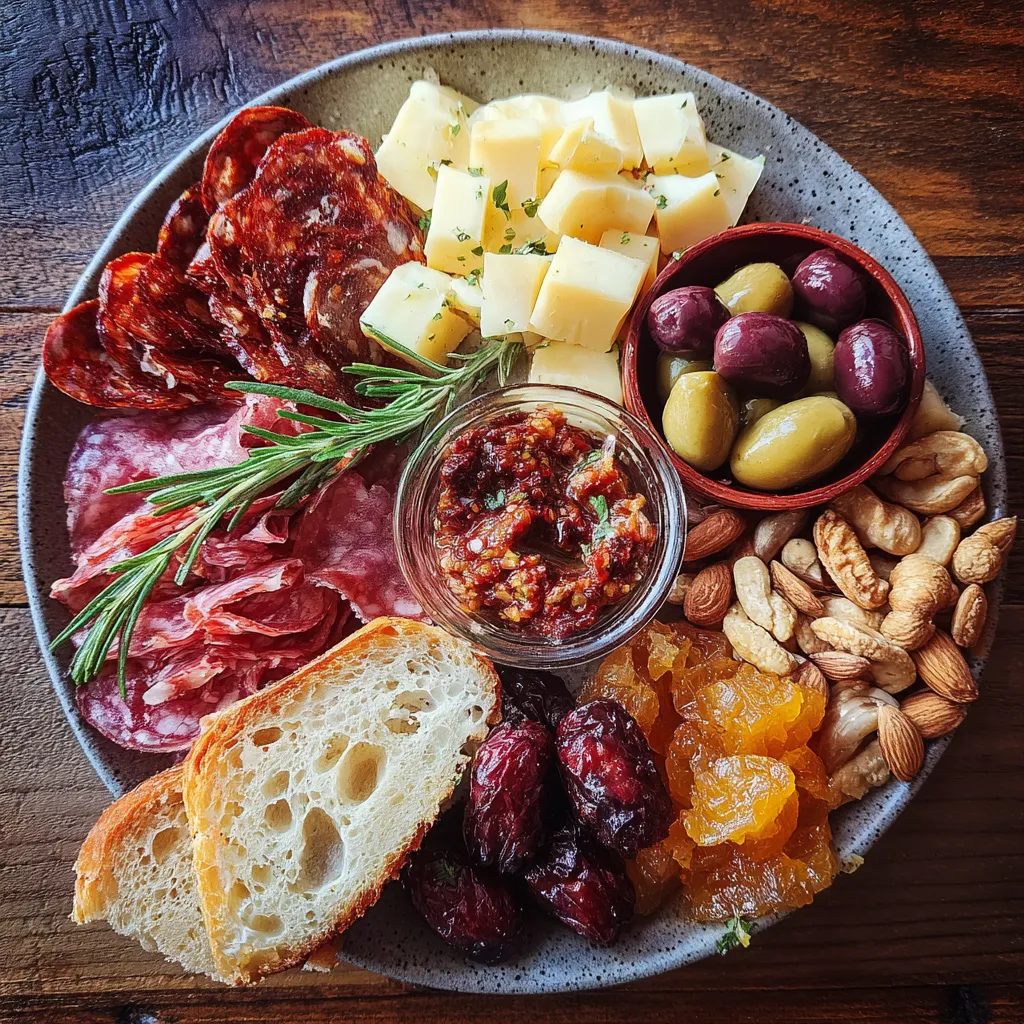

Charcuterie Snack Plate
Description
Thinly sliced salami and prosciutto mingle with creamy brie, cheddar, and gouda, while olives, nuts, and dried fruits add salty crunch and sweet chew. Drizzle honey, garnish with herbs, and serve on crusty bread or crackers.
Ingredients
Instructions
-
Remove meats and cheeses from the refrigerator and let stand at room temperature for about 15 minutes.
-
Arrange cured meats in overlapping layers or rosettes on one side of a large platter or board.
-
Place cheeses on the platter, spacing them apart and fanning or slicing semi-soft varieties.
-
Fill small bowls or ramekins with olives, nuts, and dried fruits and position them around the meats and cheeses.
-
Add bread slices or crackers in open areas of the platter, stacking them for visual interest.
-
Drizzle honey or spoon jam over or beside a cheese wedge for a sweet contrast.
-
Sprinkle fresh herbs over the plate to add color and aroma.
-
Serve immediately, replenishing items as needed to keep the plate abundant.
Note
- Choose a mix of flavors, textures, and colors for visual appeal.
- Bringing meats and cheeses to room temperature enhances their flavor.
- Use small bowls to contain loose items like olives and nuts.
- Pair with a crisp white wine or a light red for best enjoyment.

