

Meet the California Style Burrito: a hearty fusion wrap bursting with sizzling steak, fluffy rice, creamy guacamole, and zesty pico, all rolled into a golden skillet-seared embrace. This intermediate-level dinner recipe delivers a perfect blend of textures as a warm flour tortilla cradles tender carne asada, black beans, melted cheddar, and a dollop of sour cream. Ready in under 30 minutes from stove to table, it’s your next go-to for busy weeknights or casual gatherings—guaranteed to satisfy cravings and impress friends.
Key Ingredients
Let’s meet the stars of this burrito—simple, flavorful components that come together in every bite.
- 2 large flour tortillas: Soft yet sturdy wraps that hold all the ingredients while getting crisp edges in the skillet.
- 1 cup cooked white rice: Fluffy base that soaks up juices and adds a tender, slightly chewy texture.
- 1 cup cooked black beans: Earthy, creamy beans that boost protein and complement the steak perfectly.
- 1 cup shredded cheddar cheese: Melty, tangy layer that binds fillings together and adds gooey richness.
- 4 ounces carne asada steak: Sizzling, seasoned steak strips that are the savory heart of this burrito.
- 1/2 cup guacamole: Creamy avocado spread that brings a cool, rich contrast to the warm filling.
- 1/4 cup pico de gallo: Fresh, zesty blend of tomatoes, onions, and cilantro for a bright pop.
- 2 tablespoons sour cream: Tangy drizzle that adds creaminess and balances bold flavors.
- 1 tablespoon vegetable oil: Helps sauté the steak evenly and prevent sticking.
- 1 pinch salt: Simple seasoning that enhances every element in this wrap.
How To Make California Style Burrito
Bringing this California Style Burrito to life is easier than it looks. We’ll walk through each step—from cooking the steak to crisping the finished wrap—so you can master that golden, sealed exterior and a perfectly stacked interior. Follow along, and soon you’ll have a mouthwatering burrito ready to devour.
1. Preheat a skillet over medium heat and add vegetable oil. Ensure the pan is hot enough that a drop of water sizzles, giving you that ideal surface for searing.
2. Season the carne asada steak with salt, then place it in the skillet. Cook for 3 to 4 minutes on each side until nicely browned and juicy. Remove and let it rest briefly before slicing.
3. Warm the flour tortillas in a separate dry skillet over medium heat. Let each tortilla heat for about 30 seconds per side until pliable and easy to roll.
4. Lay a tortilla flat on your work surface. Layer 1 cup of rice, 1 cup of black beans, and the sliced steak down the center. Sprinkle 1 cup of shredded cheddar so it starts to melt, then add 1/2 cup guacamole, 1/4 cup pico de gallo, and 2 tablespoons sour cream.
5. Fold in the sides of the tortilla, then roll from the bottom edge up, using firm but gentle pressure to form a tight burrito.
6. Place the burrito seam-side down on the skillet. Cook for 1 to 2 minutes on each side until the tortilla is golden and sealed.
7. Remove from heat, slice in half if desired, and serve immediately while it’s hot and the cheese is wonderfully melty.
Serving Suggestions
This California Style Burrito shines on its own, but a few complementary sides will take your meal next level. Here are some fun ways to round out the plate:
- Serve with a side of Cilantro Lime Slaw: Toss shredded cabbage with lime juice, chopped cilantro, and a pinch of salt for a crisp, tangy bite.
- Accompany with Mexican Street Corn (Elote): Brush grilled corn with mayo, sprinkle on cotija cheese and chili powder, then finish with a squeeze of lime.
- Pair with a refreshing Agua Fresca: Blend watermelon or hibiscus with water, a touch of sugar, and ice to cleanse the palate between bites.
- Offer a trio of salsas: Present salsa verde, spicy chipotle salsa, and classic red tomato salsa so everyone can customize their heat level.
Tips For Perfect California Style Burrito
Let’s talk insider tricks to ensure your California Style Burrito turns out amazing every time. From rice texture to tortilla handling, these friendly pointers will simplify the process and boost your confidence in the kitchen.
- Use freshly cooked rice for the best texture.
- Substitute the carne asada steak with grilled chicken or tofu for variation.
- Warming the tortillas helps prevent tearing when rolling.
- Serve with extra salsa or hot sauce for added spice.
How To Store It
If you have leftovers or want to prep ahead, proper storage keeps this burrito tasting fresh and flavorful. Here’s how to lock in that deliciousness:
- Wrap each burrito individually in foil and store in an airtight container in the refrigerator for up to 2 days; this keeps the tortilla soft and prevents drying out.
- Place cooled, assembled burritos in zip-top freezer bags, squeeze out excess air, and freeze for up to one month; thaw overnight before reheating.
- Store filling components—rice, beans, and steak—in separate airtight containers for up to 3 days; reheat gently on the stovetop or in the microwave before assembling.
- To reheat and retain crispiness, unwrap from plastic, leave foil on for oven warming at 350°F (175°C) for 5–10 minutes, then briefly pan-sear in a hot skillet to refresh the golden exterior.
Frequently Asked Questions
Got questions about the California Style Burrito? You’re not alone! Here are some quick answers to common queries.
- Q: How long does it take to prepare and cook the California Style Burrito?
It takes about 20 minutes to prepare and assemble the burrito and another 6 to 10 minutes to cook the steak, warm the tortillas, and crisp the assembled burrito. This includes 3 to 4 minutes per side for the carne asada, 1 minute per side to warm each tortilla, and 1 to 2 minutes per side to seal and brown the rolled burrito.
- Q: What substitutions can I make for the carne asada steak?
You can substitute grilled chicken by slicing a boneless chicken breast into strips, seasoning with salt, and cooking 3 to 4 minutes per side in the skillet. For a vegetarian option, use firm tofu cut into strips, seasoned with salt, or pan-seared tempeh with a light soy marinade. Cook times remain about the same, and you can still layer rice, beans, cheese, guacamole, pico de gallo, and sour cream as directed.
- Q: How do I prevent the flour tortilla from tearing when rolling?
Warming the tortillas in a dry skillet for about 30 seconds per side makes them more pliable and less likely to crack. Make sure they’re warm but not overheated. Work quickly after warming, lay the tortilla flat, and place fillings slightly off-center. Fold the sides in first, then roll from the bottom edge upward, using gentle but firm pressure to keep the ingredients contained without stretching the tortilla too much.
- Q: Can I prepare any components ahead of time?
Yes. You can cook the rice, beans, and carne asada up to a day ahead and store them in airtight containers in the fridge. Guacamole and pico de gallo can also be prepped up to 12 hours in advance, though guacamole may brown slightly—press plastic wrap directly onto its surface to minimize oxidation. On the day of serving, reheat components gently before assembling and crisping the burrito.
- Q: What’s the best way to keep assembled burritos warm before serving?
After rolling and crisping each burrito, wrap it in aluminum foil to retain heat and place it in a low oven set to 200°F (95°C). This keeps them warm and the tortilla soft without drying out. Unwrap immediately before slicing and serving to preserve the crisp edge and prevent condensation.
- Q: How can I adjust the spice level to suit different tastes?
To increase heat, add chopped jalapeños or serrano peppers to the pico de gallo or drizzle hot sauce or chipotle salsa inside the burrito before rolling. For milder flavors, omit spicy peppers from the pico de gallo and serve with mild salsa on the side. You can also mix a pinch of smoked paprika into the carne asada seasoning for smoky depth without extra heat.
- Q: Is it possible to freeze these burritos, and how should I reheat them?
Yes, fully assembled and cooled burritos can be wrapped tightly in foil or plastic wrap and frozen for up to one month. To reheat, unwrap from plastic (leave foil on if using) and bake at 350°F (175°C) for 20–25 minutes, or until heated through. For a crisp finish, remove the foil for the last 2–3 minutes of baking or briefly pan-sear each side in a hot skillet.
What Makes This Special
This California Style Burrito stands out because it balances bold flavors and textures—juicy, seasoned steak; creamy guacamole; melty cheddar; and fresh pico—in a perfectly toasted tortilla hug. It’s fun to assemble, infinitely adaptable, and quick enough for busy weeknights, yet impressive enough for weekend gatherings. Don’t forget to print and save this recipe for later—you’ll want to revisit it again and again! If you whip one up, drop a comment below or share your questions and feedback—I’d love to hear how your burrito adventure turns out.
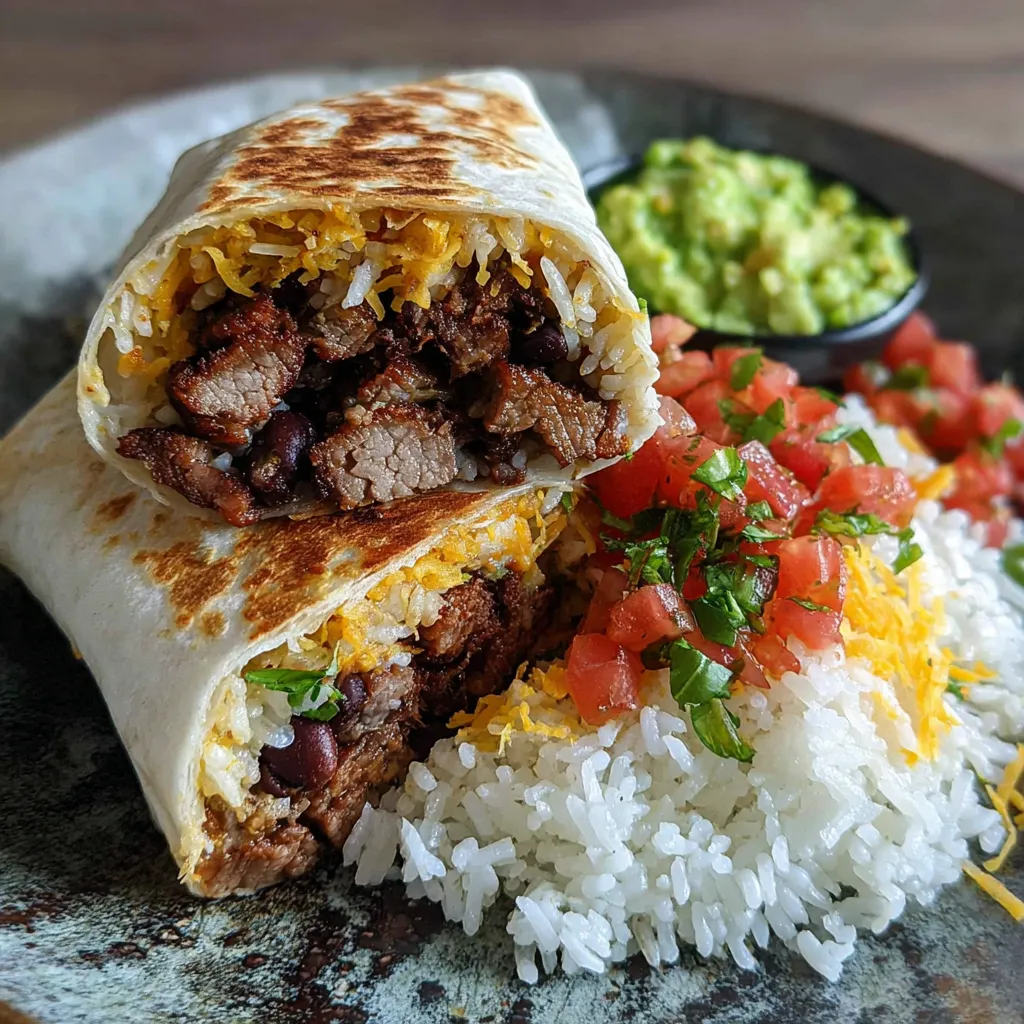

California Style Burrito
Description
Warm tortilla cradles tender carne asada, fluffy rice, black beans, melted cheddar, fresh guac, pico de gallo, and a dollop of sour cream. Pan-toasted edges add a crisp golden finish.
Ingredients
Instructions
-
Preheat a skillet over medium heat and add vegetable oil.
-
Season the carne asada steak with salt and cook in the skillet for 3 to 4 minutes on each side until browned.
-
Warm the flour tortillas in a separate dry skillet for about 30 seconds per side.
-
Lay a tortilla flat and layer rice, black beans, cooked steak, shredded cheese, guacamole, pico de gallo, and sour cream.
-
Fold in the sides of the tortilla and roll it tightly into a burrito shape.
-
Place the burrito seam-side down on the skillet and cook for 1 to 2 minutes on each side until golden and sealed.
-
Remove from heat, slice in half if desired, and serve immediately.
Note
- Use freshly cooked rice for the best texture.
- Substitute the carne asada steak with grilled chicken or tofu for variation.
- Warming the tortillas helps prevent tearing when rolling.
- Serve with extra salsa or hot sauce for added spice.

