

S’mores might be the ultimate campfire indulgence, but there’s something downright irresistible about tucking those gooey marshmallows and melty chocolate chips inside a golden, flaky crust. These Buttery S’Mores Hand Pies take everything you love about the classic treat—crunchy graham cracker crumbs, pillow-soft mini marshmallows, and rich semisweet chocolate—and wrap it all up in a perfectly portable pocket of pure indulgence. From the moment you roll out those refrigerated pie crusts to the final sprinkle of cinnamon sugar, every step is an invitation to unleash your inner pastry artist. Whether you’re whipping these up for a cozy movie night, a weekend brunch with friends, or a backyard bonfire under the stars, one bite transports you to dessert heaven without the fuss of skewers or open flames.
As the oven works its magic at 375°F, your kitchen fills with comforting warmth and the promise of sweet delight. The crunchy exterior gives way to that trademark s’mores ambrosia—mini marshmallows that ooze and bubble, semisweet morsels that soften into ribbons of chocolate, and graham cracker crunch that echoes each nostalgic bite. It’s a dessert that feels both timeless and fresh, offering the joys of a campfire classic in an easy, beginner-friendly package. Plus, with simple pantry staples and just a handful of steps, these hand pies prove that you don’t need to be a seasoned baker to create something truly sensational. Get ready to treat yourself (and everyone you know) to a dessert that’s flaky, buttery, and brimming with classic s’mores goodness!
KEY INGREDIENTS IN BUTTERY S’MORES HAND PIES
Before we dive into rolling and filling, let’s get acquainted with the stars that make these hand pies shine. Each ingredient plays a special role in creating that perfect balance of richness, sweetness, and crunch. Gather them on your countertop, and you’ll be one step closer to dessert bliss.
- Pie Crusts
Refrigerated pie crusts form the buttery, flaky shell that holds all the gooey goodness. Their crisp layers provide structure while staying tender and melt-in-your-mouth.
- Mini Marshmallows
These tiny clouds of sweetness puff up and soften, delivering that signature marshmallow pull. They’re the heart of the s’mores experience in each bite.
- Semisweet Chocolate Chips
Deep, rich chocolate chunks offer a perfect counterpoint to the sugary marshmallows. They soften just enough to create a luscious, melty center.
- Graham Crackers
Crushed into fine crumbs, graham crackers bring a toasty, slightly honeyed crunch. They recreate that classic campfire flavor and add textural contrast.
- Unsalted Butter
Melted butter helps the cinnamon sugar adhere to each hand pie and adds an extra layer of rich, creamy flavor without overpowering the s’mores notes.
- Granulated Sugar
A simple sprinkle of granulated sugar adds a delicate sparkle and sweetness to the crust, enhancing its golden color and crisp texture.
- Ground Cinnamon
This warm, aromatic spice mingles with sugar for a cozy finish that complements both the buttery crust and the sweet filling.
- Egg
Beaten into an egg wash, the egg gives each hand pie a beautiful sheen and helps the edges seal, ensuring your marshmallow-chocolate filling stays locked inside.
HOW TO MAKE BUTTERY S’MORES HAND PIES
Now that your ingredients are prepped and ready, let’s walk through the step-by-step process of transforming them into delightful hand pies. Each stage is simple, but together they deliver maximum flavor with minimal fuss—perfect for home cooks of any skill level.
1. Preheat the oven to 375°F (190°C) and line a baking sheet with parchment paper. This setup ensures even baking and easy cleanup once your pies are perfectly golden.
2. Unroll the refrigerated pie crusts on a lightly floured surface. A dusting of flour prevents sticking and helps you roll out any creases for an even thickness.
3. Using a round cookie cutter or a small bowl, cut out circles from the dough. Aim for uniform shapes so all your hand pies bake at the same rate.
4. In a medium bowl, combine the mini marshmallows, semisweet chocolate chips, and crushed graham crackers. Stir gently so each circle gets the perfect s’mores mix.
5. Place a spoonful of the marshmallow-chocolate-graham blend in the center of each dough circle. Be careful not to overfill to avoid premature leakage.
6. Fold each dough circle over the filling to form a half-moon shape. Press the edges firmly with the tines of a fork to seal and create a decorative border.
7. Transfer the sealed hand pies onto the prepared baking sheet, leaving space between them for even puffing.
8. In a small bowl, whisk together the melted butter, granulated sugar, and ground cinnamon to create the cinnamon sugar coating.
9. Brush the top of each hand pie with the beaten egg wash, then generously coat with the cinnamon sugar mixture for a sweet, crackly finish.
10. Bake in the preheated oven for 15–18 minutes, or until the hand pies are golden brown and puffed, signaling that the filling is hot and gooey.
11. Allow the pies to cool slightly on a wire rack before serving, giving the filling a moment to set and ensuring a cleaner bite.
SERVING SUGGESTIONS FOR BUTTERY S’MORES HAND PIES
Once these hand pies emerge from the oven, you’ll want to serve them in ways that enhance their creamy filling and buttery crust. Whether you’re hosting a gathering or indulging in a solo treat, these ideas will take your presentation—and taste—to the next level.
- Scoop of Vanilla Ice Cream
Serve each warm hand pie with a generous scoop of creamy vanilla ice cream on the side. The cold, velvety ice cream contrasts beautifully with the hot, gooey center, creating a dynamic flavor experience.
- Drizzle of Chocolate or Caramel Sauce
Add an elegant touch by drizzling rich chocolate or silky caramel sauce over the pies. Use a spoon or squeeze bottle to create artistic swirls that amp up the sweetness.
- Dusting of Powdered Sugar
For a refined look, lightly dust powdered sugar over the tops just before serving. This quick garnish adds a delicate sweetness and transforms your hand pies into café-worthy treats.
- Campfire-Inspired Platter
Arrange the pies on a rustic wooden board alongside small bowls of extra mini marshmallows, chocolate chips, and graham cracker chunks. Guests can customize their bites—just like at a bonfire gathering.
HOW TO STORE BUTTERY S’MORES HAND PIES
Whether you’re planning ahead for a party or saving leftovers for later, proper storage keeps these hand pies tasting fresh and flaky. From room temperature snacking to freezer preps, here’s how to preserve that crisp crust and gooey center.
- Room Temperature Storage
Cool baked hand pies completely, then store in an airtight container at room temperature for up to two days. Use parchment paper between layers to prevent sticking and maintain crisp edges.
- Refrigeration
For a slightly longer shelf life, place cooled pies in an airtight container and refrigerate for up to four days. Warm them in a preheated 350°F oven for 5–7 minutes to revive the gooey interior.
- Freezing Unbaked Hand Pies
Assemble and seal the hand pies, then flash-freeze them on a baking sheet until solid. Transfer to a freezer-safe bag or container for up to three months. Bake directly from frozen, adding a few extra minutes to the baking time.
- Freezing Baked Hand Pies
Once fully cooled, wrap each baked pie in plastic wrap and then foil. Freeze for up to two months. To reheat, unwrap and bake at 350°F for 8–10 minutes, or microwave on low power for 30–45 seconds until warm.
CONCLUSION
Pulling together butter, sugar, cinnamon, and all the classic s’mores fixings has never felt so effortless—or so rewarding. You’ve learned how to transform simple refrigerated pie crusts into little pockets of joy, packed with melty marshmallows, rich chocolate, and crunchy graham crumbs. With only minutes of hands-on prep time and minimal baking expertise required, these hand pies make an ideal dessert for beginners and seasoned bakers alike. You can personalize them by experimenting with dark or milk chocolate chips, adding a swirl of peanut butter or Nutella, or swapping in chocolate graham crackers for an extra twist. Don’t forget to sprinkle on that cinnamon sugar topping—it’s the signature flourish that brings warmth and sparkle to every bite. Feel free to print this article and save it for later reference, so you’ll have the full recipe, ingredient notes, and tips at your fingertips whenever the s’mores craving hits.
As you gather around the oven or share these treats at your next get-together, know that you’re creating more than just dessert—you’re crafting sweet memories and moments of joy. I’d love to hear how your hand pies turned out, what variations you’ve tried, or any questions that popped up along the way. Be sure to check out the FAQ below for answers to common baking queries. If you need help perfecting your technique or want to share a fun twist on the recipe, drop a comment or send your feedback. Happy baking, and here’s to many more flaky, buttery adventures in the kitchen!
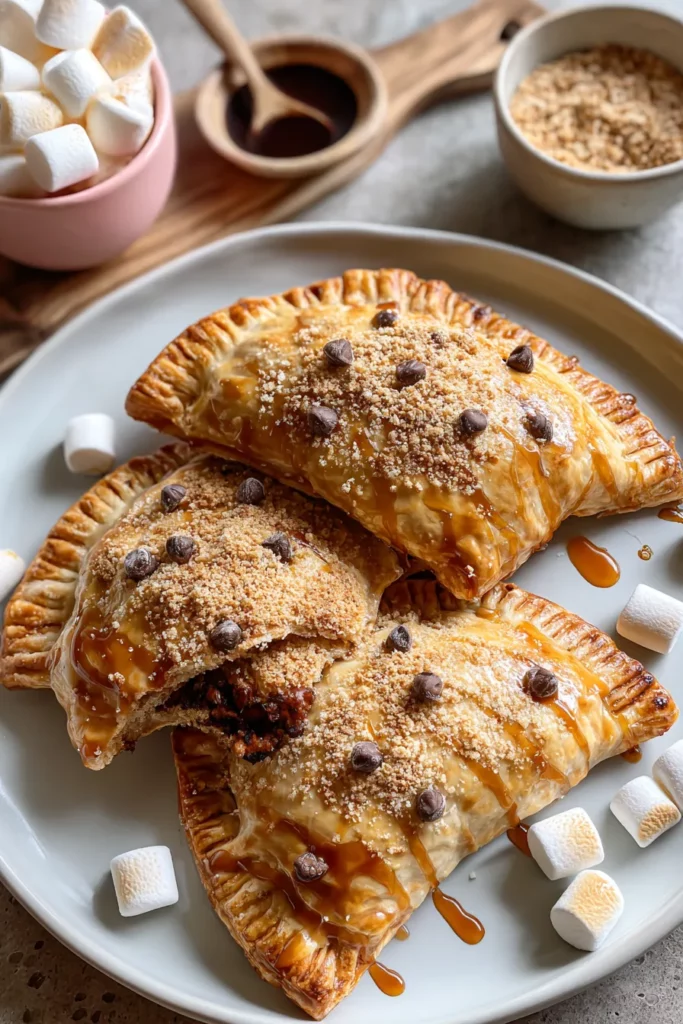

Buttery S’Mores Hand Pies
Description
These irresistible hand pies are bursting with gooey marshmallows, rich chocolate, and crunchy graham crackers, all encased in buttery golden crusts. Perfect for any occasion!
Ingredients
Instructions
-
Preheat the oven to 375°F (190°C) and line a baking sheet with parchment paper.
-
Unroll the refrigerated pie crusts on a lightly floured surface.
-
Using a round cookie cutter or a small bowl, cut out circles from each pie crust.
-
In a bowl, combine mini marshmallows, chocolate chips, and crushed graham crackers.
-
Place a spoonful of the marshmallow mixture in the center of each dough circle.
-
Fold the dough over the filling to form a half-moon shape and press edges with a fork to seal.
-
Transfer the hand pies to the prepared baking sheet.
-
In a small bowl, combine melted butter, granulated sugar, and cinnamon.
-
Brush each hand pie with the egg wash, then generously coat with the cinnamon sugar mixture.
-
Bake in the preheated oven for 15-18 minutes, or until golden brown and puffed.
-
Allow the pies to cool slightly on a wire rack before serving.
Note
- Serve with a scoop of vanilla ice cream for an extra indulgent treat.
- These hand pies can be made ahead and frozen before baking; simply bake from frozen.
- Experiment with dark chocolate or milk chocolate chips for different flavor profiles.
- Swap out regular graham crackers with chocolate graham crackers for an added layer of chocolatey goodness.
- Be creative and add a spoonful of peanut butter or Nutella to each pie for a delicious twist.

