

Banana Chia Pudding is a creamy, nourishing breakfast that marries ripe bananas and chia seeds into a velvety pudding you can whip up in minutes and let chill overnight. With a silky banana-milk base enriched by honey and vanilla, the chia seeds plump into a pillowy, spoonable treat by morning. Perfect for busy weekday starts or lazy weekend brunches, this beginner-friendly recipe is gluten-free, and vegan-friendly when you choose plant-based milk.
Key Ingredients
Before you start, gather these simple pantry staples that guarantee a luscious, grab-and-go breakfast.
- 2 medium bananas: These ripe bananas lend natural sweetness and create a smooth, creamy base for the pudding.
- 1/2 cup chia seeds: Tiny powerhouses that swell overnight, giving the pudding its thick, gel-like texture.
- 1 cup milk: The liquid component—dairy or plant-based—helps blend the bananas and soak up chia seeds.
- 1 tablespoon honey: Adds a touch of natural sweetness and balances the banana flavor.
- 1/2 teaspoon vanilla extract: Infuses a warm, aromatic note that elevates the taste.
- 1 pinch salt: Enhances all the flavors and prevents the sweetness from feeling flat.
How To Make Banana Chia Pudding
Creating this pudding is as easy as mash, mix, chill, and enjoy. In just a few simple steps, you’ll see how the ingredients transform as the chia seeds absorb the liquid, yielding that coveted creamy, spoonable consistency. With no cooking required, it’s perfect for beginners and busy cooks alike—just follow these detailed steps for the best results.
1. Peel the bananas and mash them in a mixing bowl until mostly smooth, leaving a few small chunks for delightful texture.
2. Add the milk, honey, vanilla extract, and salt to the mashed bananas and whisk vigorously until fully combined and free of lumps.
3. Pour in the chia seeds and stir thoroughly, making sure each seed is coated and evenly distributed to prevent clumping.
4. Cover the bowl with plastic wrap or a lid and refrigerate for at least 4 hours or overnight; this allows the chia to swell and thicken into pudding.
5. Remove the pudding from the fridge and stir well before serving to break up any dense pockets and achieve a uniform consistency.
6. Serve chilled, garnished with fresh banana slices or berries if desired, for a colorful and flavorful finish.
Serving Suggestions
Once your Banana Chia Pudding is set, it’s time to dress it up! Here are some tasty ways to serve this versatile breakfast or snack.
- Fresh fruit medley: Top with slices of banana, berries, or diced mango for vibrant color and extra vitamins.
- Crunchy granola sprinkle: Add a handful of homemade or store-bought granola just before serving to introduce a satisfying crunch.
- Nutty drizzle: Swirl in a teaspoon of almond or peanut butter on top for a boost of protein and creaminess.
- Spice it up: Dust with cinnamon, cocoa powder, or cacao nibs to add warmth and a hint of indulgence.
Tips For Perfect Banana Chia Pudding
Getting that dreamy, spoonable texture is all about simple tricks and small adjustments. From experimenting with your favorite milk to tweaking sweetness levels, these friendly pointers will help you nail the recipe every time.
- Use any type of milk you prefer such as almond milk or coconut milk.
- Stir the pudding once during chilling to prevent chia seeds from settling at the bottom.
- Adjust the sweetness by adding more or less honey to taste.
- Consume within two days for the best texture and flavor.
How To Store It
Whether you’re meal-prepping for the week or just saving leftovers, proper storage keeps your pudding fresh and delicious. Follow these methods to maintain its creamy charm.
- Refrigerate in an airtight container: Transfer pudding to a sealed container to keep out fridge odors and maintain moisture; it will stay creamy for up to two days.
- Stir before serving: Give the pudding a quick stir to revive its smooth texture, as chia gel can settle and thicken further over time.
- Separate toppings: Store any fresh fruit, nuts, or granola in separate containers to prevent sogginess and add them just before eating.
- Freeze individual portions: For longer storage up to one month, spoon pudding into freezer-safe jars; thaw overnight in the refrigerator before enjoying.
Frequently Asked Questions
Here are some quick answers to common questions about Banana Chia Pudding:
- Q: How long does it take to prepare this recipe?
A: It takes about 10 minutes to mash the bananas, whisk the liquids, and stir in the chia seeds, plus at least 4 hours of refrigeration (or overnight) for the pudding to thicken.
- Q: Can I use different types of milk?
A: Yes, you can use dairy or plant-based milks such as almond, coconut, or oat milk; each will give the pudding a slightly different flavor and creaminess depending on its fat and protein content.
- Q: How can I adjust the sweetness?
A: Adjust the sweetness by adding more or less honey according to taste, or swap honey for maple syrup, agave nectar, or a sugar-free sweetener—just note that the flavor may change slightly with different sweeteners.
- Q: My pudding is too thick or too thin—what can I do?
A: If it’s too thick, stir in a splash of milk and let it rest for another 30 minutes; if it’s too thin, add an extra teaspoon or two of chia seeds, stir thoroughly, and refrigerate for another hour until it reaches your desired consistency.
- Q: Why do I need to stir during chilling?
A: Stirring once or twice during refrigeration prevents the chia seeds from settling at the bottom and ensures an even gel formation, resulting in a smooth, creamy texture throughout.
- Q: How should I store leftovers and how long will they keep?
A: Transfer leftover pudding to an airtight container and refrigerate; it will keep for up to two days in the fridge, though the texture may firm up slightly—just give it a quick stir before serving.
- Q: Can I add mix-ins or toppings?
A: Absolutely—you can top the pudding with fresh banana slices, berries, chopped nuts, shredded coconut, a drizzle of nut butter, or a sprinkle of cinnamon or cacao nibs to enhance both flavor and texture.
What Makes This Special
This Banana Chia Pudding shines because it’s effortlessly creamy, naturally sweetened, and endlessly adaptable—no cooking required and perfect for even kitchen newbies. The chia seeds magically transform your simple banana-milk mixture into a satisfying treat, ready whenever you need a healthy boost. Feel free to print this recipe and tuck it into your go-to collection for easy access. If you give it a whirl, drop a comment below or share any fun variations—you know I love hearing about your breakfast wins and helping out with any questions!
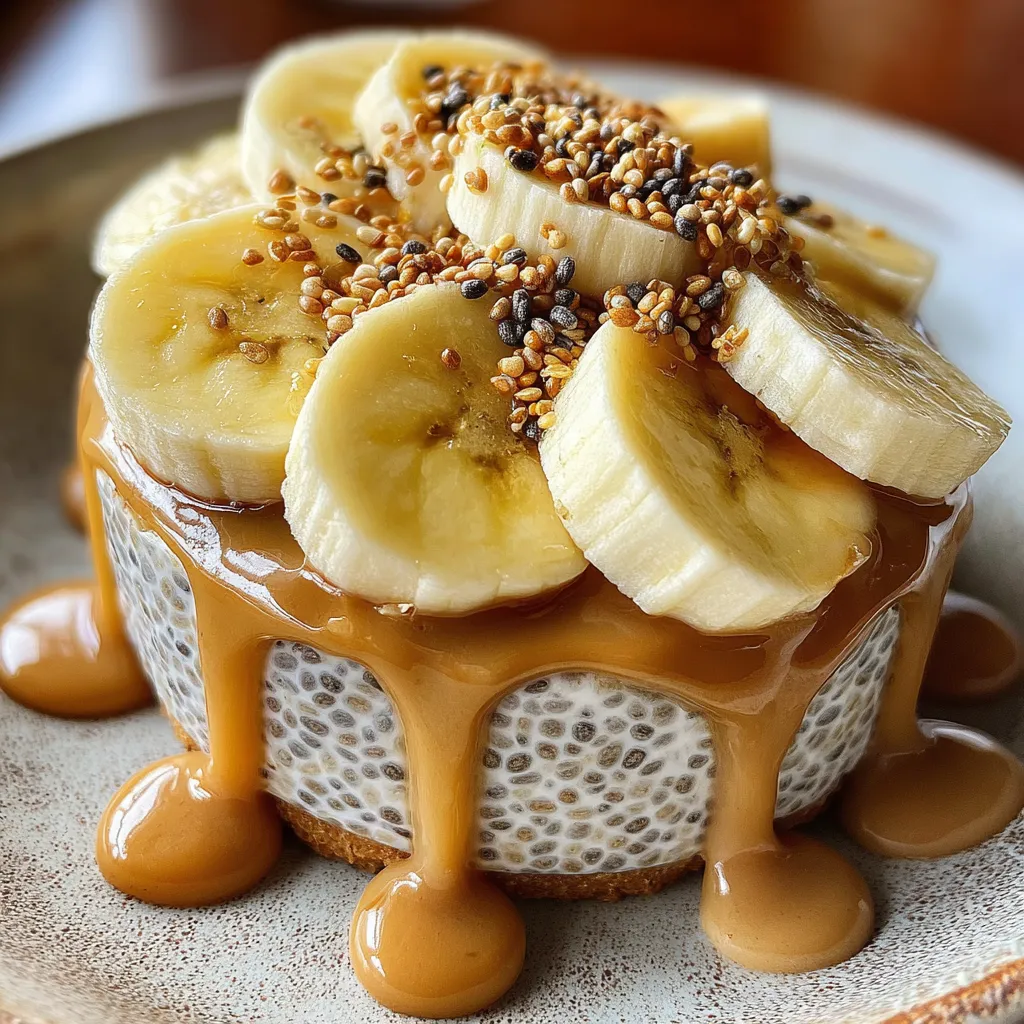

Banana Chia Pudding
Description
Ripe banana and milk whisk together into a silky base, then chia seeds swell overnight into a pillowy, spoonable treat. Drizzle honey and top with fresh fruit for a cool, nourishing breakfast or snack.
Ingredients
Instructions
-
Peel the bananas and mash them in a mixing bowl until mostly smooth.
-
Add the milk, honey, vanilla extract and salt to the mashed bananas and whisk until well combined.
-
Pour in the chia seeds and stir thoroughly to distribute them evenly.
-
Cover the bowl and refrigerate for at least 4 hours or overnight to allow the pudding to thicken.
-
Stir the pudding before serving to break up any clumps.
-
Serve chilled, garnished with fresh banana slices or berries if desired.
Note
- Use any type of milk you prefer such as almond milk or coconut milk.
- Stir the pudding once during chilling to prevent chia seeds from settling at the bottom.
- Adjust the sweetness by adding more or less honey to taste.
- Consume within two days for the best texture and flavor.

