
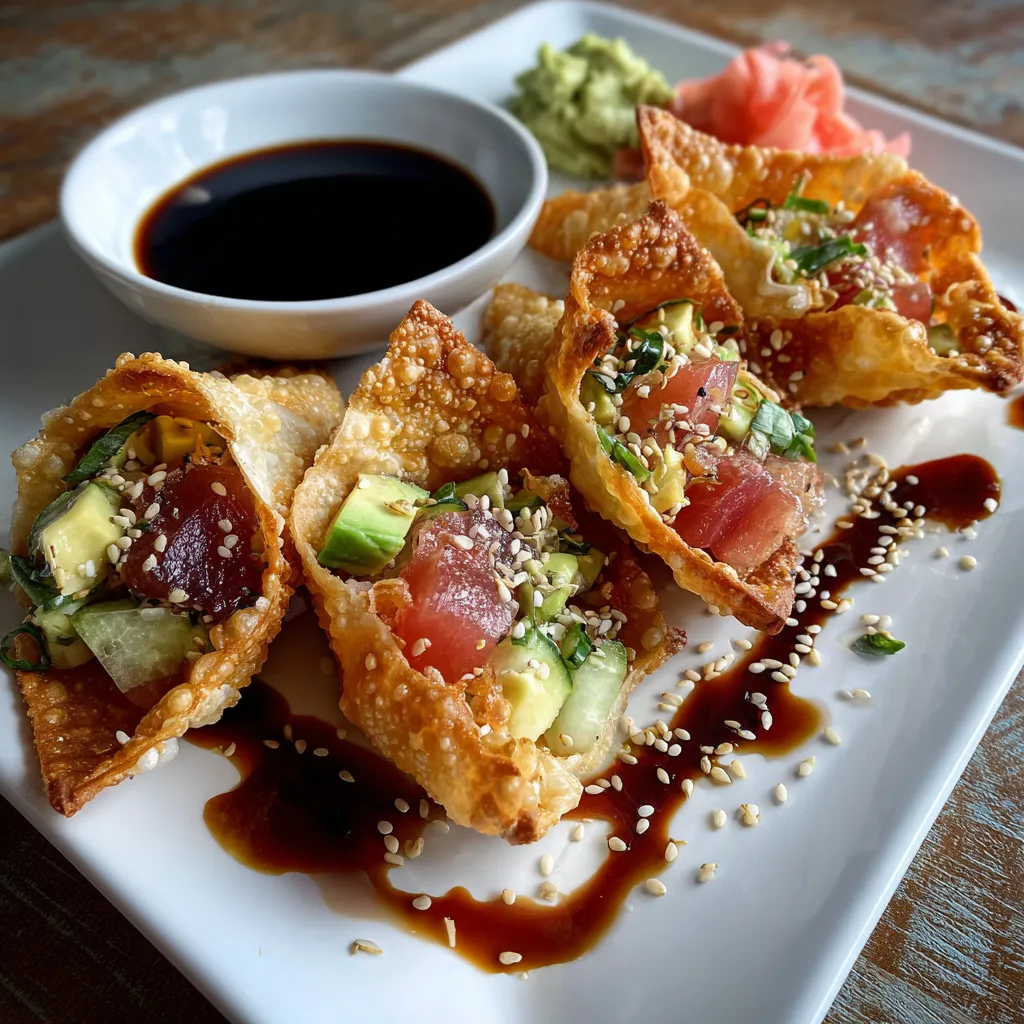
Sushi wonton cones are a delightful mash-up of crispy, golden cups and the fresh flavors of classic sushi. These crunchy bite-sized cones cradle fluffy, tangy sushi rice, silky diced fish, crisp cucumber, and creamy avocado, all topped with sesame seeds, a drizzle of soy, and a side of pickled ginger or wasabi. They’re fun to assemble, even more fun to eat, and perfect for lunch or entertaining friends. Ready to turn your kitchen into a mini sushi party? Let’s dive in!
To create these handheld sushi delights, gather a mix of pantry staples and fresh produce for the perfect balance of crunch and creaminess. Each element plays a crucial role in flavor and texture.
These step-by-step instructions will guide you from raw ingredients to elegant sushi cones. We’ll cover everything from cooking and seasoning the rice to shaping and baking the wonton wrappers, then layering on fresh fish and vibrant vegetables for a texture-packed appetizer or light lunch.
1. Preheat the oven to 375°F (190°C) and place a muffin tin upside down on a baking sheet to form supports; this inverted setup ensures your wonton wrappers bake into perfect cones without collapsing.
2. Cook the sushi rice: combine 1 cup sushi rice and 1 1/4 cups water in a medium saucepan, bring to a boil, then cover and reduce heat to low. Simmer for 20 minutes until the water is fully absorbed and the grains are tender.
3. Season the rice: transfer cooked rice to a bowl, mix 1 tablespoon rice vinegar, 1 tablespoon sugar, and 1/2 teaspoon salt until dissolved, then gently fold into the warm rice. Spread it out to cool to room temperature.
4. Shape and bake the cones: press each wonton wrapper into the inverted muffin tin cups, ensuring they hold a cone shape. Bake for 8–10 minutes or until the edges are golden and crispy, then remove and let them cool completely on a wire rack.
5. Fill with rice: once the cones are cooled, add a layer of seasoned sushi rice to each, pressing down gently but firmly so it stays compact.
6. Add the toppings: spoon diced sushi-grade fish, cucumber matchsticks, and avocado over the rice, creating a colorful and balanced assembly.
7. Finish with seasonings: sprinkle each cone with toasted sesame seeds and drizzle 2 tablespoons soy sauce over the top; serve 1 tablespoon wasabi on the side for extra heat if desired.
8. Garnish and serve: tuck pickled ginger around the cones or on top for a zesty contrast before presenting to your guests.
Whether you’re hosting a casual get-together or enjoying a creative lunch, these cones are as beautiful as they are delicious. Serve them in a way that highlights their vibrant colors and satisfying crunch, and watch your friends and family swoon.
These sushi wonton cones shine when each component is handled with care. Keep your flavors vibrant and textures contrasting by paying attention to temperature, timing, and presentation. With these insider tips, you’ll be a wonton-cone master in no time!
If you end up with leftovers or want to prep ahead, proper storage is key for maintaining freshness and crunch. Follow these guidelines to ensure every cone stays as delightful as the moment you first assembled it.
Got questions? Here are answers to the most common ones in a snap.
It takes about 45 minutes in total. Rice cooking and cooling require around 30 minutes, forming and baking the wonton cones takes 10 minutes, and assembly and garnishing take another 5 minutes.
Yes. You can cook and season the sushi rice up to one day ahead and refrigerate it in an airtight container. You can also bake the wonton cones several hours before serving; store them at room temperature in a sealed container to keep them crisp. Assemble just before serving to maintain texture.
Ensure you fully preheat your oven to 375°F (190°C) before baking, and bake the cones directly on the upside-down muffin tin without overcrowding. Let the cones cool completely on a wire rack so air can circulate. Avoid wrapping them in plastic while still warm.
Yes. Rinse the sushi rice under cold water until the water runs clear to remove excess surface starch. This helps the rice grains cook up plump and separate rather than gummy. No soaking time is required beyond the rinse itself; simply follow the water ratio and cooking instructions.
Purchase fish labeled “sushi-grade” from a reputable fishmonger or grocery store. Keep it refrigerated at 40°F (4°C) or below until use, and dice it just before assembly. If you’re unsure about raw fish safety, you can briefly freeze the fish at –4°F (–20°C) for 7 days to kill parasites, then thaw it in the refrigerator before dicing.
You can use cooked shrimp, crab meat, tofu strips, or even thinly sliced vegetables like bell peppers and carrots for a vegetarian version. Adjust seasonings by mixing sauces or adding sesame oil to complement your chosen filling.
Store leftover components separately: keep rice and fillings in airtight containers in the refrigerator for up to 2 days, and store baked cones at room temperature. Refill cones before serving. Do not attempt to reheat filled cones, as the moisture will soften the shells.
These sushi wonton cones are a playful twist on traditional rolls, combining an irresistible medley of textures—crispy, creamy, tender, and tangy—into a portable bite. They work because each element is perfectly balanced: the seasoned rice holds everything together, the wonton shell brings crunch, and fresh fish and veggies deliver brightness. Feel free to print and save this recipe sheet for your next get-together or solo indulgence. If you try these cones or have questions, drop a comment—I’d love to hear how they turn out or help troubleshoot any kitchen adventures!
Crunchy baked cones cradle fluffy, tangy sushi rice layered with silky raw fish, crisp cucumber and buttery avocado. A hint of soy and sesame sparks each bite, finished with pickled ginger and wasabi.

Hi, I'm Matthew Roberts, founder of Food Recipes USA! As a culinary historian and fourth-generation restaurateur, I've dedicated my life to preserving, celebrating, and evolving the rich tapestry of American cuisine.