
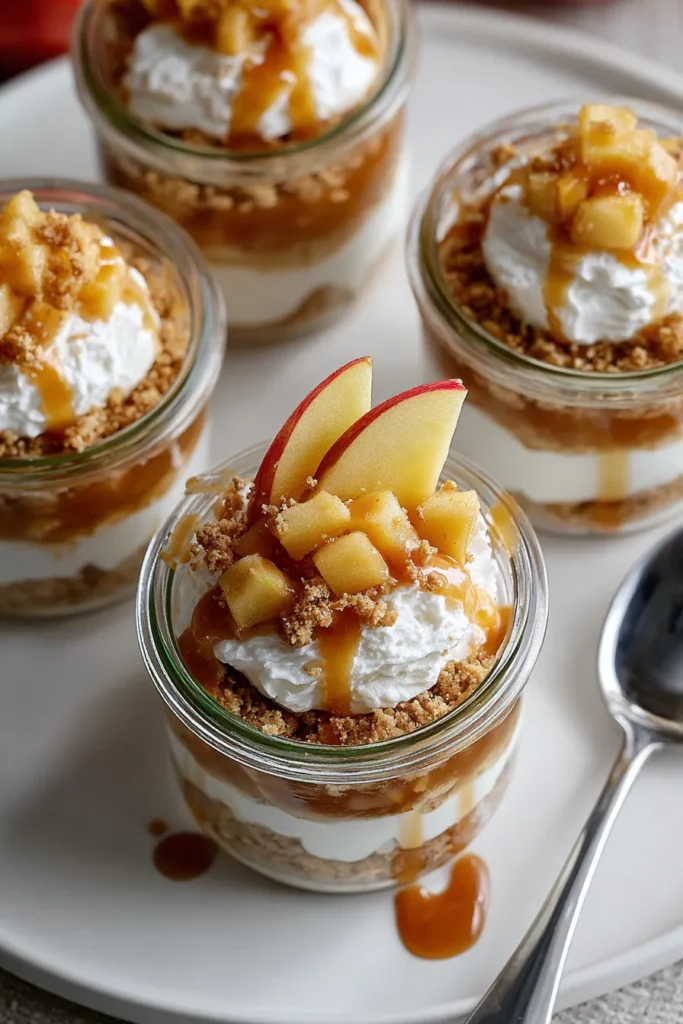
There’s something truly heartwarming about a dessert that brings the best of autumn flavors straight to your table without ever firing up the oven. These No Bake Apple Cheesecake Jars marry a buttery graham cracker crust with a luxuriously creamy cheesecake layer, all crowned by tender, cinnamon-kissed apples and a drizzle of sticky caramel. As soon as you set one of these cute little jars in front of someone, you can see their eyes light up – and honestly, I can’t blame them. With just 20 minutes of prep, a quick 10-minute stovetop dance, and a two-hour chill in the fridge, you’ll have a showstopper that looks and tastes like you spent hours fussing over it. And the best part? This is a beginner-friendly, no-bake wonder that clocks in at about 350 calories per serving and yields four perfectly portioned delights.
I still remember the first time I experimented with this concept—it was a crisp Saturday morning, leaves drifting down outside my kitchen window, and I was craving something cozy yet uncomplicated. I grabbed a few apples from the farmer’s market, dusted them with cinnamon, and wondered if I could translate my favorite cheesecake into a grab-and-go treat. Spoiler alert: those first jars vanished faster than I could snap a photo for Instagram! Since then, I’ve refined every layer—tweaking the crust’s crunch, adjusting the cheesecake’s sweetness, and getting that apple compote just right. Whether you’re hosting a casual brunch, surprising a loved one, or simply satisfying your own sweet tooth, these jars deliver everything you adore about cheesecake and apple pie—without any oven required. Seriously, once you dive into that creamy, fruity goodness, you’ll be hooked for life.
Before we dive into the step-by-step magic, let’s talk about what makes each layer sing. Every element plays its part in creating a dessert that’s rich, comforting, and irresistibly layered.
These golden crumbs form the foundation of our jars, offering a subtly sweet, crunchy base that contrasts perfectly with the creamy layers above.
Melted and mixed into the crumbs, butter acts as the glue that binds the crust, giving it that satisfying snap when you dig in with your spoon.
Whipped to stiff peaks, this silky powerhouse brings volume and airy lightness to the cheesecake layer, balancing richness with a fluffy mouthfeel.
Softened until velvety smooth, it’s the backbone of the cheesecake mixture, lending tangy depth and luscious texture.
Gently sweetens the cream cheese base without adding any gritty texture, ensuring each spoonful melts on your tongue.
A splash of pure vanilla infuses the cheesecake layer with warm, aromatic notes that elevate every bite.
Peeled and diced, tender apples add natural sweetness and juicy bursts of flavor, bringing a fresh, fruity twist to the dessert.
Caramelizes and sweetens the apple compote as it simmers, creating a golden, syrupy coating.
Adds that cosy, warming spice to the apple filling, instantly evoking thoughts of crisp fall afternoons.
A squeeze of brightness that balances sweetness and prevents the apples from browning, highlighting their natural flavor.
Drizzled on top for a decadent finish, it introduces a sticky, buttery sweetness that ties every layer together.
Crafting these jars is easier than you might think, and the layers come together seamlessly once you know the rhythm. Let’s walk through every step to ensure your dessert jars turn out dreamy and delicious.
1. In a small bowl, mix the graham cracker crumbs with the melted butter until the texture resembles wet sand. Divide this mixture evenly among four small jars, then press down gently with the back of a spoon to form a compact crust.
2. In a medium bowl, whip the heavy cream using an electric mixer until stiff peaks form. Cover and set aside—this airy component is what makes the cheesecake layer so light.
3. In another bowl, beat the softened cream cheese until completely smooth. Add the powdered sugar and vanilla extract, then continue mixing until the ingredients are fully incorporated and silky.
4. Gently fold the whipped cream into the cream cheese mixture, taking care not to deflate the airiness. Once uniform, spoon the cheesecake filling into each jar, filling to about halfway or as desired.
5. Place a small saucepan over medium heat and combine the diced apple, granulated sugar, cinnamon, and lemon juice. Cook, stirring occasionally, until the apples are tender and well-coated, about 5–7 minutes. Remove from heat and let cool slightly.
6. Once the apple compote has cooled, spoon it evenly over the cheesecake layer in each jar, creating a vibrant, fruit-forward topping.
7. Drizzle caramel sauce over the apple layer, allowing it to cascade down the sides for that picture-perfect finish.
8. Chill the jars in the refrigerator for at least two hours. This rest time helps everything set beautifully, so when you serve, each jar holds a clean, elegant layer.
Once your jars have set, it’s time to think about presentation and pairing. Whether you’re serving these at a cozy family gathering or a festive party, a few thoughtful touches can elevate the experience and showcase each layer’s beauty.
Sprinkle crushed pecans or walnuts on top of the caramel drizzle for extra crunch and a nutty contrast that complements the sweet layers.
Pipe or spoon a swirl of fresh whipped cream on each jar for an elegant finish and an extra cloud-like bite.
Pair these jars with a cup of cinnamon-spiced tea or a rich latte to echo the warm apple and caramel notes, creating a harmonized flavor profile.
Fan out a paper-thin, lightly candied apple slice on the rim of each jar for visual impact and a hint of fresh crunch before diving in.
Proper storage will keep those layers distinct and ensure every bite tastes as fresh as the day you made it. Here are a few foolproof methods to preserve texture and flavor, whether you’re prepping in advance or dealing with leftovers.
Keep jars covered with plastic wrap or secure lids to prevent absorption of other fridge odors. They’ll stay fresh for up to three days.
If you need to prep well ahead, freeze jars for up to two weeks. Thaw overnight in the fridge and add a fresh drizzle of caramel before serving.
Make the apple compote and crust in advance and store each in airtight containers. Assemble jars on the day you plan to serve for peak texture.
Store any nut toppings or whipped cream in separate containers to avoid sogginess, adding them just before enjoying.
I hope you’ve enjoyed this deep dive into how to create effortlessly elegant No Bake Apple Cheesecake Jars. From that crisp graham cracker crust to the fluffy cheesecake layer and the tender, cinnamon-kissed apples, every spoonful is a celebration of flavor and texture. These jars are perfect for beginners—they require minimal prep, no oven time, and yet deliver a dessert that feels gourmet. Whether you’re hosting a holiday brunch, looking for an easy weeknight treat, or simply indulging your own sweet tooth, this recipe has you covered. Don’t forget that you can print this article and save it in your recipe binder for those moments when you need a quick, crowd-pleasing dessert. Below, you’ll also find an FAQ section to answer any lingering questions before you begin.
Now it’s your turn: if you give these Apple Cheesecake Jars a whirl, I’d love to hear how they turned out! Got tweaks, flavor combinations, or plating ideas of your own? Please leave a comment, share your questions, or drop any feedback you might have. Your kitchen adventures inspire me just as much as I hope this recipe inspires you—let’s keep the conversation going!
Rich and creamy cheesecake meets sweet cinnamon apples, all layered in a convenient jar. It's a delightful treat that's perfect for sharing, or keeping all to yourself!

Hi, I'm Matthew Roberts, founder of Food Recipes USA! As a culinary historian and fourth-generation restaurateur, I've dedicated my life to preserving, celebrating, and evolving the rich tapestry of American cuisine.