
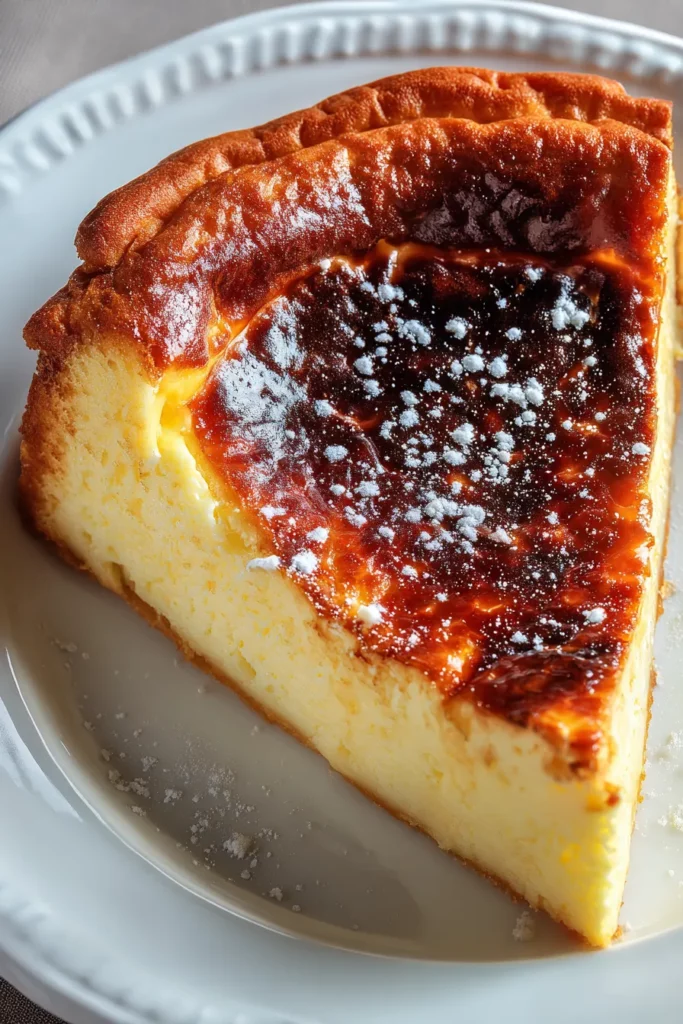
Golden-brown and irresistibly creamy, this Burnt Basque Cheesecake is the kind of dessert that wins friends and captivates taste buds from the very first bite. With its beautifully charred top, a crackled, almost caramelized crust forms an elegant contrast to the lusciously smooth interior. As you slice into it, you’ll witness that silky custard center wobble ever so slightly, revealing its richness and promise of pure indulgence. Every forkful offers a perfect marriage of smoky-edge flavor and decadent creaminess, making this “easy cheesecake” a standout on any dessert table. Whether you’re a seasoned baker or someone looking to impress on your first foray into cheesecake territory, this dessert recipe brings a sense of adventure and reward in every forkful.
It has an intermediate difficulty level that feels accessible—you don’t need special equipment beyond a reliable electric mixer and a good nonstick pan lined with parchment paper. You’ll spend roughly 20 minutes preparing the batter before letting your oven work its magic for 50–60 minutes at 400°F (200°C), and then practice patience as the cake rests for at least four hours, or preferably overnight. With about 450 calories per slice and enough richness to serve eight generous portions, this baked delight is perfect for sharing at dinner parties, holiday gatherings, or a quiet weekend treat. Embrace the journey of baking, and let the drama of caramelization and the thrill of that jiggly center remind you why homemade desserts hold a special place in our hearts.
Every ingredient in this Burnt Basque Cheesecake plays a starring role, coming together to create that signature balance of creamy interior and deeply caramelized top. From the essential cream cheese that provides body and tang, to the vanilla extract that whispers warmth into every bite, each component is chosen to elevate both texture and flavor. Let’s dive into what makes this dessert truly unforgettable:
Before you dive into the step-by-step guide, take a moment to assemble your ingredients and equipment. You’ll need a 9-inch round pan lined with parchment, an electric mixer, and measuring tools. Once everything is ready, the process flows smoothly: you’ll whip, fold, and bake until that stunning burnt top forms, then let the cake cool and set. Follow these numbered directions precisely to get that signature crackle on top and silky center beneath.
1. Preheat your oven to 400°F (200°C). Line a 9-inch (23cm) round cake pan with parchment paper, extending it well above the edges to ease removal later. This ensures the cheesecake can expand and won’t stick to the pan sides.
2. In a large mixing bowl, use an electric mixer to beat the softened cream cheese until smooth and creamy, about 2–3 minutes. Pause to scrape down the sides of the bowl with a spatula, making sure no lumps remain and the texture is uniformly silky.
3. Gradually add the granulated sugar to the cream cheese, continuing to mix on medium speed until the sugar is fully incorporated and the mixture appears light and fluffy. This aeration step contributes to a delicate crumb and smooth texture.
4. Sprinkle in the all-purpose flour and mix on low speed just until combined, taking care to avoid overmixing. Overmixing can add unwanted air pockets and affect the final texture, so aim for just a smooth batter.
5. Crack the eggs into a separate bowl and beat them lightly. Add them to the cream cheese mixture one at a time, mixing on low speed after each addition until just blended. Remember to scrape the sides of the bowl between egg additions to ensure an even batter.
6. Pour in the heavy cream, vanilla extract, and salt. Mix on low speed until the batter is completely smooth and glossy, taking care not to overwork it. The goal is a silky custard-like consistency.
7. Transfer the batter into your prepared pan, and use a spatula to smooth the top so the surface is even. This promotes an attractive crust and even browning.
8. Bake in the preheated oven for 50–60 minutes, or until the top is deeply browned and the edges look set while the center remains delicately jiggly. Keep a close eye during the final minutes to achieve that signature burnt appearance without going too far.
9. Once baked, remove the cheesecake from the oven and let it cool in the pan at room temperature for about 30 minutes. This gradual cooling helps prevent sudden temperature changes that could cause cracks.
10. Carefully lift the cheesecake from the pan using the overhanging parchment paper and transfer it to a wire rack. Refrigerate for at least 4 hours, preferably overnight, to allow the interior to set fully and develop its luscious texture.
Presenting your Burnt Basque Cheesecake is almost as delightful as baking it. Whether you prefer it in its pure form or adorned with complementary flavors, these serving suggestions will elevate each slice into a memorable experience. From a vibrant fruit garnish to a simple honey drizzle, these ideas strike the perfect balance between simplicity and indulgence—ensuring every guest feels pampered.
Maintaining the perfect texture and flavor of your Burnt Basque Cheesecake requires thoughtful storage. Because this dessert thrives on its creamy custard consistency and crackled top, storing it correctly means preserving both moisture and that endearing charred appearance. Follow these tips to keep every future slice tasting as fresh as the first.
Burnt Basque Cheesecake is more than just a dessert recipe—it’s an experience that captures the artistry of baking and the joy of sharing something truly special. From its deeply caramelized top to its ultra-creamy interior, this intermediate-level treat rewards every step of the process, whether it’s whipping the batter until it’s flawlessly smooth or watching the oven transform the surface into that signature char. Taking about 20 minutes of hands-on prep and up to an hour in the oven, plus a patient 4-hour rest (or overnight chill), this easy cheesecake invites you to slow down and savor the rhythm of home baking. Remember that the quality of your ingredients—from that splendid cream cheese to the splash of pure vanilla—makes all the difference, so choose the best you can find. When you’re ready to serve, the simple elegance of fresh berries, honey, or citrus zest will highlight the luscious flavors without overwhelming that beloved burnt edge.
Feel free to print this article and save it for later use, and keep an eye out for the FAQ below where we dive into common questions and troubleshooting tips. If you give this Burnt Basque Cheesecake a try, please leave a comment, share your experience, or ask any questions you have about the process. Your feedback helps fellow home cooks feel confident in the kitchen and ensures everyone can enjoy that perfect balance of smoky, caramelized goodness and custardy richness. Happy baking, and may your next slice be every bit as dreamy as the first!
Experience the rich flavors of this burnt Basque cheesecake, where a decadent, creamy center meets a wonderfully charred top, creating a perfect balance.

Hi, I'm Matthew Roberts, founder of Food Recipes USA! As a culinary historian and fourth-generation restaurateur, I've dedicated my life to preserving, celebrating, and evolving the rich tapestry of American cuisine.